
Skip to content
KitploitKITPLOIT
ToolsBlog
Submit
ToolsBlog
Submit

Hacking, PenTest, and Cybersecurity Tools for Your Security Arsenal!

Kitploit is a directory of hacking, cybersecurity, and pentesting tools. Discover the latest project updates to find vulnerabilities, analyze systems, automate testing, and strengthen your security.

··Feeds·Contact·Privacy·© 2026 Kitploit

Tool Directory

Categories

View all categories
Loading categories
Exploit-Mapper — Vulnerability management platform that imports scanner reports, enriches with CISA KEV and Exploit-DB intelligence, and provides contextual risk scoring for prioritized remediation. | Kitploit
Tools/GitHubGitHub/jrokz2315/exploit-mapper
Vulnerability ScannersVulnerability AnalysisThreat Intelligence
GitHubjrokz2315/exploit-mapper

Exploit-Mapper

Vulnerability management platform that imports scanner reports, enriches with CISA KEV and Exploit-DB intelligence, and provides contextual risk scoring for prioritized remediation.

View Repository
117 months agoNot yet reviewed

Most Popular

View all →

Discover the most used tools by our community.

Explore all tools

Browse our collection of tools

View all tools →
Share

Exploit Mapper

A comprehensive vulnerability management platform that analyzes security scan reports, enriches vulnerability data with exploit intelligence, and provides actionable risk scoring for prioritized remediation.


License Node React

Features

  • Multi-Format Import: Support for CSV and Excel vulnerability reports from various scanners (Nessus, Qualys, Arctic Wolf, OpenVAS, and more)
  • Automatic Column Detection: Intelligent mapping of scanner-specific column names to standard fields
  • Exploit Enrichment: Automatic lookup against CISA KEV (Known Exploited Vulnerabilities) and Exploit-DB
  • Risk Scoring Engine: Contextual risk scores based on CVSS, exploit availability, and asset criticality
  • Manual Vulnerability Addition (Non-Systemic): The ability to manually add vulnerabilities to accept that a scanner cannot detect. Eg; Use of TLS v1 for App XYZ.
  • Interactive Dashboard: Real-time risk gauge, severity breakdowns, and trend analysis
  • Device Management: Track vulnerabilities by host/device with OS and criticality information
  • Remediation Tracking: Status workflow, assignment, and resolution tracking
  • User Authentication: Role-based access control (Admin, User, Viewer)
  • Secure by Design: OWASP-compliant file validation, PBKDF2 password hashing, session management

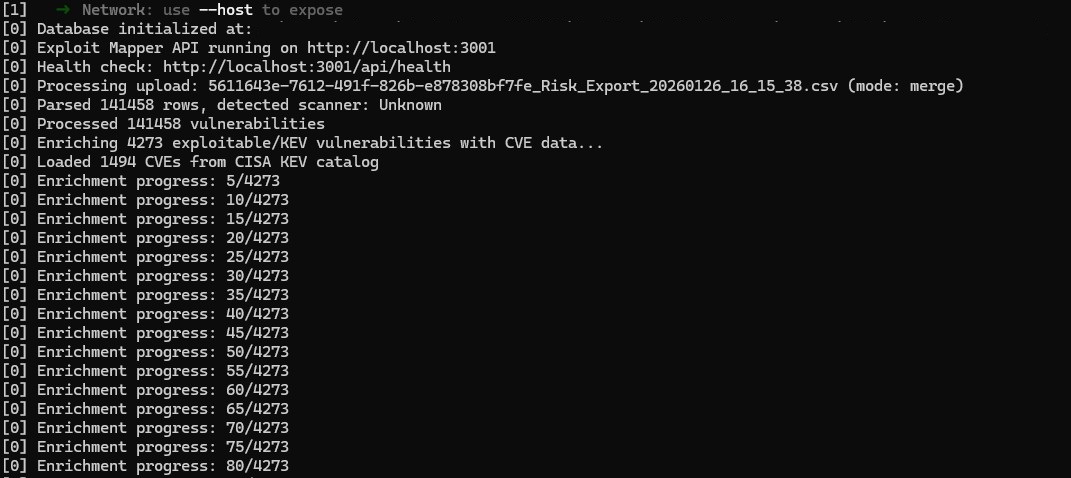
*** The use of the CVE Enrichment process on the first upload those slow down the upload process, It will only try to enrich vulnerabilities uploaded that are marked as exploitable from your scans but timing can vary significatly depending on the uploaded file size.*** Uploads
Dashboard

The dashboard provides an at-a-glance view of your security posture with:

  • Overall risk score gauge
  • Severity distribution charts
  • Top exploitable vulnerabilities
  • Remediation progress tracking

Vulnerability List

Browse, filter, and sort vulnerabilities by:
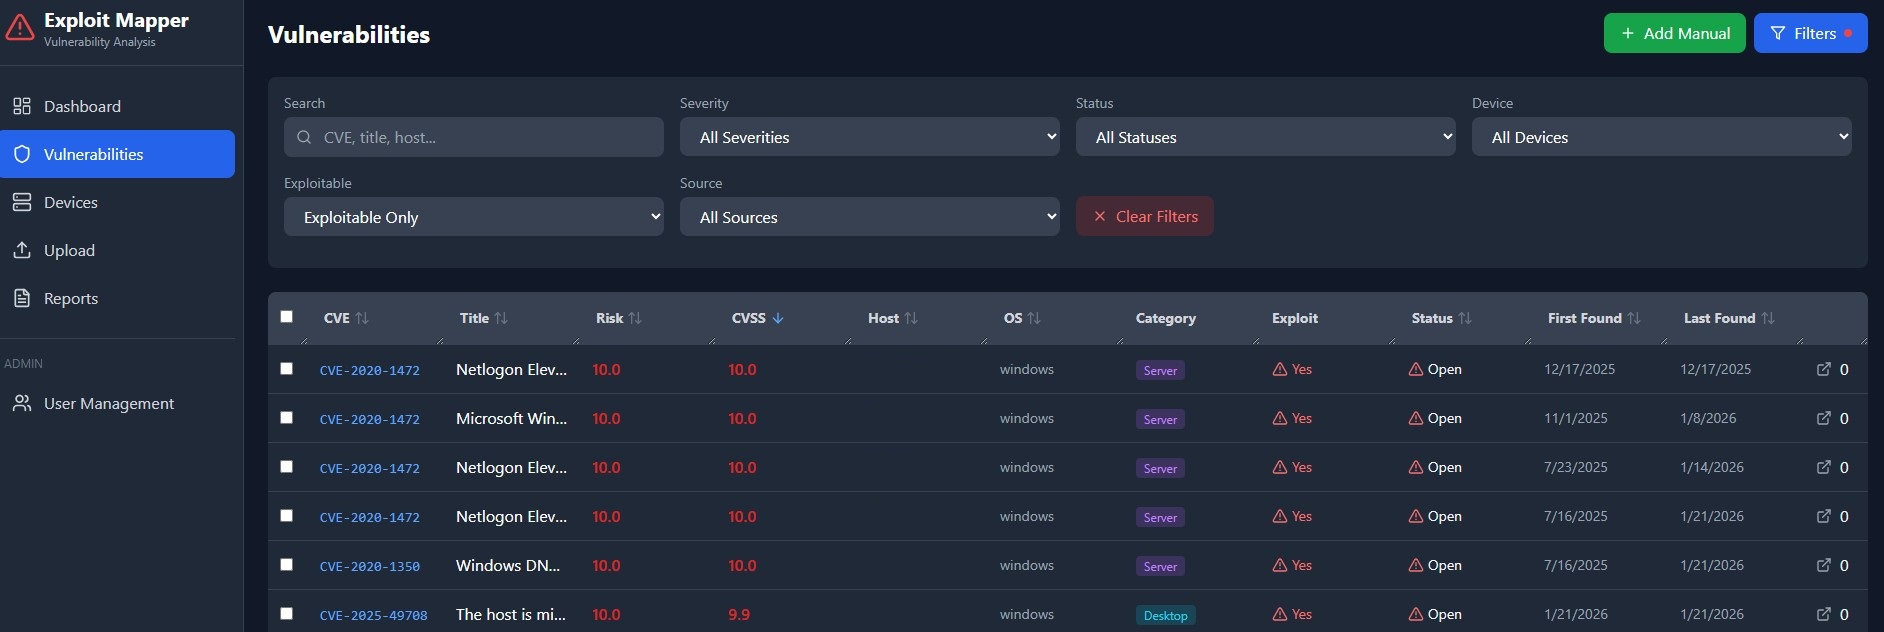
  • Severity, risk score, CVSS
  • Exploit availability
  • CISA KEV status
  • Host/device
  • Status (Open, In Progress, Resolved)

Vuln-list

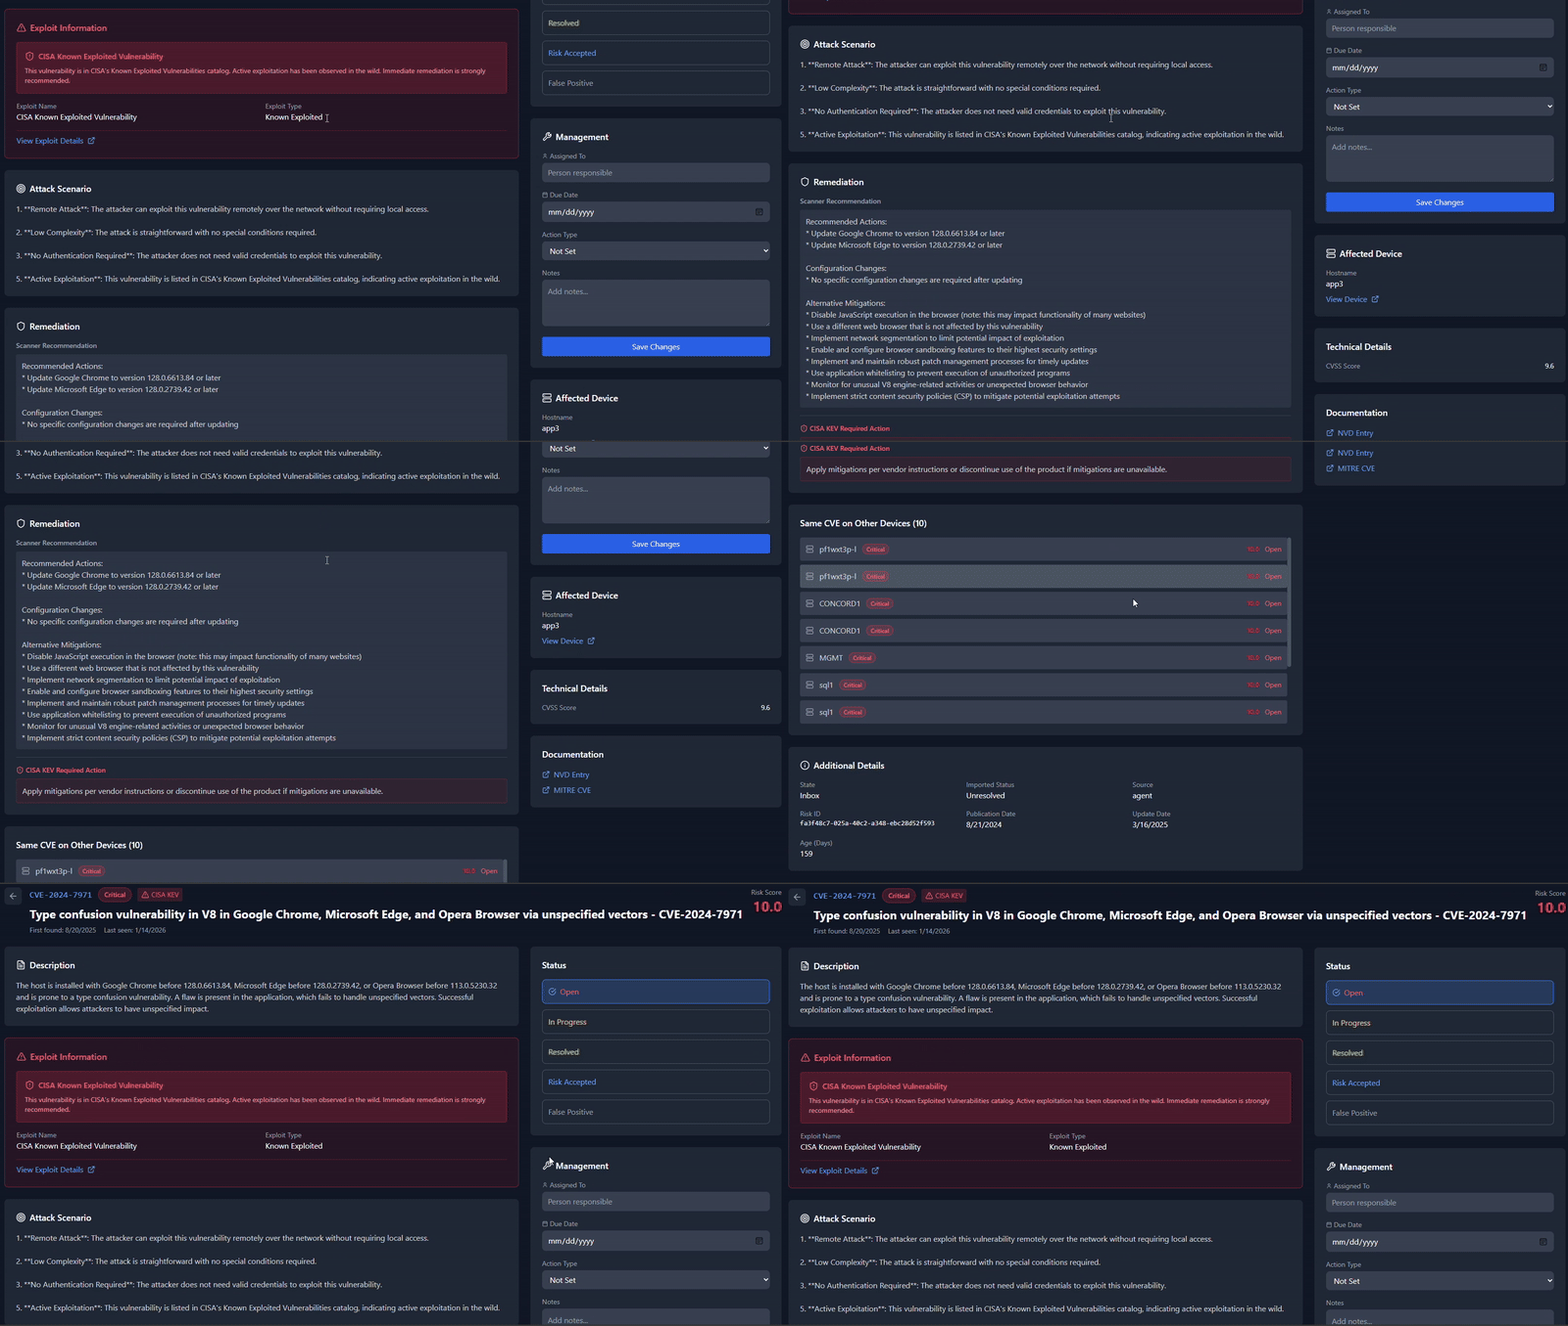
Vulnerability Detail

Detailed view including:

  • Scanner recommendations
  • CISA KEV required actions
  • Attack scenarios
  • Related findings across devices
  • Remediation workflow

Vuln-details

Prerequisites

  • Node.js >= 18.0.0
  • npm >= 9.0.0
  • Git (for cloning the repository)
  • Modern web browser (Chrome, Firefox, Edge, Safari)

Installing Prerequisites

Windows

Option A: Using the installer

  1. Download Node.js LTS from https://nodejs.org
  2. Run the installer and follow the prompts
  3. Ensure "Add to PATH" is checked during installation
  4. Open a new Command Prompt or PowerShell and verify:
    root@kitploit:~
    node --version
    npm --version
    

Option B: Use a Stable Node Version (Recommended)

  1. Download nvm-windows https://github.com/coreybutler/nvm-windows)
  2. Run the installer and follow the prompts
root@kitploit:~
nvm install 22.12.0
nvm use 22.12.0

Option C: Using winget (Windows Package Manager)

root@kitploit:~
winget install OpenJS.NodeJS.LTS
winget install Git.Git

Option D: Using Chocolatey

root@kitploit:~
choco install nodejs-lts
choco install git
macOS

Using Homebrew:

root@kitploit:~
brew install node
brew install git

Or download the installer from https://nodejs.org

Verify installation:

root@kitploit:~
node --version
npm --version
Linux (Ubuntu/Debian)
root@kitploit:~
# Using NodeSource repository for latest LTS
curl -fsSL https://deb.nodesource.com/setup_lts.x | sudo -E bash -
sudo apt-get install -y nodejs git

# Verify
node --version
npm --version

Installation

1. Clone the Repository

macOS / Linux:

root@kitploit:~
git clone https://github.com/jrokz2315/exploit-mapper.git
cd exploit-mapper

Windows (Command Prompt):

root@kitploit:~
git clone https://github.com/jrokz2315/exploit-mapper.git
cd exploit-mapper

Windows (PowerShell):

root@kitploit:~
git clone https://github.com/jrokz2315/exploit-mapper.git
cd exploit-mapper

2. Install Dependencies

All platforms:

root@kitploit:~
npm run install:all

Or install manually:

macOS / Linux:

root@kitploit:~
npm install
cd server && npm install
cd ../client && npm install
cd ..

Windows (Command Prompt):

root@kitploit:~
npm install
cd server && npm install
cd ..\client && npm install
cd ..

Windows (PowerShell):

root@kitploit:~
npm install
cd server; npm install
cd ..\client; npm install
cd ..

Note (Windows): If you encounter errors with better-sqlite3, you may need to install the Windows build tools:

root@kitploit:~
npm install --global windows-build-tools

Or install Visual Studio Build Tools with the "Desktop development with C++" workload from https://visualstudio.microsoft.com/visual-cpp-build-tools/

3. Start the Application

Development mode (with hot reload) — all platforms:

root@kitploit:~
npm run dev

This starts both the backend server (port 3000) and frontend dev server (port 5173).

Production mode — all platforms:

root@kitploit:~
# Build the client
npm run build

# Start the server
npm start

4. Access the Application

Open your browser and navigate to:

  • Development: http://localhost:5173
  • Production: http://localhost:3000

5. Default Login

On first run, a default admin account is created:

  • Username: admin
  • Password: Admin123!

You will be prompted to change this password on first login.

Project Structure

root@kitploit:~
exploit-mapper/
├── client/                 # React frontend
│   ├── src/
│   │   ├── components/     # Reusable UI components
│   │   ├── pages/          # Page components
│   │   └── App.jsx         # Main app component
│   ├── package.json
│   └── vite.config.js
├── server/                 # Express backend
│   ├── src/
│   │   ├── db/             # Database schema and connection
│   │   ├── middleware/     # Auth middleware
│   │   ├── routes/         # API routes
│   │   └── services/       # Business logic
│   ├── data/               # SQLite database (gitignored)
│   ├── uploads/            # Temporary upload storage (gitignored)
│   └── package.json
├── package.json            # Root package with scripts
├── .gitignore
├── LICENSE
├── CONTRIBUTING.md
└── README.md

API Endpoints

Authentication

MethodEndpointDescription
POST/api/auth/loginUser login
POST/api/auth/logoutUser logout
GET/api/auth/meGet current user
POST/api/auth/change-passwordChange password

Dashboard

MethodEndpointDescription
GET/api/dashboard/summaryDashboard metrics
GET/api/dashboard/riskRisk breakdown
GET/api/dashboard/trendsHistorical trends
GET/api/dashboard/executive-summaryExecutive summary

Vulnerabilities

MethodEndpointDescription
GET/api/vulnerabilitiesList (with filtering/pagination)
GET/api/vulnerabilities/:idVulnerability details
GET/api/vulnerabilities/exploitableExploitable only
GET/api/vulnerabilities/stats/summaryStatistics
PATCH/api/vulnerabilities/:idUpdate status
PATCH/api/vulnerabilitiesBulk update
POST/api/vulnerabilities/manualAdd manual entry
DELETE/api/vulnerabilities/:idDelete manual entry

Devices

MethodEndpointDescription
GET/api/devicesList devices
GET/api/devices/:idDevice details
PATCH/api/devices/:idUpdate device info

Upload

MethodEndpointDescription
POST/api/uploadUpload vulnerability report
GET/api/upload/infoUpload stats
DELETE/api/upload/clearClear all data

Reports

MethodEndpointDescription
GET/api/reportsList uploaded reports
GET/api/reports/:id/exportExport report

Supported Scanner Formats

Exploit Mapper automatically detects and maps columns from various vulnerability scanners:

ScannerDetection Method
Arctic Wolfrisk_id, asset_category columns
Nessus/Tenableplugin_id column
Qualysqid column
OpenVASnvt column
Nexpose/Rapid7nexpose identifier
Generic CSV/ExcelIntelligent column name matching

Column Mapping

The parser automatically maps common column names:

FieldRecognized Column Names
CVEcve, cves, cve_id, vulnerability_id
Titlename, title, vulnerability, plugin_name
Descriptiondescription, synopsis, summary
Solutionsolution, remediation, fix, recommendation
Severityseverity, risk_severity, risk_level
CVSS Scorecvss, cvss_score, cvssv3_score
Hosthostname, asset_name, host_name, fqdn
IP Addressip_address, host_ip, asset_ip

Risk Scoring

Individual Vulnerability Risk Score

root@kitploit:~
Risk Score = CVSS Score + Adjustments

Adjustments:
  +0.5 if in CISA KEV (actively exploited)
  +0.3 if public exploit available

Overall Organization Risk Score

root@kitploit:~
Overall = (Max Risk x 30%) + (Avg Risk x 40%) + (Avg Exploitable x 20%) + (Density x 10%)

With CISA KEV present: multiply by 1.05
ComponentWeightDescription
Max Risk Score30%Highest single vulnerability risk
Avg Risk Score40%Average across all vulnerabilities
Avg Exploitable Risk20%Average of exploitable vulns only
Density Factor10%log10(total_vulns + 1) x 3 (max 10)

Configuration

Environment Variables

Create a .env file in the server/ directory (optional — see server/.env.example):

root@kitploit:~
PORT=3000
NODE_ENV=production
SESSION_SECRET=your-secret-key

Database

Exploit Mapper uses SQLite for zero-configuration storage. The database is automatically created at server/data/exploit-mapper.db on first run.

Security Considerations

  • Passwords are hashed using PBKDF2 with 100,000 iterations and SHA-512
  • Session tokens are 256-bit cryptographically secure random values
  • File uploads are validated for type, size (500MB max), and magic bytes
  • SQL queries use parameterized statements throughout
  • CORS is configured for the frontend origin only
  • Default admin account requires password change on first login

Troubleshooting

Common Issues

Port already in use

Windows:

root@kitploit:~
netstat -ano | findstr :3000
taskkill /PID <pid> /F

macOS / Linux:

root@kitploit:~
lsof -i :3000
kill -9 <pid>
better-sqlite3 build errors on Windows

This native module requires C++ build tools:

root@kitploit:~
:: Option 1: Install via npm
npm install --global windows-build-tools

:: Option 2: Install Visual Studio Build Tools
:: Download from https://visualstudio.microsoft.com/visual-cpp-build-tools/
:: Select "Desktop development with C++" workload

After installing, delete node_modules and reinstall:

root@kitploit:~
cd server
rmdir /s /q node_modules
npm install
Database locked

Ensure only one instance of the server is running. On Windows:

root@kitploit:~
tasklist | findstr node
taskkill /IM node.exe /F

On macOS / Linux:

root@kitploit:~
pkill -f "node.*index.js"
Upload fails
  • Check file size (max 500MB)
  • Ensure file is .csv, .xlsx, or .xls format
  • Verify the file contains at least a title/name column
  • Check server console for detailed error messages
npm run dev fails on Windows

If concurrently fails, try running the server and client separately in two terminal windows:

Terminal 1 (Server):

root@kitploit:~
cd server
npm run dev

Terminal 2 (Client):

root@kitploit:~
cd client
npm run dev

Contributing

See CONTRIBUTING.md for detailed guidelines.

  1. Fork the repository
  2. Create a feature branch (git checkout -b feature/amazing-feature)
  3. Commit your changes (git commit -m 'Add amazing feature')
  4. Push to the branch (git push origin feature/amazing-feature)
  5. Open a Pull Request

License

This project is licensed under the MIT License - see the LICENSE file for details.

Acknowledgments

  • CISA KEV Catalog for exploit intelligence
  • NVD for CVE data
  • Exploit-DB for exploit information
  • Lucide Icons for the icon set
  • Tailwind CSS for styling
  • Recharts for data visualization
Download Tool