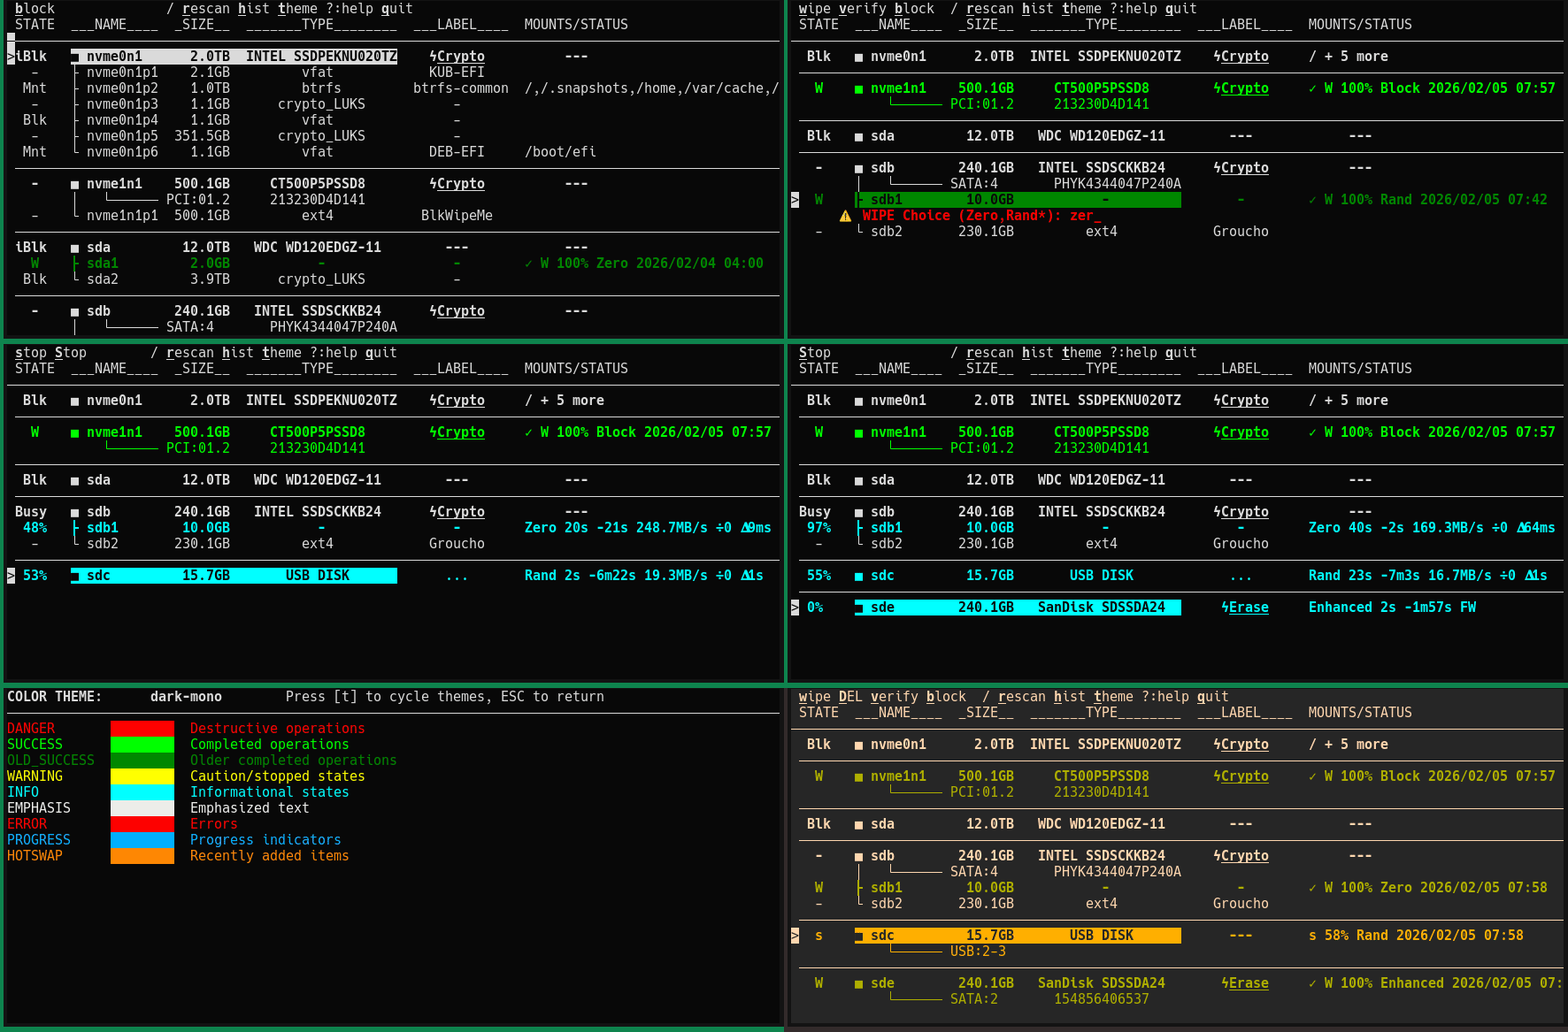
dwipe is a tool to wipe disks and partitions for Linux to help secure your data. dwipe aims to reduce mistakes by providing ample information about your devices during selection.
Certified destruction (DoD/Gutmann standards, full verification, certificates)
✗
✓
✗
✗
Firmware wipes (SATA/NVMe) are the most complete and fastest: Hardware-accelerated erase operates at controller level (seconds to minutes), clears all drive mappings, but requires whole-device erase with no progress reporting or visible verification.
Software wipes with one-pass zeros are sufficient: Modern drives (post-2001) are reliably wiped with a single pass of zeros (NIST SP 800-88). Multi-pass modes are available for additional confidence but provide no additional security guarantee.
Verification uses intelligent statistical sampling: Even 1% verification samples across the entire disk via 100 sections, providing comprehensive coverage without full sequential read.
Marquee Features
Interactive TUI with hot-swap detection - Real-time device list updates as storage changes, newly added devices marked with ^
Hardware-accelerated firmware wipes - Full support for firmware-level secure erase operations (NVMe Sanitize/Format, SATA ATA Security Erase) that complete in seconds to minutes instead of hours
Multiple simultaneous wipes - Start wipes on multiple devices at once with individual progress tracking and completion states
Persistent state tracking - Wipe status survives reboots; partially wiped and completed states persist on the device (can resume wipes across power cycles)
Smart device identification - Uses UUID/PARTUUID/serial numbers for stable device tracking across reconnections
Intelligent verification with statistical sampling - Fast verification that covers entire disk even at low percentages (1% verification samples from all 100 disk sections)
Direct I/O to disk - Fast and efficient wiping that avoids page cache pollution with automatic slowdown/stall detection and graceful abort
Multiple color themes - Terminal color themes designed for readability with context-sensitive visual feedback (mounted devices dimmed, active wipes bright)
Wipe history with logging - Detailed wipe history viewer shows timestamps, filesystems, labels, and completion percentages with persistent records
Requirements
Linux operating system (uses /dev/, /sys/, /proc/ interfaces)
Python 3.10 or higher
Root/sudo privileges (automatically requested when you run the tool)
lsblk utility (usually pre-installed on most Linux distributions)
nvme-cli - For NVMe operations (Sanitize/Format detection)
hdparm - For SATA operations (ATA Security Erase detection)
Optional (for clipboard copy in history screen):
xclip or xsel - For X11 clipboard (apt install xclip or xsel)
wl-clipboard - For Wayland clipboard (apt install wl-clipboard)
SSH sessions use OSC 52 terminal escape (no extra packages needed)
Installation
Recommended (using pipx):pipx install dwipe
Verify installation:dwipe --help
Uninstall:pipx uninstall dwipe
Quick Start (please READ THIS, at least)
Install dwipe
Run dwipe from a terminal (sudo will be requested automatically)
Observe the context-sensitive help on the first line
Navigate with arrow keys or vi-like keys (j/k)
Press ? for full help screen
When you press w to wipe a drive, you must type the abbreviation (e.g., Rand, Zero, Crypto); wipes are presented from least to most recommended, and the last one is marked with *. Normally, pick the last choice, but ...
Drives and the OS often lie about drive type. Outwit them both:
For spinning HDDs, always use Rand or Zero (interruptible, shows progress).
For SSDs, always use firmware wipes if available (faster, reaches hidden blocks).
If a drive is 'Frozen', suspend your system briefly and resume; dwipe auto-detects the resume and rescans. Or press r to rescan manually. The drive should come back unfrozen.
If a drive is 'Locked', you must unlock it manually (see "Unlock Locked Device" section below). If dwipe locked it, the password is NULL; otherwise use the password that locked it.
Hot-swap workflow for SATA drives: DEL to detach, physically swap drives, then r to rescan (if needed).
Features
dwipe provides comprehensive disk wiping capabilities with safety features:
Smart device display - Shows disks and partitions with labels, sizes, types, and vendor/model information to help identify devices correctly
Hot-swap detection - Updates the device list when storage changes; newly added devices are marked with ^ to make them easy to spot
Multiple simultaneous wipes - Start wipes on multiple devices at once, with individual progress tracking and completion states
Flexible wipe modes - Choose between Rand, Zero, Rand+V (with auto-verify), or Zero+V (with auto-verify)
Device filtering - Filter devices by name/pattern using regex in case of too many for one screen
Stop capability - Stop individual wipes or all wipes in progress
Disk blocking - Manually block disks to prevent accidental wiping (blocks hide all partitions)
Note:dwipe shows file system labels, and if not available, the partition label. It is best practice to label partitions and file systems well to make selection easier.
Usage
Simply run dwipe from the command line without arguments: dwipe
Command-Line Options
Note: All preference options use your last saved values as defaults. These defaults are shown in --help and can be changed interactively with keyboard shortcuts. Command-line arguments override saved preferences.
Wipe Configuration
--mode {-V,+V} - Verification mode (default: your last preference)
-V - Wipe without automatic verification
+V - Verify device after wipe completes
--passes {1,2,4} - Number of passes for software wipes (default: your last preference)
Single pass (1) is standard for most use cases
Multi-pass (2 or 4) alternates between zero and random patterns
--verify-pct {1,3,10,30,100} - Verification percentage (default: your last preference)
Percentage of disk to verify after wipe (1% = quick spot-check, 100% = full verify)
Display and Performance
--dense {True,False} - Compact view mode (default: your last preference)
True - Compact spacing (fewer blank lines between disks)
False - Spaced view (blank lines between disks for readability)
--port-serial {Auto,On,Off} - Disk port/serial display (default: your last preference)
Auto - Show port/serial only for whole disks (recommended)
On - Always show port and serial number
Off - Never show port and serial number
Drive Handling Tuning
--slowdown-stop {0,4,16,64,256} - Stop if disk slows down (default: your last preference, milliseconds)
0 = Disabled
Other values = Check interval in milliseconds for performance degradation
--stall-timeout {0,60,120,300,600} - Stall timeout in seconds (default: your last preference)
0 = Disabled (never timeout)
Other values = Stop wipe if no data transfer progress for this many seconds
Advanced Options
--firmware-wipes or -F - Enable firmware wipes
Enables hardware-based secure erase operations (NVMe Sanitize/Format, SATA ATA Security Erase)
Without this flag, only software wipes (Zero/Rand) are available
--dump-lsblk - Dump parsed device information and exit (for debugging)
--help - Show help message with all available options
Color Legend
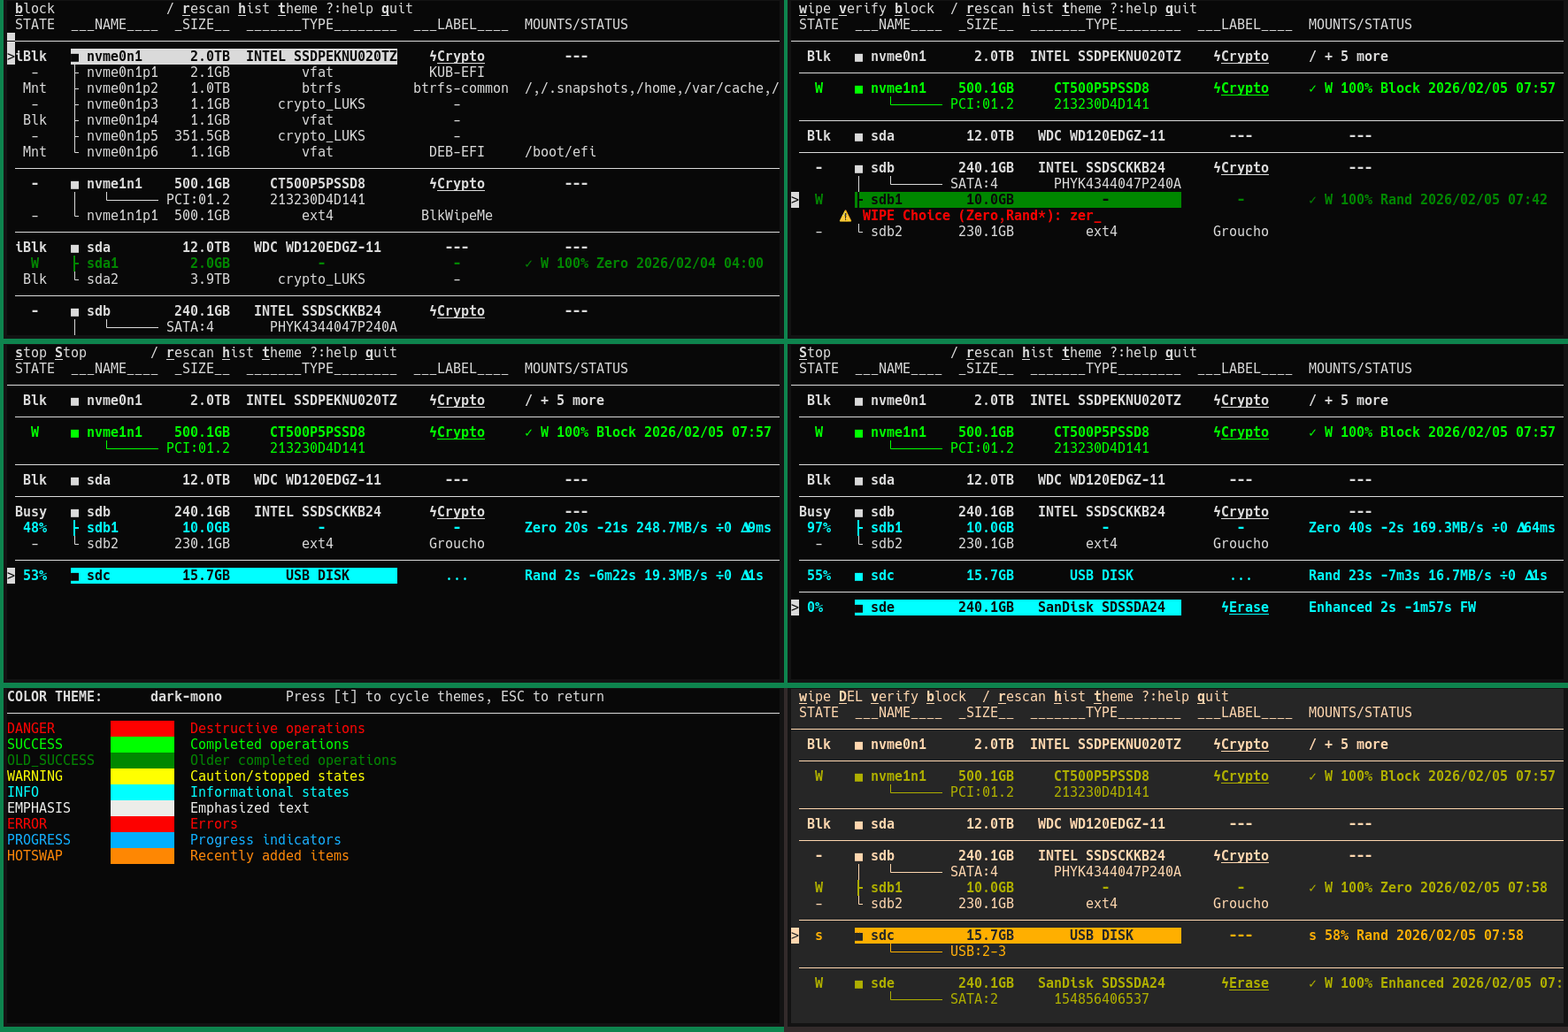
dwipe uses color coding to provide instant visual feedback about device and operation status:
Dimmed (gray) - Mounted or blocked devices (cannot be wiped)
Default (white) - Ready to wipe, idle state, or previously wiped (before this session)
Bright cyan/blue + bold - Active wipe or verification in progress (0-100% write, v0-v100% verify)
Bold yellow - Stopped or partially completed wipe
Bold green - ✅ Successfully completed wipe in THIS session (ready to swap out!)
Dimmer green - ✅ Successfully completed wipe in previous session .
Bold orange - Newly inserted (hot-swapped) device
Bold red - Destructive operation prompts (wipe confirmation)
Color Themes
dwipe supports multiple color themes for improved visibility and aesthetics.
Available themes:
default - Terminal Default (basic ANSI colors)
dark-mono - Dark Mono (almost-white on almost-black with bright colors)
light-mono - Light Mono (almost-black on almost-white with bright colors)
Press t from the main screen to open the theme preview screen
The theme screen shows color examples for each color purpose (DANGER, SUCCESS, WARNING, etc.)
Press t while on the theme screen to cycle through available themes and preview them live
Press ESC or ENTER to return to the main screen
Selected theme is saved and persists across sessions
Theme features:
Yellow/warning color for stopped wipes (state s) - highly visible even when not selected
Red/danger color for wipe confirmation prompts
Coordinated color palettes designed for terminal readability
Device State Values
The STATE column shows the current status of each device:
State
Meaning
-
Device is ready for wiping
^
Device is ready for wiping AND was added after dwipe started (hot-swapped)
Mnt
Partition is mounted or disk has mounted partitions - cannot be wiped
N%
Wipe is in progress (shows percentage complete, 0-100%)
vN%
Verification is in progress (shows percentage complete, v0-v100%)
STOP
Wipe or verification is being stopped
s
Wipe was stopped - device is partially wiped (can restart or verify)
W
Wipe was completed successfully (can wipe again or verify)
Blk
Disk is manually blocked - partitions are hidden and cannot be wiped
Unbl
Disk was just unblocked (transitory state)
Available Actions
The top line shows available actions. Some are context-sensitive (only available for certain devices):
Key
Action
Description
w
wipe
Wipe the selected device (requires confirmation)
v
verify
Verify a wiped device or detect pattern on unmarked disk (context-sensitive)
s
stop
Stop the selected wipe in progress (context-sensitive)
S
Stop All
Stop all wipes in progress
DEL
delete
Remove disk from system (whole disks only, context-sensitive)
b
block/unblock
Block or unblock a disk to prevent accidental wiping
/
filter
Filter devices by regex pattern (shows matching devices + all active wipes)
r
rescan
Rescan all devices and reset hardware capabilities detection
h
history
Show wipe history log
t
themes
Open theme preview screen to view and change color themes
q or x
quit
Quit the application (stops all wipes first)
?
help
Show help screen with all actions and navigation keys
ESC
clear filter
Clear the filter and jump to top of list
ESC
back
Return to previous screen if on nested screen
a
time format
Cycle wipe history time display format (ago+time, ago, time)
History Screen
Press h to view the wipe history log. The history screen shows all wipe and verify operations with timestamps, device info, and results.
History screen actions:
e - Expand/collapse entry to show full JSON details
c - Copy current entry to clipboard (see below)
/ - Search/filter entries (prefix with / for deep JSON search)
a - Cycle time format (ago+time, ago, time)
ESC - Return to main screen
Clipboard copy methods (detected automatically):
Environment
Method
Notes
SSH session
OSC 52
Terminal escape sequence; requires terminal support (iTerm2, kitty, alacritty, Windows Terminal, tmux with set-clipboard on)
Wayland
wl-copy
Requires wl-clipboard package
X11
xclip/xsel
Requires xclip or xsel package
Fallback
Terminal
Exits to shell, prints entry for manual copy
Note: If OSC 52 doesn't work with your terminal, the text still appears on screen for manual selection. For tmux, enable clipboard with set -g set-clipboard on in your .tmux.conf.
Wipe Types
dwipe supports firmware wipes (hardware-accelerated) and software wipes. Firmware wipes require the --firmware-wipes or -F flag. Tables below list wipe methods from most desirable (Rank 1) to least.
NVMe Drives
Rank
Abbrev
Official Name
Remarks
1
Crypto
Sanitize Cryptographic Erase
Fastest; erases encryption keys; instant data invalidation
2
Block
Sanitize Block Erase
Fast; resets all blocks to deallocated state
3
FCrypto
Format with Crypto Erase
Fast; reformats namespace with key erasure
4
FErase
Format with User Data Erase
Fast; reformats with simple data erase; less thorough than crypto
5
Ovwr
Sanitize Overwrite
Minutes; writes pattern to all blocks; most thorough but rarely needed
6
Rand
Software Random Write
Fallback; writes random data via software; hours for large drives
7
Zero
Software Zero Write
Fallback; writes zeros via software; verifiable but slower
Preferred; interruptible, resumable, fast verification
3
Enhanced
ATA Security Erase Enhanced
Slow (hours); not interruptible; no progress; same result as software
4
Erase
ATA Security Erase Normal
Slow (hours); not interruptible; no progress; same result as software
Note: HDDs don't have wear leveling or hidden blocks, so software wipes are equally thorough as firmware wipes but offer better control (progress, pause/resume, interruptibility).
Simpler; fast verification (fails on first non-zero byte)
Notes:
Firmware wipes show only methods supported by each drive (see FwCAPS column).
Firmware wipes include automatic spotcheck verification.
The +V suffix enables automatic verification after software wipes. Without +V, press v to verify manually.
Multi-pass software wipes (2 or 4) alternate zero/random patterns, ending on your selected mode.
USB drives and partitions lack firmware erase—only software wipes available.
Resuming Stopped SOFTWARE Wipes
Stopped wipes (state s) can be resumed by pressing w on the device. Choose the same type of wipe or it will start over at 0% complete.
How Resume Works:
Preserves the original wipe mode (Rand or Zero) from when the wipe was started
Uses the current passes setting to determine how much more to write
Continues from the exact byte offset where it marked that stopped (rounded to buffer boundary). "Marks" are written about every 30s so for non-gracefully ended wipes, the position may be as much as 30s (or somewhat more) from the last wiped disk blocks.
Resume Examples:
Stopped At
Current Passes
What Happens
50%
1 pass
Resumes: writes remaining 50%
150% (1.5 of 4 passes)
1 pass
Already complete (150% > 100%)
150% (1.5 of 4 passes)
4 passes
Resumes: writes 2.5 more passes (150% → 400%)
100% (1 pass complete)
2 passes
Resumes: writes pass 2 (100% → 200%)
Benefits:
Change passes setting before resuming to finish faster (reduce) or add more passes (increase)
No need to restart from beginning
Progress marker updated every 30 seconds, so resume works even after crashes or power loss
Automatic validation prevents corrupted final patterns
Software Wipe Verification Strategy
Software wipes use intelligent verification with statistical analysis and fast-fail optimizations. Verification is configurable and optional.
Smart Sampling:
Divides disk into 100 equal sections
Randomly samples configurable percentage (1%, 3%, 10%, 30%, 100%) from EACH section
Ensures complete disk coverage even with 1% verification
Set verification percentage with --verify-pct command-line option (saved as preference)
Pattern Detection:
Zero verification: Fails immediately on first non-zero byte (fast!)
Random verification: Statistical analysis of byte distribution
Tests if byte distribution is uniform (all byte values 0-255 appear fairly equally)
Fast-fails periodically if non-random pattern detected
Checks for evidence of randomness to distinguish from structured data
Verification Modes:
Automatic verification (after wipe): Use a mode with +V suffix (Rand+V or Zero+V) and set verify % > 0
Manual verification (press v): Verify previously wiped devices or detect pattern on unmarked disks (requires verify % > 0)
Unmarked disk detection: Can verify disks with no filesystem to detect if all zeros or random
If passes, writes marker as if disk had been wiped
Useful for detecting pre-wiped drives or verifying manufacturer erasure
Verification States:
✓ (green checkmark) - Verification passed
✗ (red X) - Verification failed
No symbol - Not verified
During verify: vN% shows progress (v0% to v100%)
Why statistical sampling is better than sequential:
Statistical sampling with 100 sections provides better coverage than sequential read at same percentage
Detects problems faster (could hit bad sector in early sections)
Statistical analysis actually validates randomness (sequential can't do this)
Much faster than 100% sequential verification
Firmware Wipe Verification Strategy
Firmware wipes (SATA/NVMe secure erase) use an unconditional spotcheck verification that is performed automatically for all firmware wipes. This verifies that the hardware erase command actually executed.
Spotcheck Approach:
Before the wipe: Write test data blocks at three strategic locations (front, middle, tail of drive)
Execute the firmware erase command at the controller level
After the wipe: Read those three test locations and verify they no longer contain the original data
If any test block still contains similar data, the erase has failed and is reported
Why Spotchecks Are Effective:
Proves the drive's internal erase actually processed (not just a command acknowledgment)
Three-location strategy (0%, 50%, 100% of drive) ensures coverage across the entire device
Catches firmware bugs or hardware failures that might claim success but do nothing
Much faster than sequential verification (only 3 blocks read instead of percentage of whole drive)
Mandatory and unconditional: No user configuration or additional verification step needed
Important Note: Firmware wipes do not show percentage-based verification like software wipes. The spotcheck happens silently as part of the wipe operation, and success/failure is recorded in the persistent wipe state marker.
Progress Information
When software wiping a device, dwipe displays:
Elapsed time - Time since wipe started (e.g., 1m18s)
Remaining time - Estimated time to completion (e.g., -3m6s)
Write rate - Current throughput (e.g., "45.2MB/s")
MaxSlowDown - Ratio of Fastest/Slowest write speed (e.g, ÷2). If over threshold, the write job stops.
MaxWriteDelay - Largest write delay detected (e.g., 𝚫122ms). If over threshold, the write job stops.
Persistent State
The W (wiped) and s (partially wiped) states are persistent across reboots. This is achieved by writing metadata to the first 16KB of the device:
First 15KB: zeros
Next 1KB: JSON metadata (timestamp, bytes written, total size, mode, verification status)
When a device with persistent state is displayed, additional information shows:
When it was wiped and the completion percentage
Verification status: ✓ (passed), ✗ (failed), or no symbol (not verified)
The Help Screen
When ? is typed, you can see the available keys and command-line options with their current settings.
Navigation
You can navigate the device list using:
Arrow keys - Up/Down to move through the list
Vi-like keys - j (down), k (up), g (top), G (bottom)
Page Up/Down - Quick navigation through long lists
Device Filtering
The / key activates incremental search filtering with vim-style behavior:
How it works:
Press / to start filtering
Type your regex pattern - the device list updates as you type (real-time filtering)
Your cursor position is shown with | in the header
Arrow keys, Home/End, and Backspace work for editing
ENTER to accept the filter
ESC to cancel and restore the previous filter
Filter Examples:
The filter supports regex patterns. Here are some useful examples:
root@kitploit:~
/sda # Show only sda and its partitions
/sd[ab] # Show sda, sdb and their partitions
/nvme # Show all NVMe devices
/nvme0n1p[12] # Show only partitions 1 and 2 of nvme0n1
/usb # Show devices with "usb" in their labels
Press ESC from the main screen to clear the filter and return to showing all devices.
Note: Invalid regex patterns are ignored - the filter stays at the last valid pattern while you type.
Security Considerations
Important limitations of software wipes:
dwipe supports multi-pass wiping with alternating patterns, but does not implement specific DoD 5220.22-M or Gutmann certified pattern sequences
More than adequate for personal and business data that doesn't require (antiquated) certified destruction
NOT suitable for classified, top-secret, or highly sensitive data requiring certified pattern-specific wiping with compliance certificates
SSD considerations:
Modern SSDs use wear-leveling and may retain data in unmapped blocks
TRIM/DISCARD may prevent complete data erasure
For SSDs, consider manufacturer's secure erase utilities for maximum security
Random mode may not provide additional security over zeros on SSDs
Best practices:
Verify device labels and sizes carefully before wiping
Use the Block feature to protect critical disks
Consider encryption for sensitive data as the primary security measure
Troubleshooting
dwipe won't start
Error: "cannot find lsblk on $PATH" - Install util-linux package
Permission denied - dwipe automatically requests sudo; ensure you can use sudo
Terminal display issues
Corrupted display after crash - Run reset or stty sane command
Colors don't work - Ensure your terminal supports colors (most modern terminals do)
Wipe issues
Can't wipe a device - Check the STATE column:
Mnt - Unmount the partition first: sudo umount /dev/sdXN
Blk - Press b to unblock
Busy - Another partition on the disk is being wiped
Wipe is very slow - Normal for large drives; check write rate to verify progress
Wipe seems stuck - Most likely due to bad disks; Direct I/O makes progress almost constant on good disks.
Firmware Wipe Considerations
Firmware wipes (SATA/NVMe secure erase operations) have different characteristics than software wipes:
Frozen Drives:
SATA drives are typically frozen by the BIOS/UEFI during POST as a security measure
This is a drive-level security feature, not a dwipe limitation
Solution: Suspend your system briefly and resume; dwipe auto-detects the resume and rescans (or press r manually). The suspend/resume power-cycles the SATA link which clears the freeze.
If the drive remains frozen after suspend/resume, try a full power-off (10+ minutes to drain drive capacitors) followed by boot and rescan
Device Quirks and Compatibility:
Storage devices have various firmware implementations and hardware quirks that affect secure erase operations
Some drives may not fully support certain sanitize operations, have timing issues, or exhibit unexpected behavior
dwipe cannot guarantee that all devices will be successfully wiped—some hardware simply may not cooperate with erase commands
Always verify a drive after wiping (use v key) to confirm the erase actually completed
For mission-critical data destruction on quirky hardware, consider using manufacturer-specific secure erase tools as a fallback
Dealing with Bad or Failing Disks
dwipe includes built-in protections for problematic storage devices:
Automatic Error Handling. When encountering disk errors during wiping:
Consecutive write errors: Wipe aborts after 3 consecutive failed writes
Total error threshold: Wipe aborts after 100 total write errors
Automatic retry: On write failure, device is automatically closed and reopened (transient error recovery)
File descriptor recovery: Bad FD states are detected and handles are refreshed
Stall and Slowdown Detection. dwipe monitors write performance and can abort problematic operations:
Stall detection: Aborts if no progress for 5 minutes (configurable)
Slowdown detection: Measures baseline speed during first 5 seconds, aborts if speed drops below threshold (e.g., 1/4 of baseline)
Progress tracking: Continuous monitoring ensures writes are actually reaching the device
If a Wipe Gets Stuck... If a wipe appears frozen or unresponsive:
First attempt: Press s to gracefully stop the selected wipe
Wait patiently: Some disk operations can take minutes to timeout at the kernel level
If still stuck: Press S (Shift+s) to stop ALL wipes
Last resort: If the interface is completely frozen:
Press Ctrl-Z to suspend dwipe
In the terminal, run: sudo pkill -f "python.*dwipe" (targets only dwipe processes)
Run reset to restore terminal if display is corrupted
Preventing Issues with Problematic Media. For known bad disks or questionable hardware:
Start with verification: Press v first to test readability
Use lower speeds: Enable dirty page throttling (d key) to reduce I/O pressure
Monitor system logs: Check dmesg -w in another terminal for disk errors
Consider hardware issues: USB enclosures, cables, and controllers often cause issues
Common Disk Error Patterns
USB connection drops: dwipe will detect and attempt recovery
Bad sectors: Errors will be counted; job aborts if excessive
Controller timeouts: Kernel may hang; stall detection should trigger
Full disk: Write past end-of-device errors are handled gracefully
Recovery After Abort. If a wipe aborts due to disk errors:
Device state shows s (stopped/partial)
You can attempt to resume (w) - may succeed if error was transient
Or verify (v) to see what was actually written
Consider replacing the disk if errors persist
Note: Some disks are fundamentally broken and cannot be reliably wiped. dwipe will protect itself and your system, but cannot fix hardware failures.
Recommendations for SATA Wiping over USB
Requirement 1: SAT (SCSI-ATA Translation) Support
The USB bridge must be capable of "passing through" ATA commands.
The Test: If the app can see the "Security" section in the drive details, the bridge supports SAT.
Requirement 2: Stable Power
Firmware wipes (especially on 3.5" HDDs) draw significant peak power.
The Risk: If a USB-powered "bus-only" cable is used, the voltage might sag during the wipe, causing the bridge to reset and "brick" the drive in a locked state.
The Recommendation: Always use an externally powered USB dock for 3.5" drives.
Requirement 3: Command Timeout Integrity
The bridge must not have an aggressive "Watchdog Timer."
The Risk: Some bridges disconnect if they don't see "data" for 60 seconds. During a firmware wipe, the drive is busy internally and doesn't send data.
The Recommendation: Use high-quality chipsets like ASMedia (1153E) or JMicron (JMS578).
Unlock Locked Device
root@kitploit:~
sudo hdparm --user-master u --security-unlock NULL /dev/sdX
sudo hdparm --user-master u --security-disable NULL /dev/sdX
