Skip to content
KitploitKITPLOIT
ToolsBlog
Submit
ToolsBlog
Submit

Hacking, PenTest, and Cybersecurity Tools for Your Security Arsenal!

Kitploit is a directory of hacking, cybersecurity, and pentesting tools. Discover the latest project updates to find vulnerabilities, analyze systems, automate testing, and strengthen your security.

··Feeds·Contact·Privacy·© 2026 Kitploit

Tool Directory

Categories

View all categories
Loading categories
CVE-2022-21445-for-12.2.1.3.0-Weblogic — Pre-authentication remote code execution exploit for Oracle WebLogic ADF Faces (CVE-2022-21445, CVSS 9.8). Includes detailed environment setup, payload generation, and remote debugging instructions for penetration testing. | Kitploit
Tools/GitHubGitHub/hienkiet/cve-2022-21445-for-12.2.1.3.0-weblogic
Vulnerability AnalysisCode AnalysisExploitationWeb Application ExploitationPenetration TestingRemote Access ToolPayload Development
GitHubhienkiet/cve-2022-21445-for-12.2.1.3.0-weblogic

CVE-2022-21445-for-12.2.1.3.0-Weblogic

Pre-authentication remote code execution exploit for Oracle WebLogic ADF Faces (CVE-2022-21445, CVSS 9.8). Includes detailed environment setup, payload generation, and remote debugging instructions for penetration testing.

View Repository
53472 years agoNot yet reviewed

Most Popular

View all →

Discover the most used tools by our community.

Explore all tools

Browse our collection of tools

View all tools →
Share

Overview

CVE-2022-21445 (CVSS 9.8), a vulnerability is an untrusted data deserialization, identified in the ADF Faces component, which can be exploited remotely by attackers without authentication (pre-authentication) to perform RCE.

This vulnerability was discovered by two cybersecurity experts: PeterJson from VNG Corporation and Nguyen Jang from VNPT. Oracle received this report in October 2021 and took 6 months, until April 2022, to release the patch.

In this article, exploitation focuses on Oracle Business Intelligence version 12.2.1.4.0.

Analysis - Reproducing the Vulnerability

Environment Setup

Victim/Target Machine Side

Requirements: Install Windows 10+ Pro or Windows Home (x64) with active license, or use Windows Server (Oracle's products are preferred).

Step 1: Install Java, version jdk 8u112 or later (8Ux), download link: JDKv8U112
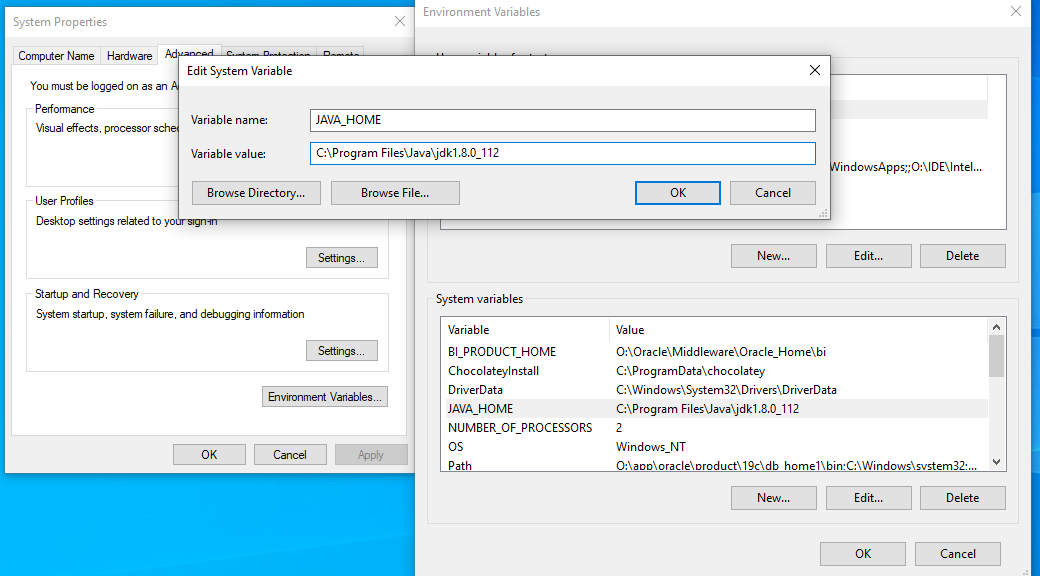
  • Add JAVA_HOME with the path pointing to the jdk directory (not jre). Image 1.1: Install Java

Step 2: Install Oracle Database 19c, download link: Oracle 19c

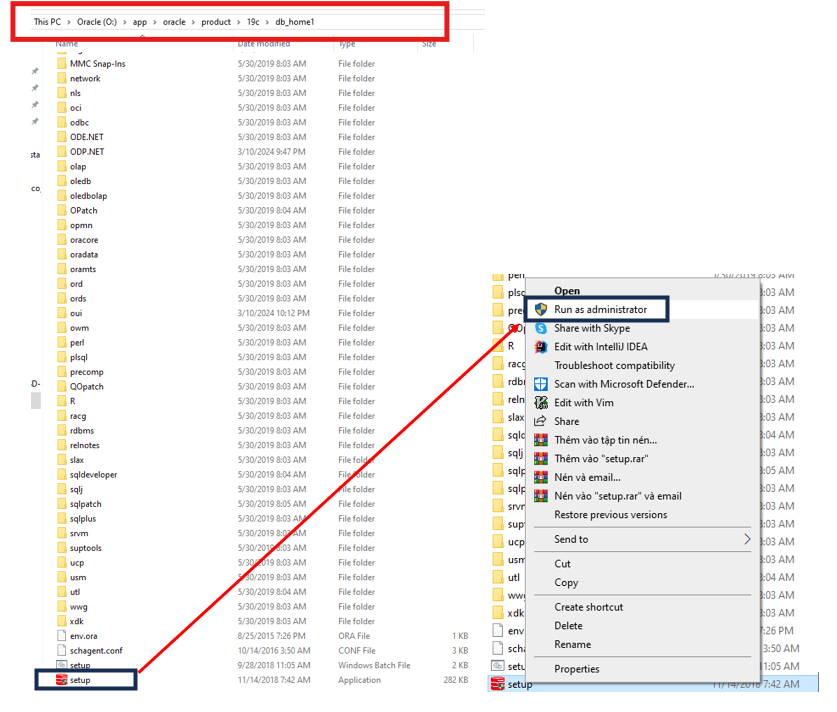
  • Prepare a folder for database installation, create a path like below and extract the downloaded database zip file into it: C:\app\oracle\product\19c\db_home1

  • Run setup.application with administrator privileges. Image 2.1: Run DB setup
  • Follow each step by step as instructed in DB Installation Guide

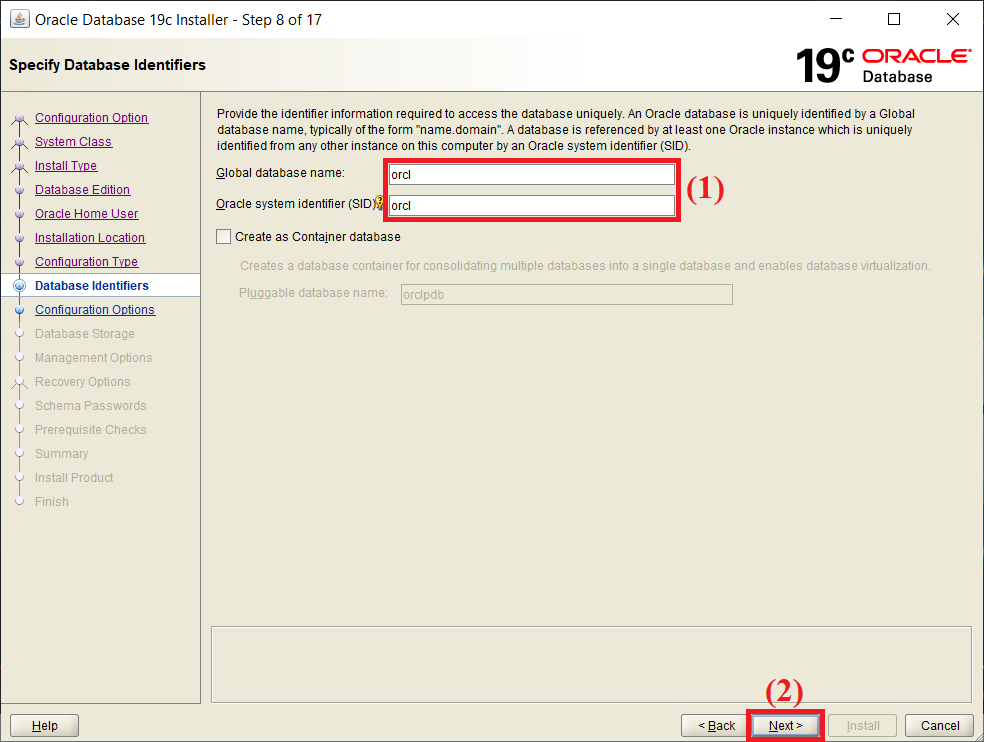
  • Important note: At step 8/17, remember to check Create as Container database to open a pluggable database for the upcoming Fusion Middleware installation. Image 2.2: Initialize Pluggable Database
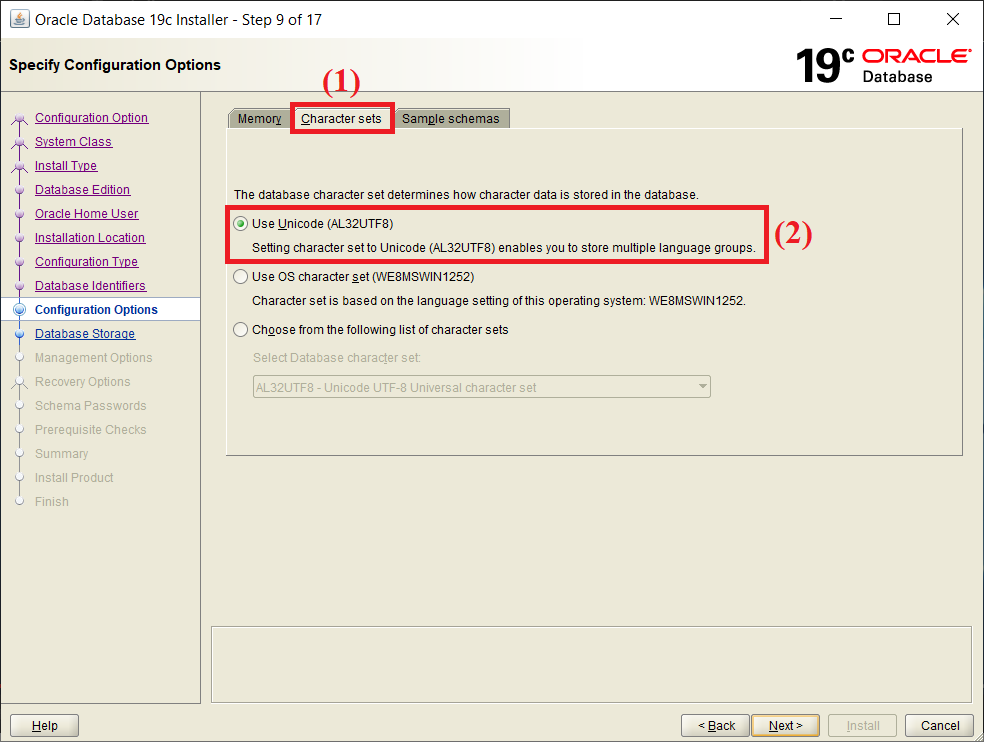
    At step 9/17, select character set as Unicode (AL32UTF8). Image 2.3: Select Unicode
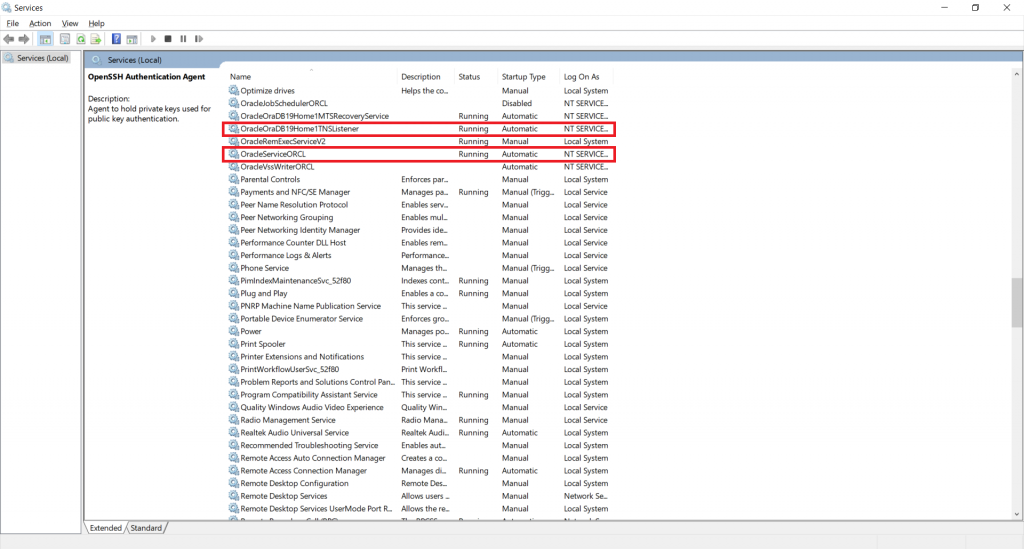
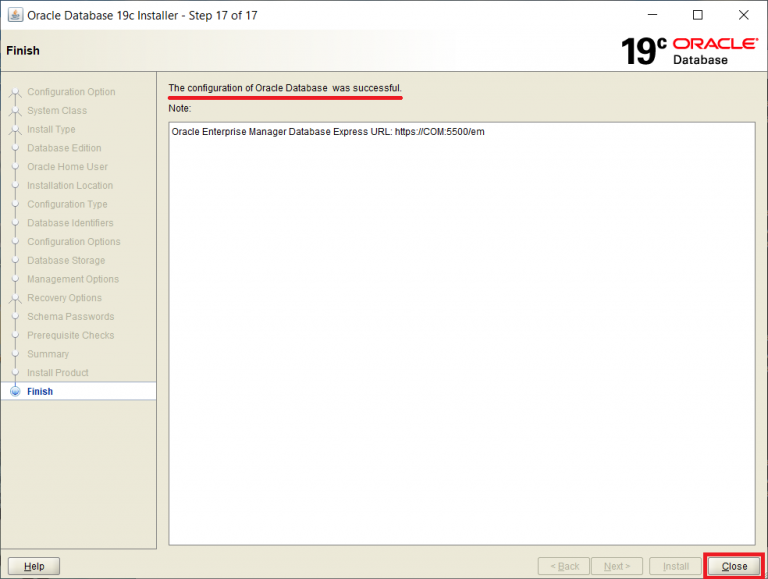
  • After the installation is complete, carefully check in Windows Services to ensure that the 4 main services as shown below have RUNNING status. Image 2.4: Successful installation
  • Image 2.5: Check Services

    1. Create a new Oracle database account by following these steps:
    • Terminal Administrator -> sqlplus / as sysdba
    • Create system user: alter user system identified by system_password account unlock;
    • Check existence of system user: select username from dba_users;
    • Set environment: alter session set “_oracle_script”=true;
    • Create regular user hr: create user hr identified by user_password;
    • Grant privileges: grant all privileges to hr;
    • Unlock account – change password: alter user hr identified by hr_pass account unlock;
    • Create new system account: alter user sys identified by sys_pass account unlock;

    Step 3: Install SQL Developer, no-jre version, download link: SQLDev-NoJRE Image 3.1: Download SQL Developer

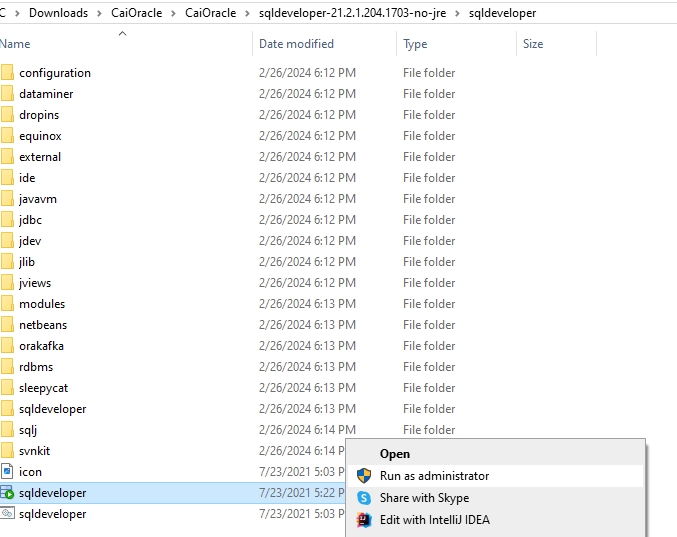
    • Run sqldeveloper.application with administrator privileges. Image 3.2: Launch SQL Developer
    • Configure parameters for a new connection as shown below, note to change Username and Password (as in the example above: hr), Hostname (default is localhost), Port (default is 1521), SID (the global database name installed in step 2). Image 3.3: Configure SQL Developer parameters
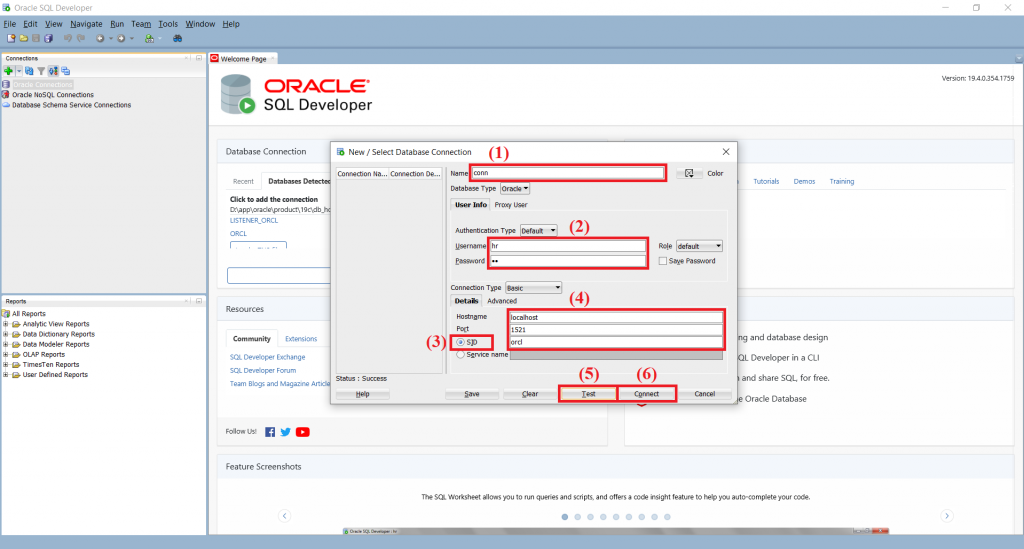
    • If when selecting Test you see a Success message, the connection is successful; then select Connect.

    Step 4: Install Fusion Middleware Infrastructure (FMW) version 12.2.1.3.0, download link: FMW_ver_12.2.1.3.0 Image 4.1: Download FMW

    • Create a path for the FMW installation directory in the format: C:\Oracle\Middleware\Oracle_Home
    • Follow the instructions step by step: FMW Installation Guide

    Step 5: Install Oracle Business Intelligence (OBIEE) version 12.2.1.4.0, download link: OBIEE_ver_12.2.1.4.0

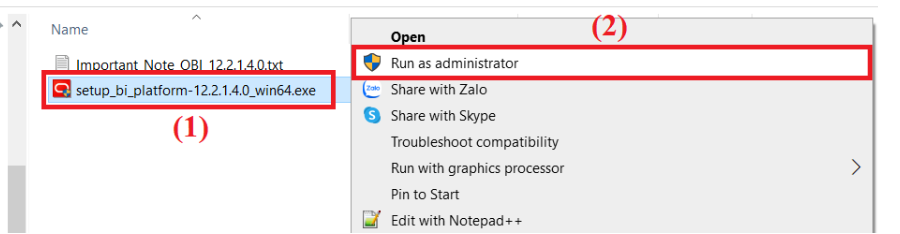
    • Run setup_bi_platform-12.2.1.4.0_win64.exe with administrator privileges. Image 5.1: Run OBIEE installer
    • Install step by step according to OBIEE Installation Guide

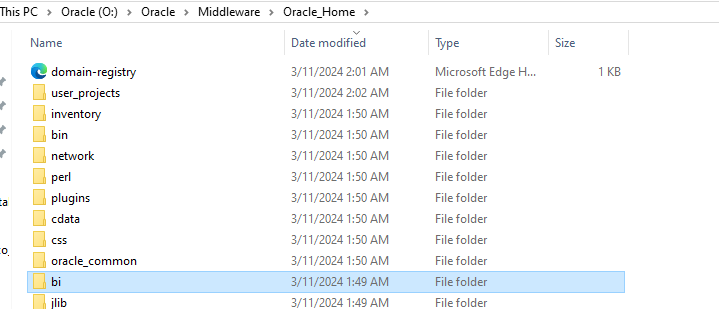
    • Note: The BI path must match the FMW installation path, e.g., Oracle/Middleware/Oracle_Home. Image 5.2: BI path must match FMW path
    Step 6: Set up BI Schema using the Repository Creation Utility (RCU)

    • At the path C:\Oracle\Middleware\Oracle_Home\oracle_common\bin, run rcu.bat as administrator.

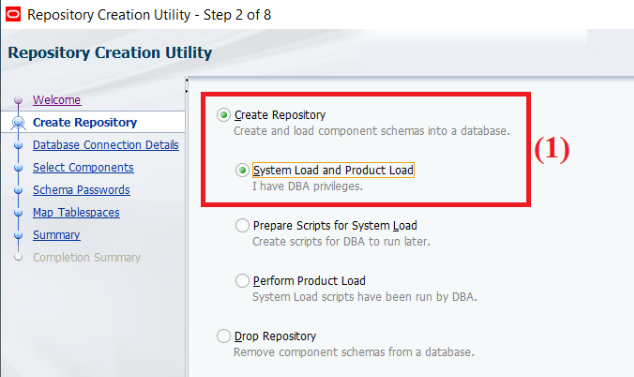
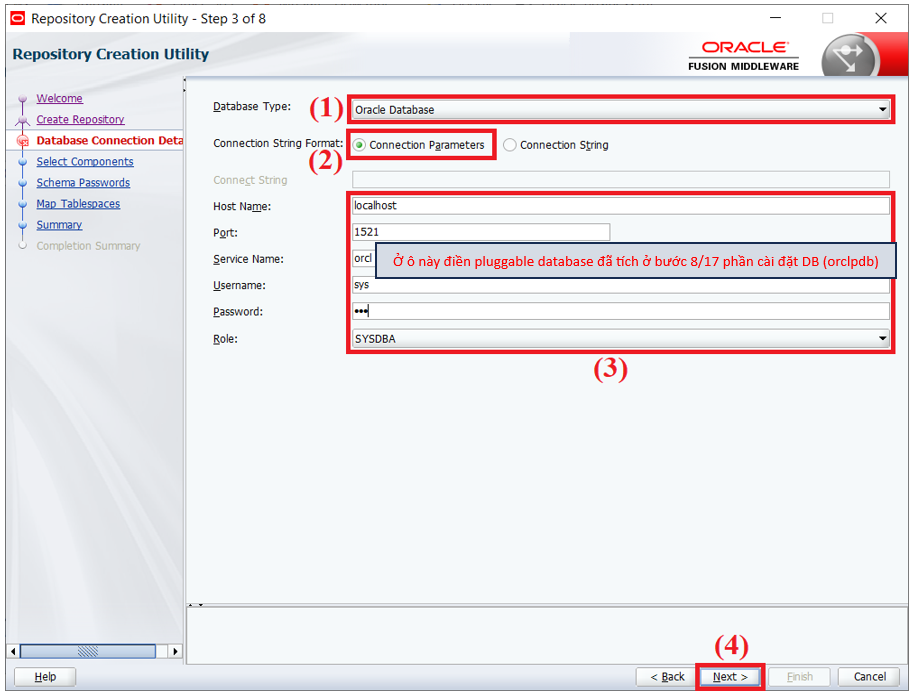
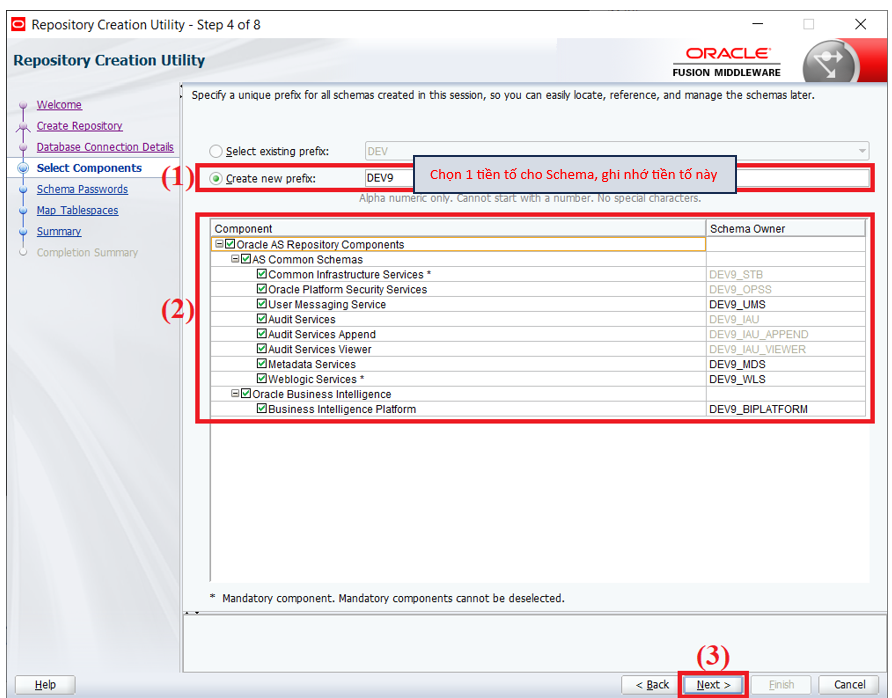
    • Follow the steps below:

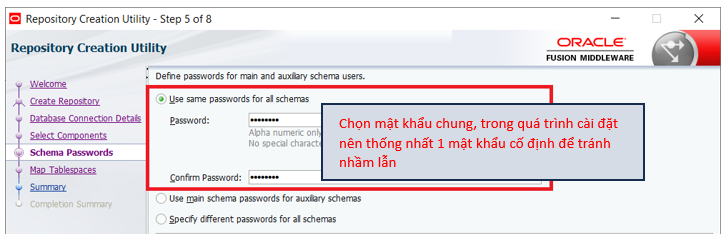
    Image 6.1: Create Repository

    Image 6.2: Database Connection Detail

    Image 6.3: Select Component

    Image 6.4: Schema Password

    • Finally, click Create to let the system create the BI Schema.

    Step 7: Set up environment variables for OBIEE
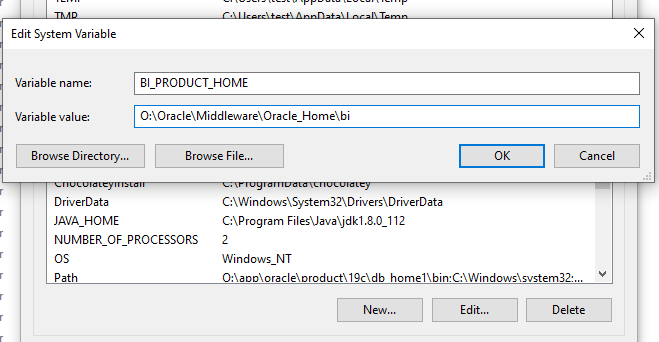
    • Go to Control Panel > System > Advanced system settings > Advanced > Environment Variables > New System Variable Image 7.1: Environment Variables

    Step 8: Create BI Domain

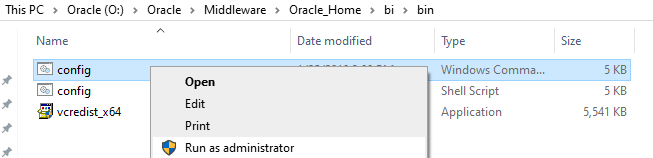
    1. At the path C:\Oracle\Middleware\Oracle_Home\bi\bin, run config.cmd as administrator.

    Image 8.1: Run config

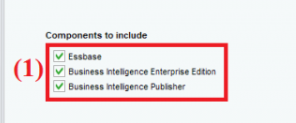
    1. In step 1: Select all 3 components, where Essbase is the OLAP server, Business Intelligence Enterprise Edition is BI Analytics, and Business Intelligence Publisher is BI Publisher.

    Image 8.2: Select components

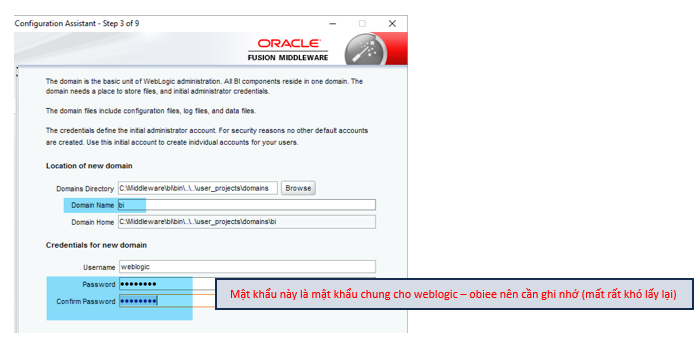
    1. In step 3: Configure a new domain as shown below, !! REMEMBER THE DOMAIN PASSWORD BECAUSE IT WILL BE VERY DIFFICULT TO RECOVER. Leave the domain as bi since it's the default.

    Image 8.3: Domain account

    1. In step 4: Update domain information for the Database.

    Image 8.4: Update information

    1. In step 8: If the process goes smoothly, the result will be as shown below.

    Image 8.5: Configuration successful

    1. If everything is Done, save the OBIEE information file for the next step, log in to the URLs:
    • http://localhost:9500/console*
    • http://localhost:9500/em*
    • http://localhost:9502/xmlpserver*
    • http://localhost:9502/analytics*
    1. Some possible errors:
    • In step 4, if the system reports fail to logon, check the domain password for correctness.

    • In step 8, if the system shows an error like the image below, check whether you have activated your Windows license and whether your Windows meets the requirements described.

    Image 8.6: License error

    • Error: BI_HOME_PRODUCT not added, review Step 7.
    • Error update ...

    Step 9: After setup, access the newly created BI domain at path $Oracle_Home\user_projects\domains\bi\servers\AdminServer\tmp_WL_user\adf.oracle.domain.webapp\i83uao

    • Copy all jar files from here into a separate folder, share it to the attack machine (for lab environment do this; for real attacks, the attack machine must also have the same setup as the target to obtain the source code).

    • Also add the coherence.jar library from $Oracle_Home\coherence\lib into this folder.

    • This folder is crucial for payload success because each FMW or BI version or each machine's environment may differ, so the exact version is needed to minimize risks or exceptions during payload transmission.

    Step 10 (only if remote debug is needed; again, if testing in a real environment, since you cannot freely set up the victim machine, the attacker must perform the target machine setup on their own machine to remote debug and check errors.)

    • Install Mozilla, add Burp Proxy with port 8181.

    • Enable Remote Debug on the BI server.

      Access localhost:9500/console

      In Domain Structure -> select bi -> Environment -> Servers

    Image 10.1: Domain Structure

    Two servers will appear: the Weblogic AdminServer and the BI bi_server1.

    Image 10.2: List of servers displayed

    Click Lock & Edit in the upper left corner, select bi_server1 to edit its configuration. Then click Configuration -> Server start -> Scroll to the bottom, select Advanced (if present) -> Click to enter Arguments -> Enter the debug parameters:

    -Xdebug -Xnoagent – Xrunjdwp:transport=dt_socket,address=5005,server=y,suspend=n

    (you can try 0.0.0.0:5005 if later you encounter errors restarting bi_server1)

    Enter the weblogic password (set earlier in the Config BI Domain step) -> Apply change & Restart.

    Open Administrator terminal -> Navigate to $Oracle_Home\user_projects\domains\bi\bitools\bin run ./stop.cmd and ./start.cmd to restart bi_server1. During restart, if no errors occur, debug is enabled and listening on port 5005 as above. If there are errors, check the debug parameters for extra spaces or address issues.

    Attack Machine Side

    Step 1: Download IntelliJ IDEA Ultimate, activate using code found on GitHub.

    Step 2 (Only do this step if the attack process throws errors like 500 Server Error, ... due to exceptions in the payload.)

    1. Change the jdk/sdk version of the project to match the target machine (installation as in Target Machine - Step 1).

    2. Create an empty project for source code analysis and remote debugging.

    3. Add all jar files received from the target machine to this project:

      Project Structure -> Modules -> Click + -> 1 JARS or Directories -> Add the entire jar folder.

    Image 11.1: Add jar files

    Image 11.2: Result

    1. Set up Remote Debugging:

      Run -> Edit Configurations -> + -> Remote JVM Debug

    Image 12.1: Set up Remote Debug

    Run Remote Debug; if a message appears in the console: Connected … then it's successful.

    Image 12.2: Run Remote Debug

    Step 3:

    • Clone the code from this repository to your machine, delete the old coherence.jar in the lib folder and replace it with the file you received from the target machine in the previous step.

    • Next, add it to a project in IntelliJ, add the jar files in lib with the option Add as library.

    • Check the name of the class LambdaIdentity$.... for the correct Weblogic version; if there is a change, refactor the file and rename it.

      Weblogic 12.2.1.3: LambdaIdentity$E12ECA49F06D0401A9D406B2DCC7463A

      Weblogic 12.2.1.4: LambdaIdentity$423B02C050017B24DB10DFF759AA56BF

    • Edit the path to the LambdaIdentity$....class file in Main.java. To get the exact path, there are two ways: You can run javac on the jar file to generate the .class file; another approach is to comment out the main function's code, then run the project normally; the class file path can be found in the target directory.

    • Check that the jdk and sdk of the project match the target machine.

    Analysis of BI Code and Payload Generation Code

    Analysis of BI Code

    1. At the path $Oracle\Middleware\Oracle_Home\user_projects\domains\bi\servers\AdminServer\tmp_WL_user\em\fw8wi5\war\WEB-INF

    We see the web.xml file, which describes the servlet-mapping relationships. "resources" is a servlet related to system resources, containing important data and information; therefore, this is a location often targeted by attackers.

    Image 13.1: Servlet-mapping relationships

    1. Dive into the ResourceServlet class, specifically org.apache.myfaces.trinidad.webapp.ResourceServlet, we see the doGet method responsible for handling GET requests sent to the server.

    Image 13.2: doGet method

    • Here, through the method _getResourceLoader(), a new loader is created from the input request. Also, a resourcePath is initialized and receives the servletPath and servletInfo values via the getResourcePath method with the request parameter. That loader calls the getResource(resourcePath) function, attempting to load the resource from the input request and find it through the function org.apache.myfaces.trinidad.resource.ResourceLoader.getResource.findResource(), finally the found value is passed to a url instance of the URL.class.

    Image 13.3: getResource function

    • _getResourceLoader maintains a ConcurrentMap to store the mapping between servletPath and loaders. This relationship is clearly defined in oracle.adfinternal.view.resource.rich.RenderKitResourceLoader

    Image 13.3: class RenderKitResourceLoader

    • The method _register in the RenderKitResourceLoader() function is called, passing the corresponding regex + loader, then returns super.register (its parent function). This function adds the pattern and corresponding loader to the concurrentmap_loaders. Therefore, when the loader is initialized in the doGet() function and receives the input request parameter, the servletPath from the request URL is taken and passed to _loader.get() to retrieve the corresponding servlet.

    Image 13.4: method _register

    Image 13.5: method register (parent method)

    • The vulnerability author believes that among the classes containing the overridden findResource() method, oracle.adfinternal.view.resource.rich.RemoteApplicationResourceLoader is the class that poses a deserialization risk. Let's analyze it to find the reason.

    Analysis of the findResource() function in RemoteApplicationResourceLoader.class

    Image 13.6: findResource() function

    This function returns a method containing a custom protocol RAStreamHandler(). RAStreamHandler creates a URLConnection object with the value new RAURLConnection.

    Image 13.7: method RAStreamHandler()

    The RAURLConnection function calls the _getPathBean function.

    Image 13.8: method RAURLConnection()

    The _getPathBean function contains a bean object created by calling the getInstanceFromString() function, which processes the input string to extract the corresponding keys (filter).

    Image 13.9: _getPathBean function

    The input bean string is converted via the SerializationUtils class from URL-encoded form into a URLEncoderPathBean object. If everything is still fine, the subsequent input continues to be passed to the fromURLEncodeString() function.

    Image 13.10: getInstanceFromString() function

    Image 13.11: fromURLEncodedString() function

    If the input string encounters an error, it throws an exception. Exceptions mainly come from the library used in the payload, due to version mismatch or incorrect path to the Lambda file.

    In the fromURLEncodedString() function, a fromString function is returned with the url parameter, and its code is as follows:

    Image 13.12: fromString() function

    In the fromString function, data is readObject() and returned. It can be seen that the input is not filtered at all. It passes through many functions and finally gets deserialized in fromString(). This is the sink for exploitation. With the sink found, now we need to find the source.

    1. Finding the source: as analyzed above, to find the source, we need to determine the input request URL. We see that to call the findResource() function, we must be able to route to the RemoteApplicationResourceLoader class. In the RenderKitResourceLoader class, it is clearly defined:```bash this._register("/./remote/(.)", new RemoteApplicationResourceLoader());
    root@kitploit:~
    Therefore, to call the aforementioned class, we need a regex in the form “/.*/remote/(.*)”. Consequently, when a router or input path is of the form /em/afr/foo/remote/payload, it will satisfy the structure defined in this file, and RemoteApplicationResourceLoader will be used as the loader in doGet, and the corresponding class file oracle.adfinternal.view.resource.rich.RemoteApplicationResourceLoader will call the overridden function findResource(). So if a payload is sent to the correct address, the data will be transmitted easily without being blocked by any filter.
    
    Here is the final URL used for exploitation:
    __hostname:port/contextApp/afr/foo/remote/payload/__
    
    Where contextApp is one of the paths that exists when OBIEE is first installed, such as /em; /bicomposer; ….
    
    Foo is any arbitrary string.
    
    Payload is the string generated when running the Main function of the prepared attack project.
    
    ### Code analysis for payload generation
    
    This project follows the gadget chain of CVE-2020-14644
    
    ![file Lambda](https://raw.githubusercontent.com/hienkiet/CVE-2022-201145-12.2.1.3.0-Weblogic/main/image/payload2.png)
    
    The class LambdaIdentity$E12ECA49F06D0401A9D406B2DCC7463A inherits from AbstractRemotable and is used to interact with the remote system.
    
    By using the Java Reflection API, an attacker can easily retrieve the WorkAdapter from the current execution thread.
    
    Next, they obtain the connectionHandler field of the WorkAdapter and perform a query to retrieve the ServletRequest and ServletResponse from the connectionHandler.
    
    Then, they retrieve the value of the "cmd" header from the request (ServletRequest), and if "cmd" is not empty, execute a shell command corresponding to the current operating system (Windows or Linux/Unix).
    
    Read the output from the shell command and send that result back in the response (ServletResponse).
    
    If any error occurs during execution, it will be printed to the console via the printStackTrace() method.
    
    The ID after the class name LamdaIdentity depends on the version of the Weblogic server. It is a string encoded from the MD5 hash of the class com.tangosol.internal.util.invoke.ClassIdentity. Since this class differs between versions, as mentioned, to avoid payload errors, this must be carefully checked.
    
    Here, a variable cmd is extracted from the header of the incoming request, then added to the Runtime.getRuntime().exec() command below, encoded and decoded using MD5 hex. After being transmitted to the OBIEE system, it returns a deserialized value.
    
    Finally, in the Main function, a RemoteConstructor object is created, and through the SerializationUtils library, it is converted into a URL-encoded string. This string is passed directly into the source URL, giving attackers the opportunity to inject an arbitrary __cmd__ command.
    
    ![Hàm Main](https://raw.githubusercontent.com/hienkiet/CVE-2022-201145-12.2.1.3.0-Weblogic/main/image/payload1.png)
    
    ## Exploitation Reproduction
    
    ![Exploit /em](https://raw.githubusercontent.com/hienkiet/CVE-2022-201145-12.2.1.3.0-Weblogic/main/image/exploit1.png)
    
    ![Exploit /em](https://raw.githubusercontent.com/hienkiet/CVE-2022-201145-12.2.1.3.0-Weblogic/main/image/exploit2.png)
    
    ## Reference
    
    1. https://peterjson.medium.com/miracle-one-vulnerability-to-rule-them-all-c3aed9edeea2
    
    2. https://testbnull.medium.com/oracle-access-manager-pre-auth-rce-cve-2021-35587-analysis-1302a4542316
    
    ## Author of Vulnerability: Jang Nguyen & Duc PeterJson
    
    Download Tool