 sajibuu/upload_bypass
أداة بسيطة لتجاوز قيود رفع الملفات.

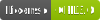

Upload Bypass هي أداة بسيطة مصممة لمساعدة مختبرى الاختراق ومطاردي الثغرات في اختبار آليات رفع الملفات. تستخدم الأداة تقنيات متنوعة من برامج مكافآت الثغرات لتبسيط عملية تحديد واستغلال نقاط الضعف، مما يضمن تقييماً شاملاً لتطبيقات الويب.
هذه الأداة محظورة في امتحان OSCP!
مناسب لاختبارات الاختراق الواقعية. سيقوم هذا الوضع برفع ملفات غير ضارة ولن يحاول استغلال الهدف.
جديد - إذا تم توفير مجلد وجهة للملفات المرفوعة، سيقوم البرنامج بتحديد ما إذا كان ملف العينة المرفوع يتم عرضه. على سبيل المثال، إذا اخترت PHP، سيحاول البرنامج تحديد ما إذا كان أمر echo قد تم تنفيذه وعرضه بنجاح، وإذا نجح، فسيقترح الدخول إلى واجهة تفاعلية.
مناسب عندما ترغب في استغلال الهدف ورفع Web-shell تفاعلي (إذا تم توفير مجلد رفع وجهة)، سيقوم برفع الملف بمعرّف UUID عشوائي، مما يجعل تخمينه أصعب على أدوات الفازر.
مناسب لاختبار وجود برامج مكافحة الضارة. قم برفع ملف Eicar (ملف اختبار مكافحة البرامج الضارة) إلى النظام، وإذا قام المستخدم بتحديد موقع الملف المرفوع، سيتحقق البرنامج من نجاح رفع الملف ووجوده في النظام لتحديد ما إذا كان هناك برنامج مكافحة ضارة على النظام.
افحص ملف config.py في مجلد lib، يمكنك إضافة امتدادات جديدة، أنواع MIME، وحدات البايت السحرية، تكوين استخدام بروتوكول HTTP/HTTPS، إلخ.
لإضافة وحدة جديدة، ببساطة أضف دالة بالوظيفة المرغوبة إلى modules.py ثم أضف الدالة بالاسم إلى القائمة "active_modules" في config.py.
لإضافة امتداد ملف جديد، أضف ملف sample.{ext} إلى assets/sample_files، ثم أضف الامتداد ونوع MIME/وحدات البايت السحرية الخاصة به إلى config.py.
git clone https://github.com/sAjibuu/Upload_Bypass.git
pip install -r requirements.txt
sudo docker pull sajibuu/upload_bypass
sudo docker build -t sajibuu/upload_bypass .
sudo docker run -v $(pwd)/request:/Upload_Bypass/{your_request_file} -it sajibuu/upload_bypass -r request -s 'file was uploaded successfully' -E php -e
تأكد من الاستماع على المنفذ 8080 على جميع الواجهات!
sudo docker run -v $(pwd)/request:/Upload_Bypass/{your_request_file} -it sajibuu/upload_bypass -r request -s 'file was uploaded successfully' -E php -e -p http://{docker_interface_IP}:8080
لن تعمل الأداة بشكل صحيح مع الحالات التالية:
يرجى ملاحظة أن استخدام Upload Bypass وأي إجراءات تتخذها به تكون على مسؤوليتك الخاصة. الأداة مقدمة لأغراض تعليمية واختبارية فقط. مطور Upload Bypass غير مسؤول عن أي إساءة استخدام أو ضرر أو أنشطة غير قانونية ناتجة عن استخدامها.
يعمل البرنامج فقط مع ملفات الطلبات المولدة بواسطة أدوات الوكيل، مثل Burp Suite وZAP OWASP.
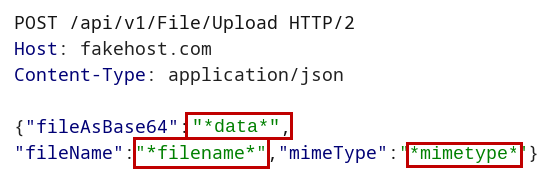
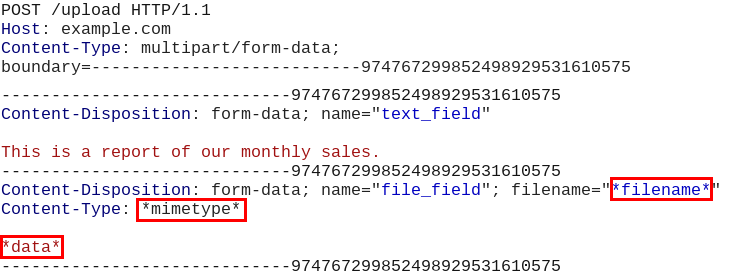
قبل حفظ ملف الطلب من الوكيل الذي تستخدمه، على سبيل المثال Burp Suite، استبدل قيم المعاملات التالية بالعلامات المقابلة لها:
محتوى الملف: *data*
مثال: استبدل البيانات الثنائية للصورة بالسلسلة *data*
اسم الملف: *filename*
مثال: استبدل اسم الملف بما في ذلك امتداده بالسلسلة *filename*
رأس Content-Type: *mimetype*.
مثال: استبدل نوع المحتوى (mimetype) للملف بالسلسلة *mimetype*
كيف يجب أن يبدو في طلب JSON:
كيف يجب أن يبدو في طلب multi-part data:
Usage: Upload Bypass [OPTIONS]

Options:
  -h, --help     Print help (see more with '--help')
  -U, --usage   Print the how to save the request file instructions.
  -v, --version  Print version

Required Arguments:
  -r, --request_file <REQUEST_FILE>    Provide a request file to be proccessed
  -E, --extension    <EXTENSION>       Forbidden extension to check (ex: php)
  -A, --allowed      <EXTENSION>       Allowed extension (ex: jpeg) - Optional - if not set the program will auto-detect the extension

  Choose only one from the options below:
  -s, --success      <MESSAGE>         Provide a success message when a file is uploaded (ex: File was uploaded successfully)
  -f, --failure      <MESSAGE>         Provide a failure message when a file is uploaded (ex: File is not allowed!)
  -S, --status_code  <STATUS_CODE>     Provide a status code for a success upload (ex: 200)

Mode Settings:
  -d, --detect          Upload harmless sample files (Suitable for a real penetration test)
  -e, --exploit         Upload Web-Shells files when testing
  -a, --anti_malware    Upload Anti-Malware Test file (Eicar) when testing
      I.  If set with -E flag the program will test with the Eicar string along with the choosen extension
      II. If set without the -E flag the program will test with Eicar string and a com extension

Modules Settings:
  -l, --list            List all modules
  -i, --include_only <MODULES>   Include only modules to test from (ex: extension_shuffle, double_extension)
  -x, --exclude      <MODULES>   Exclude modules (ex: svg_xxe, svg_xss)

Request Settings:
  --base64              Encode the file data with Base64 algorithm
  --allow_redirects     Follow redirects
  -P, --put             Use the HTTP PUT method for the requests (Default is POST)
  -Pa, --patch          Use the HTTP Patch method for the requests (Default is POST)
  -R, --response        Print the response to the screen
  -c, --continue        Continue testing all files, even if a few uploads encountered success
  -t, --time_out <NUM>  Set the request timeout (Default is 8)
  -rl, --rate_limit <NUMBER>  Set a rate-limit with a delay in milliseconds between each request

Proxy Settings:
  -p, --proxy <PROXY>   Proxy to use for requests (ex: http(s)://host:port, socks5(h)://host:port)
  -k, --insecure        Do not verify SSL certificates
  --burp_http           Set --proxy to 127.0.0.1:8080 and set --insecure to true (For HTTP requests)
  --burp_https          Set --proxy to 127.0.0.1:8080 and set --insecure to false (For HTTPs requests)
