
Skip to content
KitploitKITPLOIT
أدواتالمدونة
إرسال
أدواتالمدونة
إرسال

أدوات الاختراق واختبار الاختراق والأمن السيبراني لترسانتك الأمنية!

Kitploit هو دليل لأدوات الاختراق والأمن السيبراني واختبار الاختراق. اكتشف آخر تحديثات المشاريع للعثور على الثغرات وتحليل الأنظمة وأتمتة الاختبارات وتعزيز أمنك.

··الخلاصات·اتصال·الخصوصية·© 2026 Kitploit

دليل الأدوات

الفئات

عرض جميع الفئات
Loading categories
wafparan01d3 — تقييم الطبيب "المصاب بجنون العظمة" السريع لـ WAF | أداة WAFPARAN01D3 | Kitploit
أدوات/GitHubGitHub/alt3kx/wafparan01d3
أدوات دفاعيةالبرمجة النصية والأتمتةتدقيق التكوينأمن الويباختبار الاختراق
GitHubalt3kx/wafparan01d3

wafparan01d3

تقييم الطبيب "المصاب بجنون العظمة" السريع لـ WAF | أداة WAFPARAN01D3

عرض المستودع
246منذ 4 سنواتتمت المراجعة من قبل Kitploit

الأكثر شعبية

عرض الكل →

اكتشف الأدوات الأكثر استخدامًا من قبل مجتمعنا.

استكشف جميع الأدوات

تصفح مجموعتنا من الأدوات

عرض جميع الأدوات →
مشاركة

تقييم سريع لمستوى "جنون العظمة" (Paranoid) في WAF

wafparano1d3
WAFPARAN01D3

أداة اختبار مستوى جنون العظمة لجدار حماية تطبيقات الويب (WAF).
— من alt3kx.github.io

مقدمة إلى مستويات جنون العظمة (Paranoia Levels)

في جوهر الأمر، يتيح لك مستوى جنون العظمة (PL) تحديد مدى عدوانية مجموعة القواعد الأساسية (Core Rule Set).
المرجع: https://coreruleset.org/20211028/working-with-paranoia-levels/

كيف يعمل

  • يأخذ سكربت بايثون 3 wafparan01d3.py الطلبات الخبيثة باستخدام حمولات مشفّرة موضوعة في أجزاء مختلفة من طلبات HTTP استنادًا إلى معاملات GET، وتُسجَّل نتائج التقييم في ملف تقرير التصحيح wafparan01d3.log المنشأ على جهازك.
  • لاحظ السلوك والاستجابة لكل مستوى جنون عظمة في WAF عند ضبط هجمات أو حمولات مختلفة باستخدام مستوى الإعداد الافتراضي.
  • يوفر إثبات المفهوم (PoC) أدناه التثبيت والإعداد الأساسيين من الصفر، وإعادة استخدام WAF الحالي المنشور عن طريق ضبط "Mock" أساسي ومحاكاة الواجهة الخلفية (backend).
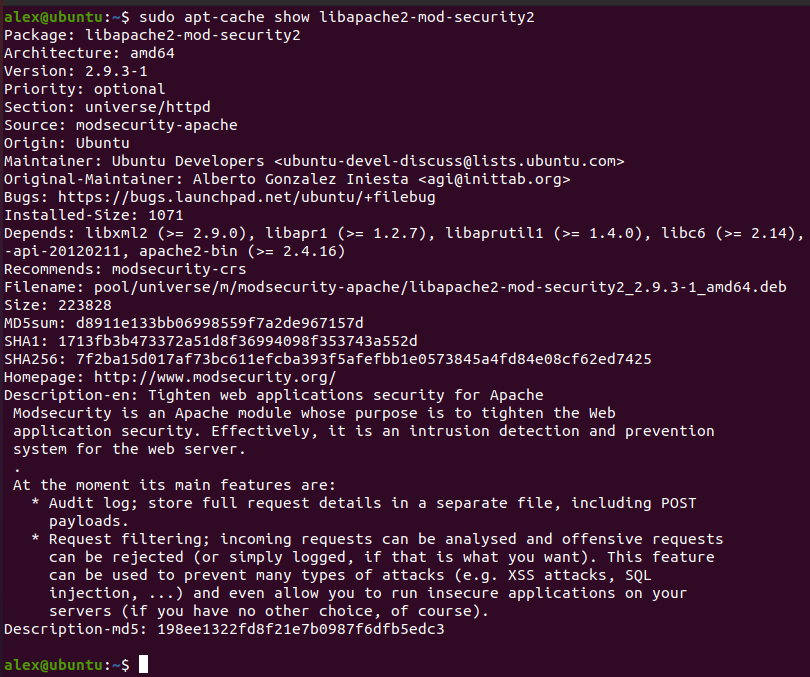
  • كانت الحمولات الافتراضية المتاحة تُسمى mysql_gosecure.txt استنادًا إلى البحث "خطأ في الترميز العلمي في MySQL جعل عملاء AWS WAF عرضة لحقن SQL" من gosecure والمتاح هنا https://www.gosecure.net/blog/2021/10/19/a-scientific-notation-bug-in-mysql-left-aws-waf-clients-vulnerable-to-sql-injection/ وذلك لتقييم جدران الحماية لدينا باستخدام modsecurity في مستوياتها المختلفة من جنون العظمة سواء في إعداد افتراضي أو عن طريق تعطيل قواعد/معرّفات مختلفة بطريقة متدرجة وسريعة.
النهج

  • Pentesters: نطاق الصندوق الرمادي (GreyBox) مع وصول محدود إلى جهاز WAF بنظام Linux باستخدام "قشرة" (shell) بصلاحيات لبدء/إعادة تحميل وتحرير ملفات إعداد Apache الخاصة بـ WAF على بيئات DEV/STG/TEST مع إرسال حمولات مختلفة.
  • Secutity Officers: اتخاذ القرار الأفضل لتطبيق مستوى جنون العظمة في WAF لكل حل داخل مؤسستك.
  • Blueteamers: فرض القواعد، وأفضل تنبيه، ونتائج إيجابية كاذبة أقل في مؤسستك.
  • Integrators: إجراء استكشاف أخطاء أعمق وتحديد المستوى المناسب لجنون العظمة في WAF بسرعة مع تخصيص القواعد أو إنشاء رقع افتراضية.

إثبات المفهوم: استنادًا إلى Ubuntu 20.04.3 ومجموعة القواعد الأساسية OWASP (CRS) v3.3.2

المرجع: https://www.inmotionhosting.com/support/server/apache/install-modsecurity-apache-module/

التثبيت الأولي

  1. تحديث مستودعات البرامج:
root@kitploit:~
$ sudo apt update -y && sudo apt dist-upgrade -y
  1. تثبيت الحزم الأساسية:
root@kitploit:~
$ sudo apt-get install build-essential -y
  1. تثبيت Apache2 لأوبونتو (إذا لم يكن مثبتًا):
root@kitploit:~
$ sudo apt-get install apache2 -y
  1. تنزيل وتثبيت وحدة ModSecurity الخاصة بـ Apache:
root@kitploit:~
$ sudo apt install libapache2-mod-security2 -y
  1. تثبيت curl لأوبونتو (إذا لم يكن مثبتًا):
root@kitploit:~
$ sudo apt-get install curl vim gridsite-clients net-tools -y
  1. إعادة تشغيل خدمة Apache:
root@kitploit:~
$ sudo systemctl restart apache2
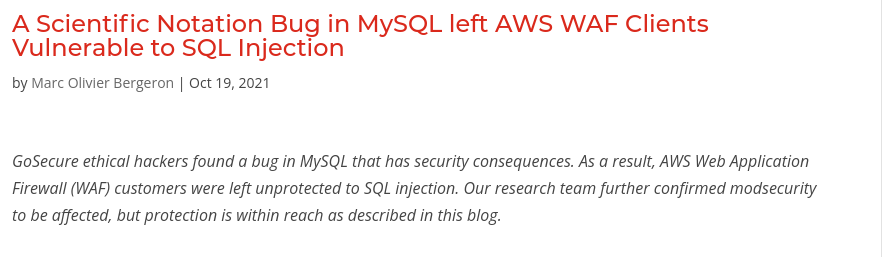
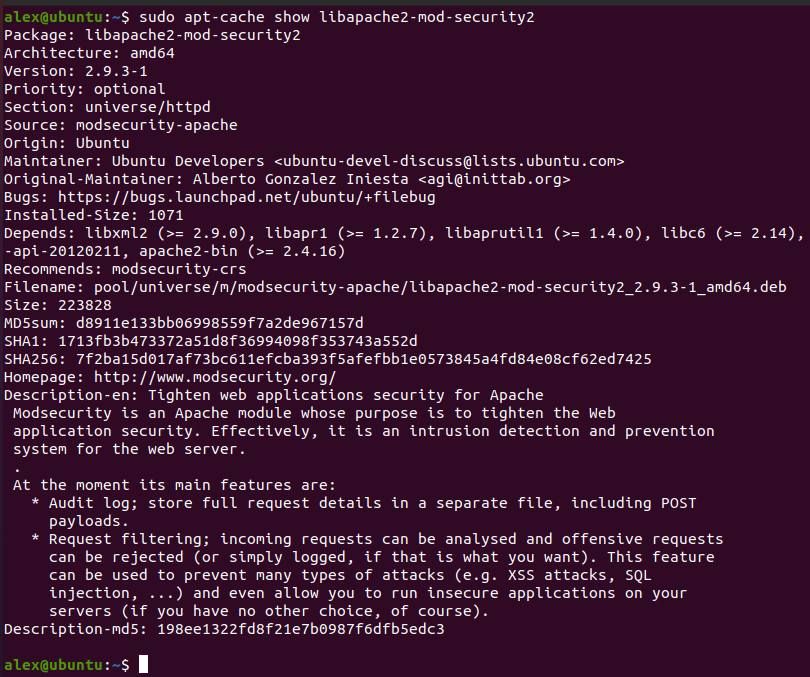
  1. التأكد من أن إصدار البرنامج المثبت هو 2.9.x على الأقل:
root@kitploit:~
$ sudo apt-cache show libapache2-mod-security2
install

إعداد ModSecurity

  1. انسخ الملف وأعد تسميته:
root@kitploit:~
$ sudo cp /etc/modsecurity/modsecurity.conf-recommended /etc/modsecurity/modsecurity.conf

بعد ذلك، غيّر وضع الكشف في ModSecurity. أولًا، انتقل إلى المجلد cd /etc/modsecurity
2. حرّر ملف إعداد ModSecurity باستخدام vi أو vim أو emacs أو nano.

root@kitploit:~
$ sudo vim /etc/modsecurity/modsecurity.conf
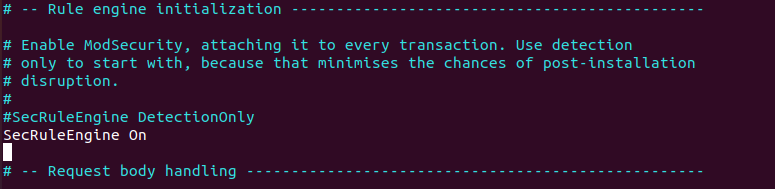
  1. بالقرب من أعلى الملف، سترى SecRuleEngine DetectionOnly. غيّر DetectionOnly إلى On.

القيمة الأصلية: SecRuleEngine DetectionOnly
القيمة الجديدة: SecRuleEngine On
modsec

  1. احفظ التغييرات.
  2. أعد تشغيل Apache:
root@kitploit:~
$ sudo systemctl restart apache2

تنزيل مجموعة القواعد الأساسية OWASP (Core Rule Set)

  1. نزّل أحدث إصدار من CRS من موقع CoreRuleSet.org/installation
root@kitploit:~
$ cd ~
$ wget https://github.com/coreruleset/coreruleset/archive/refs/tags/v3.3.2.zip
  1. تحقق من المجموع الاختباري (checksum)، وتأكد من مطابقته للمجموع المتاح للعموم هنا: https://coreruleset.org/installation/
root@kitploit:~
$ sha1sum v3.3.2.zip && echo ProvidedChecksum
88f336ba32a89922cade11a4b8e986f2e46a97cf  v3.3.2.zip
ProvidedChecksum 
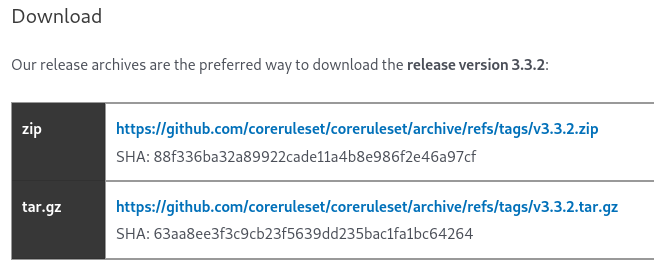
checksum

  1. فك ضغط ملف zip.
root@kitploit:~
$ unzip v3.3.2.zip
  1. انقل ملف إعداد CRS من الدليل الجديد إلى دليل ModSecurity الخاص بك:
root@kitploit:~
$ sudo mv coreruleset-3.3.2/crs-setup.conf.example /etc/modsecurity/crs/crs-setup.conf
  • (اختياري لكن موصى به) انقل دليل القواعد من الدليل الجديد إلى دليل ModSecurity الخاص بك:
root@kitploit:~
$ sudo mv coreruleset-3.3.2/rules/ /etc/modsecurity/crs/
  1. حرّر ملف security2.conf الخاص بخادم Apache لديك للتأكد من أنه سيحمّل قواعد ModSecurity:
root@kitploit:~
$ sudo vim /etc/apache2/mods-enabled/security2.conf
root@kitploit:~
<IfModule security2_module>
        # Default Debian dir for modsecurity's persistent data
        SecDataDir /var/cache/modsecurity

        # Include all the *.conf files in /etc/modsecurity.
        # Keeping your local configuration in that directory
        # will allow for an easy upgrade of THIS file and
        # make your life easier
        IncludeOptional /etc/modsecurity/crs-setup.conf
        IncludeOptional /etc/modsecurity/rules/*.conf

        # Include OWASP ModSecurity CRS rules if installed
        #IncludeOptional /usr/share/modsecurity-crs/*.load
</IfModule>
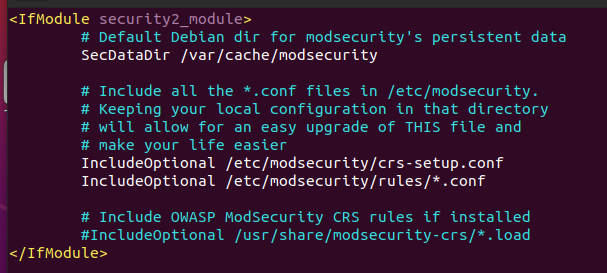
secmodule

  1. تأكد من إدراج كل من ملفي إعداد ModSecurity الافتراضي وCRS الجديد في القائمة. قد يكون مسار ملف الإعداد في السطر الأول مضمنًا بالفعل. يجب أن يكون مسار الملف الثاني هو المكان الذي نقلت إليه دليل /rules.
  2. حرّر /etc/apache2/apache2.conf
root@kitploit:~
$ sudo vim /etc/apache2/apache2.conf

انسخ والصق الكود التالي واحفظه.

root@kitploit:~
# Include list of ports to listen on
Include ports.conf

Include /etc/modsecurity/modsecurity.conf
Include /etc/modsecurity/crs/crs-setup.conf
Include /etc/modsecurity/crs/rules/*.conf
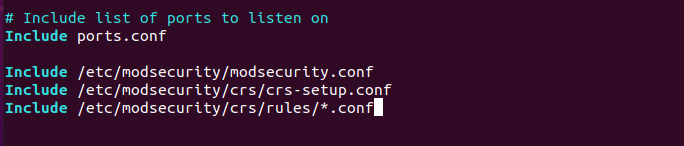
ports

تحميل وحدات Apache: Rewrite و Proxy

  1. انسخ الوحدات التالية. فعّل وحدتي Proxy وRewrite.
root@kitploit:~
$ cd /etc/apache2
$ sudo cp mods-available/proxy_http.load mods-enabled
$ sudo cp mods-available/proxy.load mods-enabled/
$ sudo cp mods-available/rewrite.load mods-enabled/
  1. أعد تشغيل Apache
root@kitploit:~
$ sudo systemctl restart apache2

إضافة استضافات افتراضية (VirtualHosts) لاختبار "Mocks"

  1. أضف المنافذ، وحرّر /etc/apache2/ports.conf
root@kitploit:~
$ sudo vim /etc/apache2/ports.conf

انسخ والصق الكود التالي واحفظه.

root@kitploit:~
# If you just change the port or add more ports here, you will likely also
# have to change the VirtualHost statement in
# /etc/apache2/sites-enabled/000-default.conf

Listen 8080
Listen 18080

<IfModule ssl_module>
        Listen 443
</IfModule>

<IfModule mod_gnutls.c>
        Listen 443
</IfModule>

ports2

  1. انتقل إلى /etc/apache2/sites-enabled وأنشئ الملف 001-test.conf
root@kitploit:~
$ cd /etc/apache2/sites-enabled/
$ sudo touch 001-test.conf
$ sudo vim 001-test.conf

انسخ والصق الكود التالي واحفظه.

root@kitploit:~
<VirtualHost *:8080>
        ServerName test.domain:8080

        SecRuleEngine On

        ErrorLog ${APACHE_LOG_DIR}/test_error.log
        CustomLog ${APACHE_LOG_DIR}/test_access.log combined
        SecAuditLog ${APACHE_LOG_DIR}/test_audit.log

        ProxyPass / http://127.0.0.1:18080/
        ProxyPassReverse / http://127.0.0.1:18080/
</VirtualHost>
  1. انتقل إلى /etc/apache2/sites-enabled وأنشئ الملف 002-moc.conf
root@kitploit:~
$ cd /etc/apache2/sites-enabled/
$ sudo touch 002-moc.conf
$ sudo vim 002-moc.conf

انسخ والصق الكود التالي واحفظه.

root@kitploit:~
<VirtualHost 127.0.0.1:18080>

        ErrorLog ${APACHE_LOG_DIR}/moc_error.log
        CustomLog ${APACHE_LOG_DIR}/moc_access.log combined

        RewriteEngine On
        RewriteRule ^(.*)$ $1 [R=200,L]
</VirtualHost>
  1. أعد تشغيل Apache
root@kitploit:~
$ sudo systemctl restart apache2
  1. أنشئ الملف wafparan01d3_rulesremove.conf داخل /etc/apache2/conf-enabled
root@kitploit:~
$ sudo touch /etc/apache2/conf-enabled/wafparan01d3_rulesremove.conf
  1. أعد تحميل Apache
root@kitploit:~
$ sudo service apache2 reload

اختبار الواجهة الأمامية (FE) والخلفية (BE) (mock)

root@kitploit:~
يجب تحديد نطاق (domain)، حرّر الأسطر التالية:  

Windows:
C:\Windows\System32\drivers\etc\hosts
192.168.56.106 test.domain <-- أضف هذا السطر وحدد عنوان IP الخاص بك  

Linux: 
/etc/hosts
192.168.1.23 test.domain <-- أضف هذا السطر وحدد عنوان IP الخاص بك 

$ curl -i -k -s -XGET http://test.domain:8080/
HTTP/1.1 200 OK
Date: Mon, 22 Nov 2021 06:31:41 GMT
Server: Apache/2.4.41 (Ubuntu)
Content-Length: 571
Content-Type: text/html; charset=iso-8859-1
Vary: Accept-Encoding

<!DOCTYPE HTML PUBLIC "-//IETF//DTD HTML 2.0//EN">
<html><head>
<title>200 OK</title>
</head><body>
<h1>OK</h1>
<p>The server encountered an internal error or
misconfiguration and was unable to complete
your request.</p>
<p>Please contact the server administrator at 
 [no address given] to inform them of the time this error occurred,
 and the actions you performed just before this error.</p>
<p>More information about this error may be available
in the server error log.</p>
<hr>
<address>Apache/2.4.41 (Ubuntu) Server at 127.0.0.1 Port 18080</address>
</body></html>

$ curl -i -k -s -XGET http://localhost:18080/
HTTP/1.1 200 OK
Date: Mon, 22 Nov 2021 06:27:17 GMT
Server: Apache/2.4.41 (Ubuntu)
Content-Length: 571
Content-Type: text/html; charset=iso-8859-1

<!DOCTYPE HTML PUBLIC "-//IETF//DTD HTML 2.0//EN">
<html><head>
<title>200 OK</title>
</head><body>
<h1>OK</h1>
<p>The server encountered an internal error or
misconfiguration and was unable to complete
your request.</p>
<p>Please contact the server administrator at 
 [no address given] to inform them of the time this error occurred,
 and the actions you performed just before this error.</p>
<p>More information about this error may be available
in the server error log.</p>
<hr>
<address>Apache/2.4.41 (Ubuntu) Server at localhost Port 18080</address>
</body></html>

كيفية الاستخدام

للمساعدة يمكنك استخدام خيار help. الاستخدام الأساسي هو تمرير وسائط مختلفة محددة.
مثال:

root@kitploit:~
$ sudo python3 wafparan01d3.py -h 

           (                                  )   ) (       )
 (  (      ))\ )          ) (      )        ( /(( /( )\ ) ( /(
 )\))(  ( /(()/( `  )  ( /( )(  ( /(  (     )\())\()|()/( )\())
((_)()\ )(_))(_))/(/(  )(_)|()\ )(_)) )\ ) ((_)((_)\ ((_)|(_)\
_(()((_|(_)(_) _((_)_\((_)_ ((_|(_)_ _(_/( /  (_) (_)_| |__ (_)
\ V  V / _` |  _| '_ \) _` | '_/ _` | ' \)) () || |/ _` ||_ \
 \_/\_/\__,_|_| | .__/\__,_|_| \__,_|_||_| \__/ |_|\__,_|___/
                |_|

                    ~ WAFPARANO1D3 : v1.1 ~
     The Web Application Firewall Paranoia Level Test Tool.

usage: wafparan01d3.py [-h] [--run [_RUN]] [--debug [_DEBUG]] [--pl [_PARANOIALEVEL ...]] [--proxy [_PROXY]] [--payload [_PAYLOAD]] [--rules-remove [_RULESREMOVE]] [--log [_LOG]] [--domain [_DOMAIN]] [--conf-file [_CONF_FILE]]
                       [--time-sleep [_TIME_TO_SLEEP]] [--time-sleep-request [_TIME_TO_SLEEP_REQUEST]] [--desc [_DESC]] [--output-desc [_OUTPUT_DESC]]

optional arguments:
  -h, --help            show this help message and exit
  --run [_RUN]          Run script
  --debug [_DEBUG]      Debug mode
  --pl [_PARANOIALEVEL ...]
                        Define paranoia level Ex. -pl 2
  --proxy [_PROXY]      Define Proxy. Ex: http://127.0.0.1:8081
  --payload [_PAYLOAD]  Define payload file. Ex. --payload payload2.txt
  --rules-remove [_RULESREMOVE]
                        Define rules remove file. Ex. --rules-remove rules1.txt
  --log [_LOG]          Define path of the log file. Ex. --log /var/log/apache/wafparan01d3.log
  --domain [_DOMAIN]    Define your domain. Ex. --domain example.domain:8080
  --conf-file [_CONF_FILE]
                        Define configuration file. Ex. --conf-file /opt/modsecurity/crs/rules/INITIALIZATION.conf
  --time-sleep [_TIME_TO_SLEEP]
                        Sleep time per PL. Ex. --time-sleep 3
  --time-sleep-request [_TIME_TO_SLEEP_REQUEST]
                        Sleep time per Request. Ex. --time-sleep-request 3
  --desc [_DESC]        Description of the script and authors
  --output-desc [_OUTPUT_DESC]
                        Description of the output on console mode.
                                                              

الوسائط الاختيارية

root@kitploit:~
$ sudo python3 wafparan01d3.py -h 
	- يعرض رسالة المساعدة

$ sudo python3 wafparan01d3.py --run
	- يشغّل السكربت بالخيارات الافتراضية.

$ sudo python3 wafparan01d3.py --run --debug
	- يطبع كل سطر على وحدة التحكم.
	
$ sudo python3 wafparan01d3.py --run --pl 1
	- يشغّل السكربت على مستوى جنون العظمة المحدد.
	- افتراضيًا يعمل على مستويات جنون العظمة 1 و2 و3 و4

$ sudo python3 wafparan01d3.py --run --payload file_payload2.txt
	- يحدد ملف الحمولة الذي تريد إرساله إلى WAF.
	- افتراضيًا يأخذ الملف mysql_gosecure.txt

$ sudo python3 wafparan01d3.py --run --rules-remove rules_removex.txt
	- يحدد القواعد التي تريد إزالتها من GWAF.
	- مثال على الملف: 
		- الافتراضي 920000 920001 920002
	- افتراضيًا يأخذ الملفات: rules_remove1.txt و rules_remove2.txt و rules_remove3.txt و rules_remove4.txt

$ sudo python3 wafparan01d3.py --run --log /home/waf_user/paranoia.log
	- يحدد ملف السجل (LOG).
	- افتراضيًا يطبع السجل في paranoia_debug.log

$ sudo python3 wafparan01d3.py --run --domain mydomain.test.com
	- يحدد نطاق الواجهة الأمامية لـ WAF.
	- افتراضيًا يعمل على النطاق domain.test:8080
	
$ sudo python3 wafparan01d3.py --run --conf-file /opt/modsecurity/crs/rules/INITIALIZATION.conf
	- يحدد ملف الإعداد لتحديث مستوى جنون العظمة
	- افتراضيًا يأخذ /etc/modsecurity/crs/rules/REQUEST-901-INITIALIZATION.conf

$ sudo python3 wafparan01d3.py --run --time-sleep 3
	- يحدد زمن الانتظار (sleep) لكل مستوى جنون عظمة.

$ sudo python3 wafparan01d3.py --run --time-sleep-request 2
	- يحدد زمن الانتظار (sleep) لكل طلب يُرسل إلى WAF.

$ sudo python3 wafparan01d3.py --desc
	- يطبع وصف السكربت والمؤلفين.

العروض التوضيحية

يمكنك تجربة wafparan01d3.py عن طريق تشغيل بيئة الآلة الافتراضية (Ubuntu) التي تنشر WAF ModSecurity و'Mock' باستخدام أحدث مجموعة قواعد أساسية من OWASP CRS 3.3.2، وذلك لتقييم مستويات جنون العظمة في ModSecurity القابلة للتخصيص بسهولة.

للتشغيل:

root@kitploit:~
$ git clone https://github.com/alt3kx/wafparan01d3.git
$ cd wafparan01d3
$ sudo python3 wafparan01d3.py --help 
root@kitploit:~
$ sudo python3 wafparan01d3.py --run

wafparan01d3_001

root@kitploit:~
$ sudo python3 wafparan01d3.py --run --debug --proxy http://192.168.56.1:8081

wafparan01d3_002

root@kitploit:~
$ sudo python3 wafparan01d3.py --run --debug --pl 1 2 --proxy http://192.168.56.1:8081 --log test.log --domain vulnerable.domain:8080 --time-sleep-request 1 --time-sleep 1 --rules-remove my_rules_remove.txt --payload my_payload.txt

wafparan01d3_003

قاعدة WAF للترميز العلمي (Scientific Notation)

https://github.com/mindhack03d/WAF-Rule-Scientific-Notation

المؤلفون

أليكس هيرنانديز المعروف بـ (@_alt3kx_)
خيسوس هويرتا المعروف بـ @mindhack03d

تنزيل الأداة
