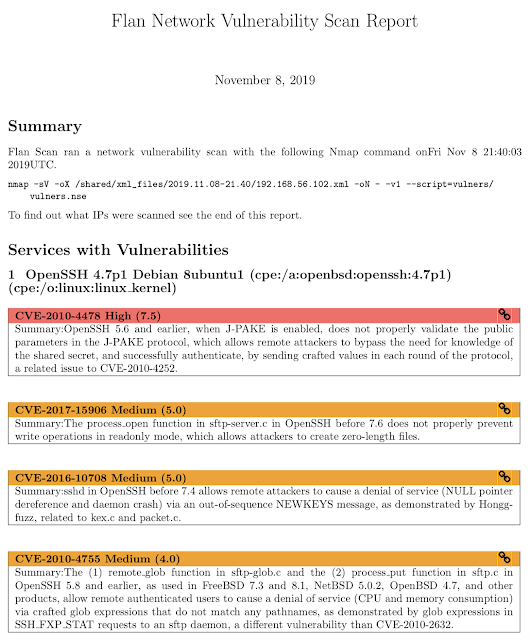
Flan - A Pretty Sweet Vulnerability Scanner By CloudFlare
Flan Scan is a lightweight network vulnerability scanner. With Flan Scan you can easily find open ports on your network, identify services and their version, and get a list of relevant CVEs affecting your network.
Flan Scan is a wrapper over Nmap and the vulners script which turns Nmap into a full-fledged network vulnerability scanner. Flan Scan makes it easy to deploy Nmap locally within a container, push results to the cloud, and deploy the scanner on Kubernetes.

Getting Started
- Clone this repository
- Make sure you have docker setup:
$ docker --version- Add the list of IP addresses or CIDRS you wish to scan to
shared/ips.txt.
- Build the container:
$ make build- Start scanning!
$ make startshared/reports. You can also see the raw XML output from Nmap in shared/xml_files.Custom Nmap Configuration
By default Flan Scan runs the following Nmap command:
$ nmap -sV -oX /shared/xml_files -oN - -v1 $@ --script=vulners/vulners.nse <ip-address>-oX flag adds an XML version of the scan results to the /shared/xml_files directory and the -oN - flag outputs "normal" Nmap results to the console. The -v1 flag increases the verbosity to 1 and the -sV flag runs a service detection scan (aside from Nmap's default port and SYN scans). The --script=vulners/vulners.nse is the script that matches the services detected with relevant CVEs.Nmap also allows you to run UDP scans and to scan IPv6 addresses. To add these and other flags to Scan Flan's Nmap command after running
make build run the container and pass in you Nmap flags like so:$ docker run -v $(shell pwd)/shared:/shared flan_scan <Nmap-flags>Pushing Results to the Cloud
Flan Scan currently supports pushing Latex reports and raw XML Nmap output files to a GCS Bucket or to an AWS S3 Bucket. Flan Scan requires 2 environment variables to push results to the cloud. The first is
upload which takes one of two values gcp or aws. The second is bucket and the value is the name of the S3 or GCS Bucket to upload the results to. To set the environment variables, after running make build run the container setting the environment variables like so:$ docker run --name <container-name> \
-v $(pwd)/shared:/shared \
-e upload=<gcp or aws> \
-e bucket=<bucket-name> \
flan_scanExample GCS Bucket Configuration
Copy your GCS private key for a service account to the
/shared file$ cp <path-to-local-gcs-key>/key.json shared/GOOGLE_APPLICATION_CREDENTIALS environment variable as the path to the GCS Key$ docker run --name <container-name> \
-v $(pwd)/shared:/shared \
-e upload=gcp \
-e bucket=<bucket-name> \
-e GOOGLE_APPLICATION_CREDENTIALS=/shared/key.json
flan_scanExample AWS S3 Bucket Configuration
Set the
AWS_ACCESS_KEY_ID and AWS_SECRET_ACCESS_KEY environment variables to the corresponding variables for your S3 service account.docker run --name <container-name> \
-v $(pwd)/shared:/shared \
-e upload=aws \
-e bucket=<s3-bucket-name> \
-e AWS_ACCESS_KEY_ID=<your-aws-access-key-id> \
-e AWS_SECRET_ACCESS_KEY=<your-aws-secret-access-key> \
flan_scan
Deploying on Kubernetes
When deploying Flan Scan to a container orchestration system, such as Kubernetes, you must ensure that the container has access to a file called
ips.txt at the directory /. In Kubernetes, this can be done with a ConfigMap which will mount a file on your local filesystem as a volume that the container can access once deployed. The kustomization.yaml file has an example of how to create a ConfigMap called shared-files. This ConfigMap is then mounted as a volume in the deployment.yaml file.Here are some easy steps to deploy Flan Scan on Kubernetes:
- To create the ConfigMap add a path to a local
ips.txtfile inkustomization.yamland then runkubectl apply -k .. - Now run
kubectl get configmapto make sure the ConfigMap was created properly. - Set the necessary environment variables and secrets for your cloud provider within
deployment.yaml. - Now run
kubectl apply -f deployment.yamlto launch a deployment running Flan Scan.
Flan - A Pretty Sweet Vulnerability Scanner By CloudFlare
 Reviewed by Zion3R
on
9:30 AM
Rating:
 Reviewed by Zion3R
on
9:30 AM
Rating:


